
You’ve got a document that uses a lot of special characters, perhaps because you’re working with a foreign language. When you try to change the text to a different font, you find that it suddenly turns into garbage! You’ve run into a font encoding nightmare.
Here’s an example of a snippet of text in Sanskrit as it’s supposed to appear:

However, when I switch to a different font, all the special characters switch to something else:

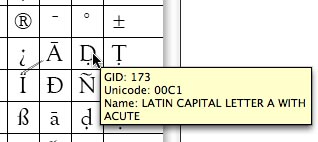
The problem is that the original font is not using Unicode encoding. Unicode is a computing industry standard allowing computers to consistently represent and manipulate text expressed in most of the world’s writing systems. Older fonts were designed before Unicode. They placed special characters in non-standard “slots” in the encoding. You can tell this in InDesign’s Glyphs panel, because when you pause over a special character, the tooltip description (based on Unicode) won’t match what you’re seeing.
You need to switch to a more modern font which uses Unicode, but to do so, you’ll need to switch the positions of the special characters to the correct Unicode “slot.” After you do so, you’ll be able to switch the fonts in your document to another font which contains the same glyphs, without having the text turn to mush.
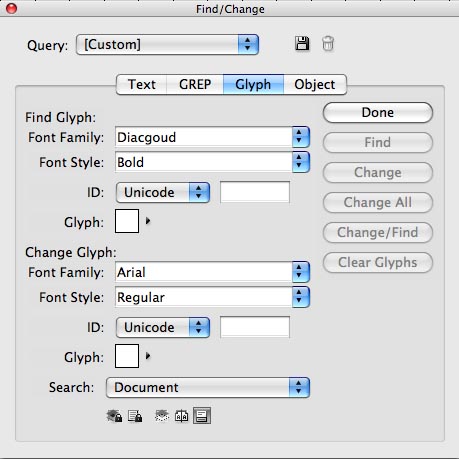
Fortunately, InDesign has a powerful feature for finding and changing glyphs which can solve this problem. A glyph is a particular shape within a font’such as a letter, symbol, or alternative letterform like a ligature, small cap, or swash?used to represent a character code onscreen or on paper. You’re probably already familiar with the Glyphs panel, which gives you a quick and convenient way of entering those special characters. But what you may not know is that you can also find and change them. You do this in InDesign’s Find/Change dialog, revamped in InDesign CS3. Start by choosing Edit > Find/Change.
While much has been written about finding and changing text, GREP, or objects, surprisingly few people have noticed that there’s a fourth tab in the Find/Change dialog box: Glyph. This lets you find any glyph from any font, and replace it with any other glyph from any other font. As with any search, you need to use the Search menu to change the range of the search, and you need to click icons to determine whether items like locked layers or master pages, for example, are included in the search.
There are three methods for picking the glyph you want to find. The first one is the easiest: Simply highlight the first glyph you want to replace, and choose Load Selected Glyph in Find from the context menu.

The second method is to click on the button beside the Glyph box, and then double-click a glyph on the panel. This panel works just like the Glyphs panel.

The third method, decidedly more techie, is to choose Unicode or GID/CID, and enter the code for the glyph.
You would use a similar set of methods for picking the replacement glyph. Then click Find, and use the Find Next, Change, Change All, and Change/Find controls to replace the glyph.
You should be sure to use the Save Query button at the top of the dialog. Name this search (I give it a name that represents the appearance of the glyph I’m find/changing), and the query will be saved so you can use the search again. Repeat this process for each glyph you need to find/change.

This article was last modified on December 19, 2021
This article was first published on April 18, 2009
Commenting is easier and faster when you're logged in!

Recommended for you

Everything Goes in Ukrainian
James Wamser, from Sells Printing in Wisconsin, sent us a great tip recently. A...
Less is more for the Control panel
I learned something yesterday. There is a Control panel menu widget that opens t...
How to Choose a Different Artboard in an AI File
Need to switch from one artboard to another in the same AI file? This simple tri...