


After I got my first professional digital SLR camera, I realized the problem it created: a massive storage burden that hit me like a ton of pixels.
That camera was a 6-megapixel model, and it created Raw files just a few megabytes in size. Yet my hard disks were constantly full, a result of downloading hundreds of multi-megabyte photos. Since then, of course, the problem has grown exponentially with each new camera model. Today, even casual shooters can run out of space fast. We all need to periodically clear images off our main drives. But how do we archive photos permanently and safely, and then find the ones we want fast?
In my mission to answer those questions for myself, I developed a workflow that lets me access any image from my archive of more than 275,000 photos and related files in less than five minutes. While I’m proud of it, I admit that my workflow is a path of least resistance, a method that some might consider inelegant. And it’s not a full-scale digital asset manager, such as Extensis Portfolio, Canto Cumulus, MediaDex, and Xinet’s server-based solution. But it works, and it has solved this huge problem for me.
My Method
My workflow is very flexible, so you don’t need to follow every step if you don’t want to. Figure 1 shows my entire workflow. For this flow chart, I invented an “Op Sign” that marks points at which you can simply stop.

Figure 1. You don’t need to follow my complete workflow. You can deviate from it wherever you see an Op Sign and still benefit.
1. Transfer images to the computer
I download images from my camera to my computer using a FireWire card reader. It’s fast and is automatically recognized by my Mac’s Image Capture application (Figure 2). I like its ability to create thumbnail images as it transfers the files into the computer. On Windows computers, transferring files is similarly easy. You can just drag or copy the images from the memory card into a directory.
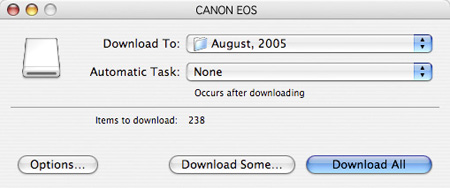
Figure 2. The Image Capture dialog box shows how many images are on the card or camera, indicates the destination, and presents an optional automatic task to carry out after download is complete. Options include down-sampling of images, creation of slide shows, and Web galleries.
2. Rename files
The benefit of this workflow is the ability to search for files by name, date, file type, or other combinations of attributes. The only way that works is when file names have real significance, such as “dolphins” or “track meet.” The names assigned by your camera, such as “DSC0098.jpg,” are useless.
The minute you transfer your photos to your hard disk, rename the photos. At that point, you can probably remember people’s names. You’ll certainly remember the subject matter. I usually make a new folder, name it by event, then rename all the photos within that folder with the event name and a sequential number (Figure 3).

Figure 3. Adobe Bridge lets you rename any selection of files. In this example, I’m changing a group of files from the camera’s XR2054.cr2-style names to the easy-to-search name group “Cargo container crane,” followed by a serial number and the original Raw suffix.
Adobe Bridge, which ships with Creative Suite 2, has made the process of naming batches of files fast and painless. You select the files you want to rename and choose Batch Rename with new criteria: a name, date, serial numbering, etc. The process takes only a few seconds, and it leaves your folder filled with photos that have names you can catalog and find later.
There is no virtue in obscurity when naming photos! Use real, whole words. Truncated words and abbreviations (unless very common) will only cause grief later when you can’t remember what you called something. Even the underscore or hyphen makes a file name hard to find; for example, some search engines fail when looking for “crane” if the file is named “cargo-crane.” I use spaces between the words.
3. Sort files
Once you’ve renamed images, you can reorganize them into folders of similar subjects using Bridge or your operating system. On a recent journey, I shot photos of dolphins, container cargo cranes, fishermen, an aircraft carrier, and a number of personal photos. After I renamed them, I sorted them into appropriately labeled folders.
4. Add credits, copyrights, keywords, and captions
The International Press Telecommunications Council (IPTC) manages the terminology and application of captions, copyrights, keywords, and headlines in images that are posted to news photo services. Known as IPTC codes, the information is stored in a dark corner of digital images, along with the camera information known as EXIF data (including shutter speed, flash condition, aperture, date, and time). You can add IPTC data to photos so your copyright claim, captions, and comments are stored inside the image files.
All photojournalists and commercial photographers should encode IPTC data in their images. When entered correctly, IPTC data helps customers find and license your images while searching photo service libraries.
You can embed IPTC data in most image types: JPEG, TIFF, PSD files — essentially anything that Photoshop has saved can have the data. However, Raw images pose a bit of an IPTC data quandary.
Many publishers require photographers to submit their Raw images in addition to edited images. Raw images record what the camera saw when the photo was taken and therefore create a legal record of the original photo. It’s impossible to open a Raw image, modify the image (for example, embed IPTC data), and then save it again in exactly the same format.
Adobe gets around this principle by encoding IPTC and image-correction data in a sidecar file (an XMP file) that’s stored in the same folder as the affected Raw image. Yet it’s not an ideal solution because the XMP file can be separated easily from its original image, losing the copyright and caption data.
Some software can modify a Raw file’s IPTC data without affecting the other image content. This leaves the image data intact, and probably doesn’t alter its value as a legal record of the original photo. I use the $150 Photo Mechanic from Camera Bits to add copyright, captioning, and keyword data to Raw images.
After renaming my images in Adobe Bridge, I launch Photo Mechanic, then open a new contact sheet (Figure 4), and embed IPTC data in all of my images (Figure 5). Photo Mechanic will also rename files, so you can use it instead of Adobe Bridge if you wish. Photo Mechanic is well-designed and can do just about anything a professional photographer needs.
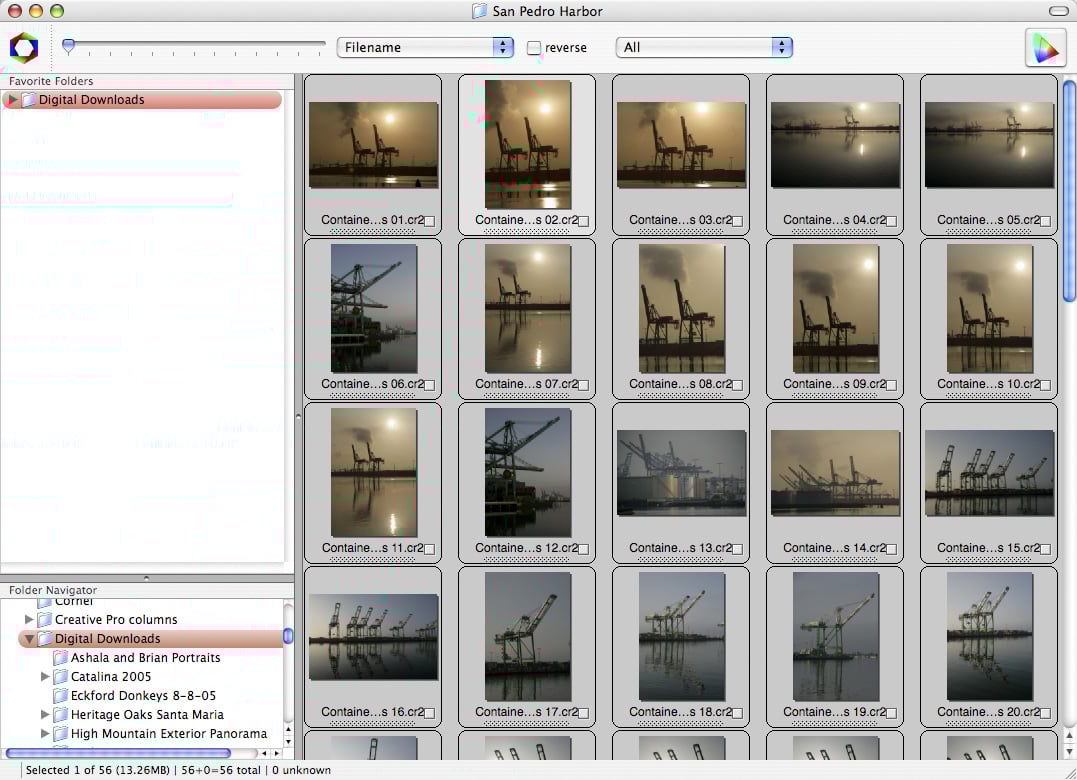
Figure 4. Photo Mechanic’s Contact Sheet view lets you select images from a folder. Once selected, you can rename images or embed IPTC information, including copyright, title, caption, and keywords. Click on the image above for a larger version.

Figure 5. Photo Mechanic’s IPTC Stationery Pad lets you embed many (but not all) of the IPTC information. I like this approach to IPTC labeling because Photo Mechanic embeds the data in the Raw file. Note that in the caption field I’ve included the use of [variables] that will extract EXIF data from the same photo and add it to the caption. There are many other variables.
5. Archiving images
After I complete the immediate requirements of a photo assignment, I want to get the images off the computer and into my archive. This restores valuable disk space and reduces the risk of keeping the originals on my hard disk. I gather the necessary files (always including the Raw images) and create a new archive DVD. To make the DVD archive discs, I use the Macintosh Finder. I insert a blank DVD, name it, and then drag all the folders and files I want on that disc. When it’s ready to burn, I click on the Burn icon in the Finder window, and it finishes my disc. Once the DVDs are burned (named for California cities in my case), I add them to my master archive using Disk Tracker. (For more on Disc Tracker, see “Retrieving Images from the Archive” below.) That gives me a record of the location of every file in the archive.
I label each disc with a felt-tip pen and put the disc in a jewel case with a label on the spine. I’m careful to keep the discs in their cases and store the cases vertically to prevent warping.
This is also the point where you could make a second archive disc to store in an off-site location, providing the added safety of a second copy. Archiving is a process for storing files for easy access and retrieval in a format that is not erasable. My archive is a library of files I can locate, use, and then return to storage. It is not a back-up of my data.
6. Low-resolution and modified format images
When I want to send a CD or DVD with images to a client for review or their Web sites, I use Photoshop CS2’s free Image Processor script (File > Scripts > Image Processor). The brainchild of Adobe’s Senior Art Director Russell Brown, this script is one of the best-kept secrets in all of the Photoshop world. It converts, resizes, and prepares batches of images for distribution or re-use in new formats. Image Processor can resize files, embed a ColorSync profile, and apply Unsharp Mask (Figure 6).
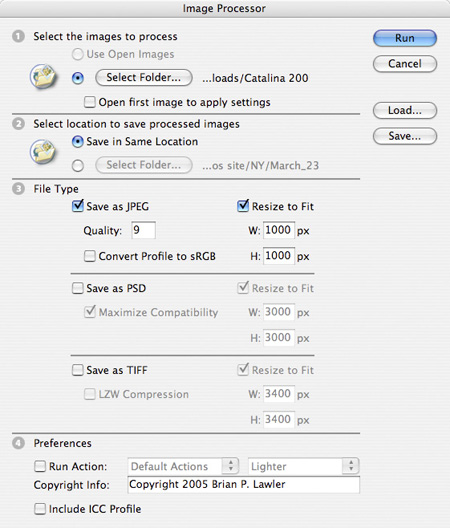
Figure 6. Image Processor allows for the conversion of batches of photos from any format into JPEG (shown here), PSD, and TIFF — or all three. It will also run Photoshop Actions on the images, embed copyright information, and embed an ICC profile on-the-fly. I use Image Processor nearly every day.
7. Customer review
I usually keep my photos on the local hard drives for a week or two, and I usually create a Web site and post the images for my clients to see my images. It’s much faster and easier than making contact sheets. To make the galleries, I use Photoshop’s Automate function and choose from the available Web Photo Gallery styles (Figure 7). Then I upload the gallery to a site and send the link to my customer. They can choose the photos they want, which I provide as prints or images on CD. The gallery images are low resolution, and I can protect them by imprinting copyright messages on each image.
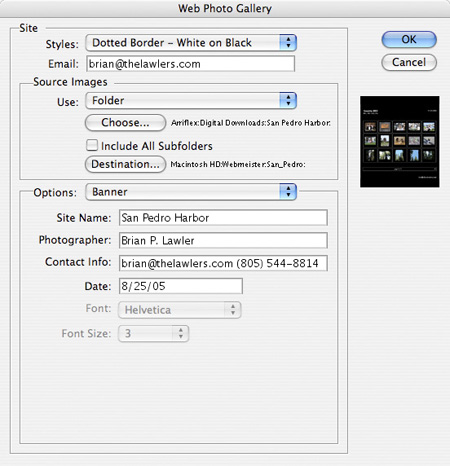
Figure 7. Photoshop CS2’s Web Photo Gallery builds Web sites from an image folder. I use these galleries to deliver thumbnail and preview images to my photography clients. It’s fast, and my clients really like them. To see an example, go to www.lawlervideos.com/San_Pedro.
Retrieving Images from the Archive
When I need one or more images, I open the cataloging program Disk Tracker ($30 shareware, Mac OS X only). Its powerful search functions indicate which of my archive discs to retrieve (Figure 8). I keep the discs in alphabetical order in a bookshelf next to my computer, so it’s easy to lay my hands on the correct jewel case. It never takes more than a few minute to find the file I am seeking.

Figure 8. Disk Tracker’s Find menu accommodates both simple and complex search criteria. In this example, I used two criteria: name and creation date. Finding files takes less than one second in my database of more than 250,000 files. I can retrieve files all the way back to the floppy disk era. (I copied my floppy and Zip disks to CDs about five years ago.)
There are several other cataloging programs available for the Macintosh, including CDFinder, DiskCatalogMaker, and AutoCat. On the Windows side, Advanced Disk Catalog and Catalog Max are both modestly priced shareware. I chose Disk Tracker because its searches are fast and quite sophisticated. Adding to the master archive is drag-and-drop convenient and takes only seconds.
Well Worth the Effort
This kind of organization doesn’t take much time, but it does require considerable discipline. But I look at it this way: I make part of my living by taking photos. If I can’t find a photo when I need it, I lose income. That’s motivation enough.
This article was last modified on January 3, 2023
This article was first published on August 2, 2006
Commenting is easier and faster when you're logged in!

Recommended for you

Creative Cloud Storage: Where Does It Go?
When you create using Adobe Creative Cloud applications, where is your work save...

Public Domain Assets at Your Fingertips
At the risk of stating the obvious, the internet is a big place. And that fact o...

10 Free Vector Patterns, Volume 3
You may have seen my 20 free vector patterns and the follow-up 20 free line...