This article appears in
Issue 2 of InDesign Magazine.
Some paragraphs are more structured than others, which is to say they have specific, repeatable formatting that differs from an underlying format. A run-in head, for example, is structured because the first sentence is formatted differently (perhaps using a bolder font) than the rest of the paragraph. A drop-cap paragraph’s first letter is always different; bulleted lists can use a different font for the bullet. Whenever you’re designing one or more paragraphs with structure, you should consider using InDesign’s coolest typographic feature—nested styles. Nested styles let you apply character styles to particular portions of a paragraph. For example, you could apply one character style to the first letter, then a different style to the end of the first sentence. Or you could apply a character style to just that special ornament character at the end of the paragraph. A single description paragraph in a clothing catalog might contain a run-in head, some text, the available color choices, and an item number—it sure would be nice to apply formatting to all that with a single click. In this example, we’re going to format a column of classified ads with a nested style. 1. Create base paragraph style. Before we start messing around with nested character styles, let’s just create and apply a basic paragraph style to these paragraphs (Type > Paragraph Styles). Our paragraph style defines what most of the text will look like: the font, size, leading, and so on (Figure 1). The paragraph’s horizontal alignment is set to Center Justify, which tells InDesign to justify the whole paragraph, except for the last line, which should be centered. Finally, we use Space After and Rule Below for a visual separation between each ad (Figure 2).
for underlying text.” width=”800″ height=”642″ /> Figure 1. Our nested styles will address exceptions to the basic paragraph style formatting in our Ad Para Style paragraph style.
Figure 2. Our Ad Para Style paragraph style formats the raw text (left) and places spacers between each paragraph (right).
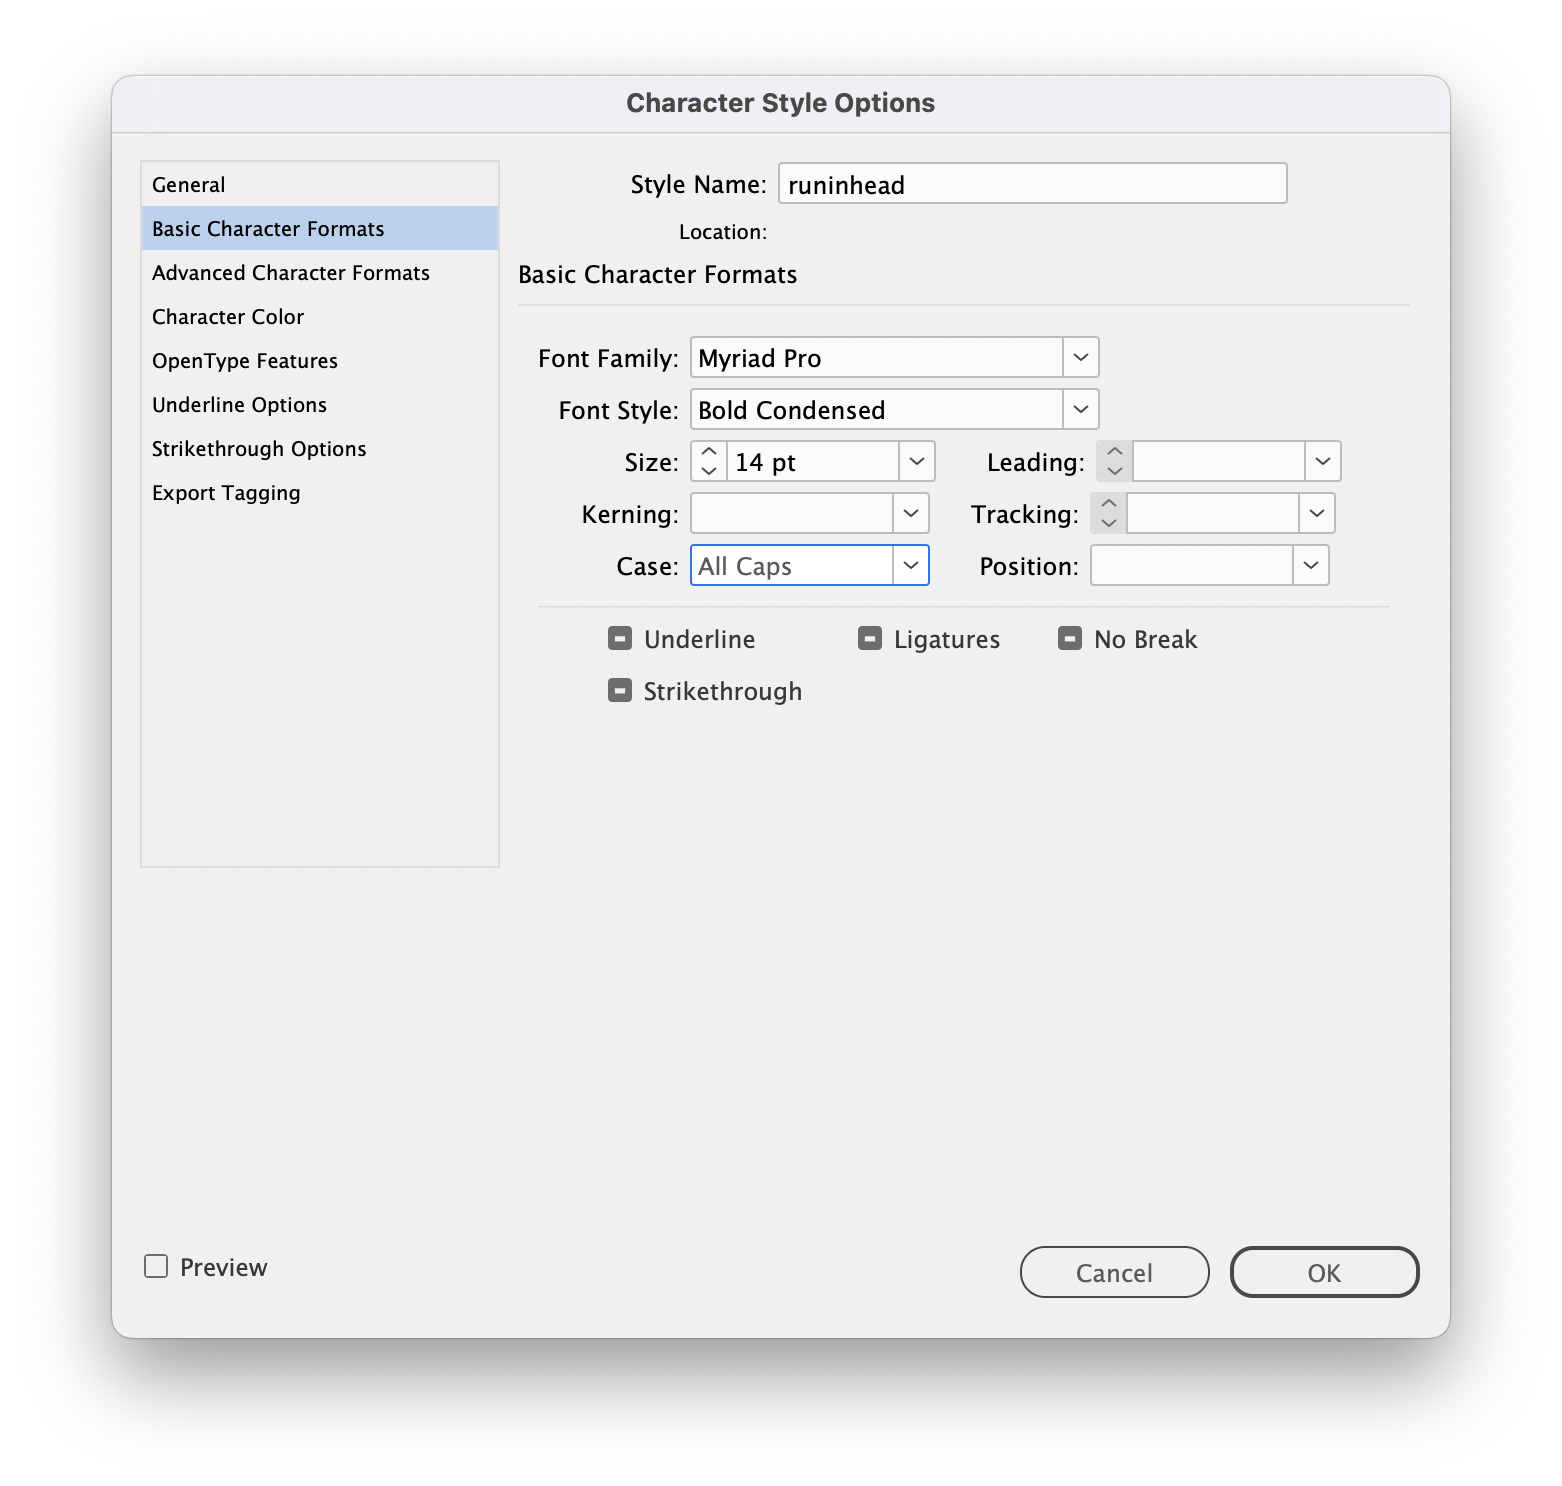
2. Buildyourcharacterstyles. Before you can build a working nested style, you have to define the character styles you’re going to use (Type > Character Styles). In this example, we know we need different text formatting for the run-in head, the telephone number, and the start/end dates at the end of the paragraph. The easiest way to make a character style is to apply your preferred styling to some text and then Option/Alt- click on the New Character Style button in the Character Styles panel. In our example, the run-in style is big, sans serif, and red; the telephone number is just italic text with the Proportional Old Style OpenType numerals feature turned on; and the dates are in tiny small caps (Figure 3).
Figure 3. Our run-in head style will change just the font, size, and capitalization of the text. The blank fields and popup menus reflect formatting that won’t be affected.
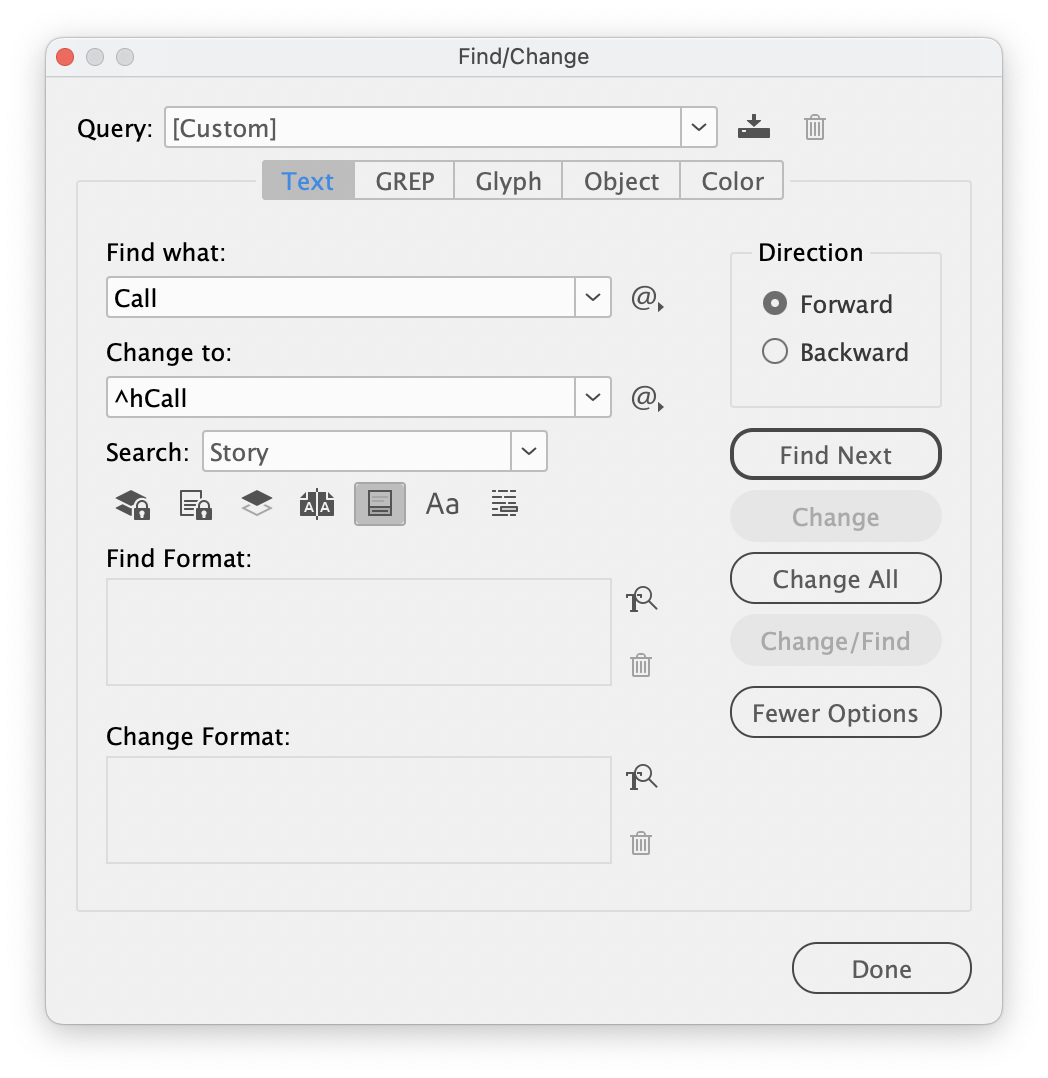
3. Searchandreplacecharacters. Our design calls for the start and end dates to be placed on the last line of the paragraph, so let’s use Edit > Find/Change to find the words “Start Date” and replace them with “^nStartDate”. The “^n” part is the forced line break character (also called a “soft return”). Tip: If you don’t feel like remembering this code, you can just select Forced Line Break from the popup menu to the right of the Change To field. Now here’s where it gets interesting. The nested styles feature relies on being able to find a single character in the paragraph that defines the end of one section and the beginning of another. For example, as we’ll see in the next step, the run-in head style will be applied up to the first punctuation character. The start/end dates style can now be applied to all the text after the forced line break character. But what about the phone number? To add a single-character character to instruct InDesign to stop applying the character style, let’s search for the word “Call:” and replace it with “^hCall”. That caret-h code inserts the special, invisible End Nested Style Here character (Figure 4). (Again, it’s easier just to select the words from the popup menu; choose Other > End Nested Style Here.)
Figure 4. The Find/Change dialog box lets us search for a word and replace it with the same word—but with a special, invisible End Nested Style character in front of it.
4. Add first nested style. You can apply a nested style to a single paragraph (from the Paragraph panel’s menu or from the Control Panel menu), but it usually makes more sense to apply it by defining or redefining a paragraph style. Let’s edit our ads paragraph style and select the Drop Caps and Nested Styles section on the sidebar. In the Nested Styles section, click the New Nested Style button and choose your run-in head character style from the popup menu that appears. Tip: You can create a new character style directly from selecting New Character Style, the last option in the menu. By default, a nested style is always applied “through 1 Words,” which means just one word will be affected. We want the style applied up to the first punctuation mark. Click on the word “through” to make the popup menu appear, then select “up to” from that menu. Now click on the word Words to turn that into a popup menu, which offers a number of choices, including Sentences, Digits, and Tab Characters. Unfortunately, there is no option for any punctuation. But you can fake it! Instead of choosing from this popup menu, just type one or more characters—the popup menu acts as both a menu and a text-entry field! If you type more than one character in this field—like “.,?!:”—it means that InDesign will apply the run-in style until any one of those characters appears in the paragraph (Figure 5).
Figure 5. By applying just one nested style rule to the paragraph style, we affect all the paragraphs tagged with that style.
Click OK or turn on the Preview checkbox to see how it worked (Figure 6).
Figure 6. The character style gets applied to the text up to the first instance of a punctuation mark every time the associated paragraph style is used.
5. More nested styles. Now return to Drop Caps and Nested Styles and click New Nested Style again. This time, leave the character style popup menu set to [None]—which says “don’t apply any special formatting”—up through an End Nested Style Character (Figure 7).
Figure 7. The nested styles in progress
Add a third nested style as the telephone number character style through a Forced Line Break. Finally, let’s add a fourth nested style that applies the dates style. We want this style to appear until the end of the paragraph, so click on Words to activate that menu/field and type a character or symbol that you know will never appear in your text. This set of four nested styles tells InDesign (Figure 8): “Apply the run-in style up to the first punctuation mark, then don’t apply any formatting until you see the special End Nested Style character. From that point, apply the telephone number style until you see the soft return; finally, switch to the dates style until you see this weird character or the end of the paragraph occurs—whichever comes first.”
Figure 8. The paragraph formatting is almost complete.
6. Makingtextdisappear. That punctuation mark after the run-in head is bothering me. Let’s get rid of it by creating a new “disappear” character style which applies the [None] fill color to text. Now return to Drop Caps and Nested Styles one more time. This time, select the first nested style (the run-in head) before clicking New Nested Style—the new style is added immediately below the one you’ve chosen (so it’s now the second in the list). Choose the “disappear” style from the first first pop-up menu, choose “Characters” from the menu in the right column (Figure 9).
Figure 9. By creating a character style to set the color of the single (annoying) punctuation character to [None]…
When you click OK, the punctuation should vanish (Figure 10).
Figure 10. … we make it disappear.
You could also edit this character style to set the horizontal scaling to 1% or change the tracking value to –200 to minimize the effect of the invisible text. The variations are endless!
Learn how to automate text formatting in InDesign via nested styles, line styles...
×By signing in, you agree to our Terms of Use and acknowledge our Privacy Notice.
Manage your privacy
This site uses cookies, but not the kind you eat. We use cookies to remember log in details, provide secure log in, improve site functionality, and deliver personalized content. By continuing to browse the site, you accept cookies.
Functional
Always active
The technical storage or access is strictly necessary for the legitimate purpose of enabling the use of a specific service explicitly requested by the subscriber or user, or for the sole purpose of carrying out the transmission of a communication over an electronic communications network.
Preferences
The technical storage or access is necessary for the legitimate purpose of storing preferences that are not requested by the subscriber or user.
Statistics
The technical storage or access that is used exclusively for statistical purposes.The technical storage or access that is used exclusively for anonymous statistical purposes. Without a subpoena, voluntary compliance on the part of your Internet Service Provider, or additional records from a third party, information stored or retrieved for this purpose alone cannot usually be used to identify you.
Marketing
The technical storage or access is required to create user profiles to send advertising, or to track the user on a website or across several websites for similar marketing purposes.
We use technologies like cookies to store and/or access device information. We do this to improve browsing experience and to show (non-) personalized ads. Consenting to these technologies will allow us to process data such as browsing behavior or unique IDs on this site. Not consenting or withdrawing consent, may adversely affect certain features and functions.
Functional
Always active
The technical storage or access is strictly necessary for the legitimate purpose of enabling the use of a specific service explicitly requested by the subscriber or user, or for the sole purpose of carrying out the transmission of a communication over an electronic communications network.
Preferences
The technical storage or access is necessary for the legitimate purpose of storing preferences that are not requested by the subscriber or user.
Statistics
The technical storage or access that is used exclusively for statistical purposes.The technical storage or access that is used exclusively for anonymous statistical purposes. Without a subpoena, voluntary compliance on the part of your Internet Service Provider, or additional records from a third party, information stored or retrieved for this purpose alone cannot usually be used to identify you.
Marketing
The technical storage or access is required to create user profiles to send advertising, or to track the user on a website or across several websites for similar marketing purposes.