

We are refreshing our oldest and most popular posts with updated information and screenshots. This post was originally published in 2013 and edited most recently in 2021.
InDesign allows you to export your selection to JPEG or PNG. When you choose File > Export to do this, the dialog allows you to specify the resolution of the export as a pixel per inch value.
Exporting to JPEG or PNG from InDesign allows you to specify only the resolution of the exported image, not the pixel dimensions.
Thinking in terms of pixels per inch is useful for creating an image that will be printed. But exporting to JPEG or PNG directly from InDesign can be really useful for creating web content such as banner ads, icons, splash pages, or other elements needed for projects that will end up on screens.
In these cases, you usually want to output your selected objects to a certain pixel dimension. For example, you may need to create a 512 pixel × 512 pixel PNG icon for an iPad app, or a JPEG banner ad that is 250 pixels wide, or an image for your web content management system that is no wider than 400 pixels.
There are two ways to do this directly from InDesign.
The best way is to create your artwork to the exact pixel dimensions in InDesign (using either pixel or points measurement units), and then export the artwork at a resolution of 72 pixels per inch. In other words, if you create artwork that is 200 × 150 pixels, and export it at 72 pixels per inch, the final pixel dimensions of the PNG or JPEG you export will be 200 × 150 pixels.
But what if you’ve already created the artwork, and need to export to a different size, or perhaps export the same artwork in multiple sizes? This requires some simple math, and I’ll even show you how to make InDesign do the calculations for you!
All you do is divide the desired output width or height by the existing width or height, and multiply the result by 72. Here’s an example:
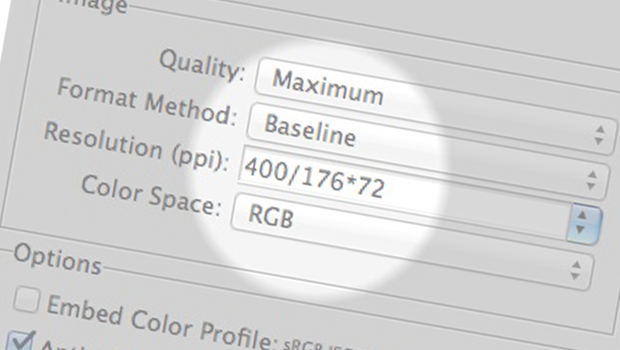
Let’s say we have content that we’ve created that is 176 pixels wide. We need to output this to JPEG format 400 pixels wide. We can verify the width of the artwork by selecting it and viewing the ‘W’ field in the Control panel at the top of the screen. For this to accurately reflect the width of objects with strokes, be sure that “Dimensions Include Stroke Weight” is selected in the Control panel menu.

The Width field (W) in the Control panel displays the current width of the selected objects.
Next, choose File > Export, and select JPEG for the format. Choose Selection for the Export type, and then in the Resolution field, enter 400/176*72. As soon as you tab or click away from this field, InDesign will do the math and enter 164 as the result. Now, when you click Export, a JPEG image the desired size will be output.

Let InDesign do the math for you!
One caveat: Due to rounding, sometimes the JPEG or PNG image that is output is off by a few pixels in size. In this example, 400/176*72 = 163.636364, which InDesign rounds up to 164 pixels, resulting in a JPEG image that is 401 pixels wide.
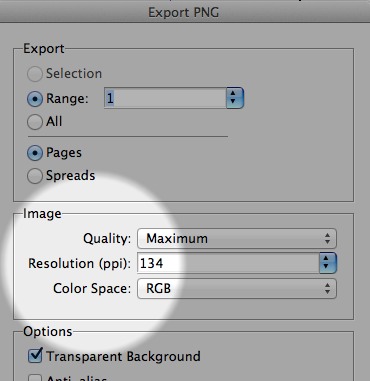
To make this even simpler, I’ve written a free script—“Export PNG with dimensions,” available here—that prompts you for the desired width or height, does the math for you, and exports to PNG format.
This article was last modified on December 15, 2021
This article was first published on June 12, 2013
Commenting is easier and faster when you're logged in!

Recommended for you

Free InDesign Script to Export JPEGs or PNGs at a Precise Size
InDesign has had the ability since at least CS2 to export pages to JPEG. But the...

This Week in InDesign Articles, Number 19
Oh, there's a whole lot o' goodies in today's issue... scripts, articles, and gr...
Copying/Pasting Text from PDFs to InDesign
The other day I needed to copy a paragraph of text from a client-supplied PDF in...