


Looking for Highlights
The highlights are another story. Dragging the Levels shadow slider to the right reveals that almost everything in this image is darker than the midtone point, and that many of the lightest pixels are in the canoe paddle, which is yellow and therefore cannot be used as a highlight point. Also, with an original highlight of 155R 163G 164B, the image is using only about two-thirds of the available tonal range, so the most important step with this image is to remap the highlight to something more reasonable.
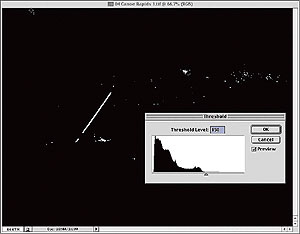
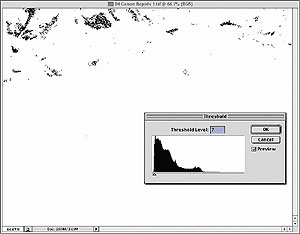
Figure 2: Guided by the Threshold or Levels command, identify the image’s lightest and darkest significant areas; then zoom in and measure with the eyedropper to find the corresponding highest and lowest RGB values. Add a sampler point by holding down the Shift key while clicking the desired pixel. In the canoeing image, the original highlight (top) is at 155R 163G 164B, and the shadow (bottom) is at 7R 5G 4B.
Precise selection of the highlight and shadow points requires measurements with the eyedropper and the Info palette, using the keyboard shortcuts: Cmd-+ (Mac) or Ctrl-+ (Windows) to zoom in and Cmd– (minus sign) (Mac) or Ctrl– (Windows) to zoom out.
If you’ve already opened the Levels dialog box and the Info palette is not visible, don’t panic! You don’t have to close the Levels dialog box to display the Info palette. Simply choose Window > Show Info (in Photoshop 6) or Window > Info (in Photoshop 7). Poke around with the eyedropper while watching the color values on the Info palette until you find the optimal highlight point; then hold down the Shift key while clicking the mouse to select this point and add Color Sampler #1 to the Info palette.
In this image, the brightest areas are in the canoe paddle and the whitecaps of the water. The paddle can’t be used as a highlight point, because it’s yellow and therefore not neutral, so carefully drag the cursor through the waves until the Info palette shows maximum values: in this case, 155R 163G 164B. Next, do the same in the shadows, moving the cursor around the dark areas in the rocks at the far left, where you’ll find minimum values around 7R 5G 4B. Click to specify Sampler #2 on the Info palette with these values.
This article was last modified on January 3, 2023
This article was first published on November 6, 2002
Commenting is easier and faster when you're logged in!

Recommended for you

The Non-Designer’s Illustrator Book
Task 9 Add arrowheads to a straight line segment You can turn straight lines cre...
Google Slashes Prices on the Nik Collection
Last fall, Google announced that it had acquired Nik Software, makers of the pop...
Photoshop CS6 updated
Adobe has released an update to Photoshop CS6 (version 13.0.1) that fixes a tota...