
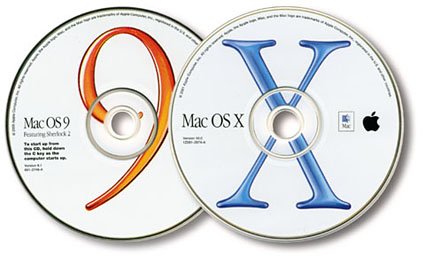
Dual-Booting OS X: The Safe Way to Explore the Future
2. Backup Your Files
Backing up your hard drive is a good idea when you install any new piece of software, and we strongly recommend that you do just that even if you’re installing OS X to its own hard disk. You’ll certainly need to backup all your files if you’re planning to repartition an existing drive to carve out a home for OS X: Repartitioning your drive will effectively wipe out all the drive’s contents.
There are various ways to backup your OS 9.X configuration, but your biggest dilemma may not be the method you choose, but the availability of media to temporarily hold all the files you need to backup: Even a small, 10GB hard disk requires about 17 writeable CDs. If you’re planning to replace your drive with a bigger, faster new model, you can effectively use your existing drive as the backup device — an approach I took when configuring my own dual-boot setup. I temporarily installed my new EIDE 60GB drive, and configured it as a second “Slave” drive. (All drive manufactures offer instructions for setting up EIDE drives for either a Master or a Slave configuration. This procedure involves resetting “jumper” pins on the back of the drive; instructions can be found on each vendor’s Web site). Next, I formatted and partitioned the new drive (as described in Step 3 below) and installed Mac OS 9.x onto the proper partition. Then, I copied all essential data files from the old startup drive to the proper partition on the new drive. Finally, I shut down the computer, switched the new drive from “Slave” to a “Master” setting, and removed the old Startup (Master) drive from my G4. Finally, I moved the new hard disk into the G4’s main drive carrier slot, plugged it in, and rebooted.
3. Partition and Reformat Drives
The most straightforward route to partitioning and formatting your drives is to use Apple’s OS X Drive Setup utility. Remember, though: Drive Setup erases everything on your hard disk, so make sure you’ve backed up your files before you go forward with this step.
Most G3 and G4 PowerMacs accept as many as three internal hard disk drives in one or two ATA (also known as EIDE) or FireWire (IEEE 1394) configurations. Also, SCSI drives are supported with the addition of a SCSI interface card in a PCI slot.
Most users will rely on an internal ATA drive for OS 9.x/OS X startup partitions, and these should be formatted as standard HFS+ volumes. Again, the multiple versions of the Mac OS will be installed onto separate partitions or drives, so that you can select either as a Startup drive. This also protects each OS installation should a problem later arise. (An OS 9.x CD is provided with OS X). During installation, you’ll have to choose the appropriate drive (or partition) you’ve planned for each installation.
Advanced Photoshop users should be familiar with repartitioning, since many routinely reconfigure drives in new computers just to set aside a separate 2GB-to-4GB section for use as Photoshop virtual memory (swap) space. This improves performance and ensures that contiguous hard disk space always is available for editing the largest image files.
Separate Photoshop virtual memory space is not needed under OS X, because the new operating system automatically employs an advanced virtual memory scheme when applications require additional memory (and when RAM is in short supply). However, the OS 9.x-to-OS X migration plan I outline here calls for setting up a Photoshop virtual memory partition for interim OS 9.x use and another for OS X virtual memory. Apple’s default OS X installation does not create a separate Virtual Memory partition, but doing this dramatically improves performance. (Using a separate hard disk would be even better.) Once you set aside and format this drive (or partition), you’ll have to use the OS X Terminal application to identify the new location for the OS X “swap file.” (See Step 5.)
Note: Be sure to set up a volume name with no spaces as the OS X Swap partition. Early OS X versions are not able to find the location for Virtual Memory “swap files” unless this is done.
Partitioning and formatting a drive Apple’s using Drive Setup is no great challenge. Follow these steps:
- Boot from the Mac OS 9x CD that is bundled with Mac OS X. With most models, insert the CD, hit the Start button, and immediately press the C key, holding it down until the CD startup screen appears.
- Launch the version of Drive Setup that is on the CD. It’s stored in the Utilities folder.
- The Functions menu lists Initialization, Update Driver, Volume Settings, Test Disks, and other options. You might want to test the disk, and you will want to update the Driver.
- In the Drive Setup window, select a Drive (Volume name) to be partitioned and formatted. The Initialize button becomes available. Select Initialize and the Initialize Window Appears. Select Custom Setup.
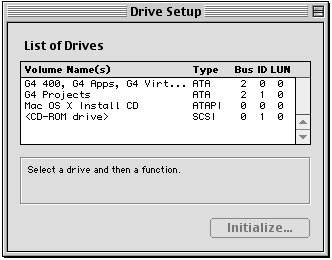
Select the drive to be partitioned and formatted. - In Custom Setup, the Volume (Drive) to be partitioned is identified. Make sure it is correct.
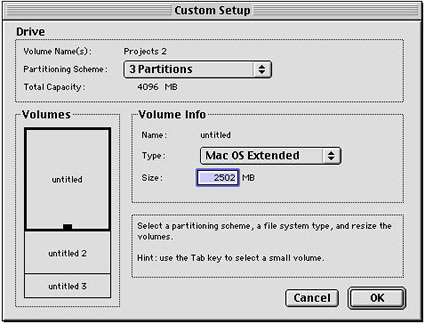
The Custom Setup window lets you select a partitioning scheme and set partition size. - Select a Partitioning Scheme (number of partitions). Again, I established five partitions on a new 60GB drive. In the Volumes section of the Drive Setup Window, click on the top “untitled” partition and drag the Control Point to reflect the correct size mapped out in your preparation plan. Note that the Size (in megabytes) is displayed in the Volume Info section. Set the desired size of each partition.
- Under Volume Info section, use the popup menu to define the formatting Type (Mac OS Extended — i.e. HFS+).
- If you are sure you are ready, select Initialize to begin the partitioning and formatting process (You cannot cancel this final action once it’s started).
This article was last modified on January 18, 2023
This article was first published on September 25, 2001
Commenting is easier and faster when you're logged in!

Recommended for you

Make Your Clients Fall in Love with Your Work
Admit it: You live for approval. As a creative pro, you’re not making art for ar...

Accessibility Plug-ins for InDesign
Generate PDFs that are more accessible with more ease by using these two new plu...

Galley and Story View are Not Available
Lately, the InCopy forums at Adobe.com have been peppered with posts from differ...