
Dropping Anchor in QuarkXPress

It’s a common scenario: You’ve spent hours — or days — finalizing the layout of a complex multi-page document in QuarkXpress. You’ve carefully positioned the boxes that contain text and pictures on each page. But at the last minute, your client makes substantial copy changes that cause text to reflow.
If you built the document conventionally, you placed all of the images in independent boxes. When the text flows to new columns (or new pages), the images are left behind in their original position. In order to reestablish the logical relationship between words and pictures, you’ll have to manually reposition numerous graphic elements.
QuarkXPress, like all high-end DTP programs, offers an alternative way to structure a document. You can anchor a box (that contains either pictures or text) within the flow of copy. The benefit of this approach should be clear. When text reflows, the image moves along with its associated copy.
The procedure is quite simple:
- Using the Item tool, select the box you want to anchor in text.
- Cut the box to the clipboard
- Switch to the Content tool, and position the Text Insertion bar at the point where you want to anchor the box.
- Paste the box at the current insertion point.
Even after you’ve anchored a picture box in a text block, you can treat it as an image. You can scale the picture, rotate the object, and reshape the box. However, the anchored box now also behaves like a text character. Its position is in large measure determined by Quark’s powerful character- and paragraph-level formats. The tips that follow show you how you can use Quark’s text formats to create different layouts. And while using anchored picture boxes won’t totally automate your design process, it can take the pain out of the inevitable revisions.
Example 1: A Simple Listing
For this first example, we created a simple directory listing with a straight linear format. As you can see in Figure 1, the information is arranged alphabetically. A graphic treatment of a single letter identifies each section and adds visual interest to the page.
Directory listings are notorious for last-minute changes, because participants in an event (or members of group) drop in and out without notice. But because we’ve anchored the picture elements in running text, adding or deleting information is not a problem.

Figure 1: When you highlight an anchored box using the Content tool, you can control the position of the element using Quark’s text formatting tools.
To ensure that that this layout looks — and behaves — as we intended, we assigned the following text formats to the anchored picture box.
We set both the point size and leading to 24 points, which provides enough room on the line for the height of the anchored box while minimizing the amount of space below the graphic. This visually associates the anchored box with the listing that follows.
When you are working with anchored boxes, pay special attention to leading. If you rely on Quark’s auto leading feature, you will find that the program determines the amount of leading based on both the size of the graphic and your auto leading preferences. In most cases (certainly if you use the default values) auto leading is set to 120% of point size. This can result in too much white space between anchored boxes and the subsequent line of text. So plan ahead. Know the correct point size of your anchored graphic, and assign a specific leading value to the paragraph to preserve your design intentions.
We also specified a value for the Space Before option. This extra space (which is ignored if the paragraph falls at the top of a column) signifies a break from the previous section.
Keeping the graphic aligned with the text was as easy as specifying left justification and indent values of zero.
Finally, we activated the Keep With Next option. This ensures that the anchored box will always appear in the same column as the first listing that follows it.

Figure 2: The Keep With Next option (lower right) — found on the Formats tab of the Paragraph Attributes dialog box — ensures that the anchored box always flows with its associated text.
Example 2: A Multi-line Composition
You’ve seen the following layout (Figure 3) a thousand times. A short text block, set at a large point size, is interspersed with images. The pictures replace words in the sentence — rebus style. We produced this effect quite easily by anchoring a series of picture boxes in the text. Now, if we have to edit the copy — even to correct a typo — the images will maintain their proper position in relation to the words.
Figure 3 illustrates an important point. If you select an anchored picture box, without highlighting it, you can continue to use Quark’s standard picture formatting functions. For example, in the final line of this sample layout, we used the Measurements palette to both resize and rotate the picture.

Figure 3: Even when embedded in text, images can be modified using Quark’s standard tools. A portion of the Measurements palette seen here reveals that the selected picture has been resized and rotated.
Many of the text attributes assigned to this paragraph don’t specifically pertain to the placement of the anchored boxes. For example, center alignment controls the overall shape of the paragraph. Point size and leading — which in this case are not equal — are crucial to the integrity of this design. We added lots of air to the paragraph by setting text at 24 points and leading at 100 points. It increases the legibility of the large type and leaves plenty of room for the images to breathe.
The vertical position of the anchored boxes in relation to the text baseline can make or break this layout. In a layout that includes only a small number of anchored boxes, it is a good idea to use the Align With Text controls (found on the Box tab of the Modify dialog box). You can position the box flush with either the ascent or the baseline of text. Alternatively, you can specify a value in the Offset field.
For a large volume job, we prefer to use the Baseline Shift command instead. Character attributes (like Baseline Shift or Tracking) can be saved as part of a Style Sheet. In this sample layout, we created a Character Style Sheet that both increased the track value (inserting white space the left and right of the anchored box) and moved the anchored box down by 25 points. (Note that Character Style Sheets were only added to version 4.x of QuarkXPress.)

Figure 4: Character level attributes, like Baseline Shift and Track (lower left), can be saved as part of a Style Sheet.
Example 3: A Multi-Column Layout
Highly structured documents, such as catalogs or sales brochures, present a perfect opportunity to use anchored images. In the next example (Figure 5) we set up a strictly ordered page. Each of the three columns on the page contains a headline, a rule, an image, and body copy. If you examine Figure 5 closely, you’ll notice that the spacing between items in each column is perfectly consistent. This level of accuracy was actually quite easy to achieve, because we controlled the relative position of elements in each column through the use of paragraph attributes.
By now it should be obvious how point size, leading, and space before and after paragraphs contribute to the relative position of objects in each column. Upon careful examination you will see that the ruled line separating the headline from the picture box is placed with equal precision. Indeed, the rule itself is automatically generated by the paragraph Style Sheet associated with the anchored box.
We have also guaranteed that all of the elements (headline, image, and body copy) will appear in the same column by applying the Keep With Next attribute to the headline paragraph and the anchored box paragraph (but not to the body copy paragraph).
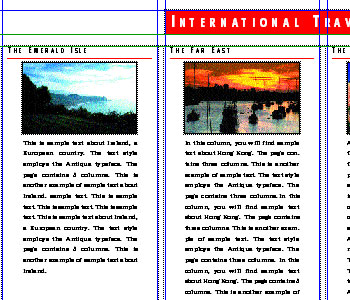
Figure 5: Visual consistency from column to column is easy to achieve when you position images and create rules as part of a paragraph Style Sheet.
This layout won’t work unless there is a forced a column break between each body copy paragraph and the subsequent headline. It would be wonderful if QuarkXPress supported column breaks as part of a paragraph style, but it doesn’t. Instead, Quark requires you to type a special control character — called the Next Column character — at the end of each body copy paragraph. To enter the Next Column character you simply press the Enter key on the numeric keypad. Now, when items are added or removed from this document, the layout controls come into play automatically. Items that logically belong together (the headline, picture box, and body copy) move as a single unit. And each listing always begins at the top of a new column.
Example 4: A Side-by-Side Layout
Page layouts that position text and pictures side-by-side are very common. An image is often segregated in a left (or right) margin area, next to its text reference. Typically this layout is constructed of independent picture and text boxes placed in separate columns. In order to take advantage of anchored boxes, we created the illusion of a two-column layout. We structured the page as a single column, and employed formatting commands to indent the text.
Figure 6 illustrates the simplest technique you can use to achieve this effect. We simply anchored a picture box at the beginning of a paragraph, and then typed a special control character — called Indent Here — to align any subsequent text in the paragraph at the right edge of the anchored box. To insert the Indent Here character press both the Control (or Command on the Mac) key and the Backslash key () simultaneously. We positioned the image vertically by choosing to align the anchored box with the ascent of the text block (Modify/Box/Align With Text/Ascent).
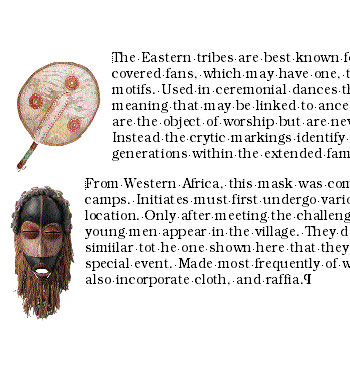
Figure 6: The Indent Here character (seen here as a light gray bar between the anchored box and the first line of text) is an easy way to place pictures and text side by side.
If you scrutinize Figure 6, you’ll discover a potential drawback of this approach. The size of the indent is controlled by the width of the anchored box. If there is a size variance between the images in your document, as there is in our example, the position of the text block will vary from paragraph to paragraph.
We were able to produce a more consistent layout (Figure 7) by employing Quark’s standard paragraph Style Sheet (Figure 8).

Figure 7: Use paragraph style sheets for more consistent layouts. Tip: Displaying invisible characters helps you to see how tab stops and a hanging indent can simulate a multi-column layout.

Figure 8: Our Paragraph Style Sheet for anchored boxes included a hanging indent.
By specifying a positive value for the left indent, and an equal but negative value for the first line indent — otherwise known as a hanging indent — we produced a very believable simulation of a two-column layout. We fine-tuned the position of the anchored picture box with a right-aligned tab. And forced the beginning of text to line up with the paragraph indent with a left aligned tab.
All of these techniques beg an essential question. When should you go to the trouble of designing a document with anchored picture boxes? The pure designer would find it reasonable to build a physical relationship between words and pictures whenever there is a strict logical relationship between the two. The practical designer would choose to anchor picture boxes in text only when it reduces the grind of producing and revising lengthy documents.
Read more by Luisa Simone.
This article was last modified on February 22, 2022
This article was first published on November 6, 2001
Commenting is easier and faster when you're logged in!

Recommended for you

Fixing a Broken JavaScript (and How To Avoid Breaking It in the First Place)
First, I freely admit this post might come across like an ad for Peter Kahrel...

InDesign Basics: Your First Animation
Back in InDesign CS5, Adobe added a very cool Animation panel to InDesign that a...
Scanning Around With Gene: We Grow ’em Big Here
I’ve always been a sucker for the various “exaggerated” postcard interpretations...