
Drop 20 Pounds with InDesign
David Blatner and Mike Rankin show you how easy a crash diet can be—for your InDesign files.


This article appears in Issue 39 of InDesign Magazine.
Cruft: Something unpleasant that accumulates over time. Unproductive, wasteful, doesn’t add value, obsolete, redundant.
InDesign documents can get needlessly heavy, slowly accumulating visible and invisible cruft as you work on them. The longer the document, and the longer you work on it, the more likely it is to become crufty and laden with excess. While there is nothing inherently bad about these files, we believe that they can lead to corruption (where the documents can “go bad”), confusion (where you may lose track of what’s in your documents and how you created them), and a general slow-down of productivity. Similarly, the files you print or export (such as PDFs and SWFs) may be far larger than they need to be, leading to long upload/download times, print times, and frustrated viewers. Fortunately, you can reduce the file sizes of both your InDesign documents and the files you export in some simple ways.
What Makes an INDD
Let’s start by taking a look at what makes up an InDesign file. InDesign files are technically database files, which enables InDesign to do a lot of clever things, like unlimited undos and crash recovery. However, all databases have a certain amount of overhead—like an infrastructure that takes up room all by itself. If you create a new blank document and save it without making any changes, it will be about 1 MB. That’s without any content, just the basic document structure made up of the four S’s: spreads, styles, swatches, and settings. The majority of that is the document’s ICC CMYK profile, which takes up about 700K. Then, as you work with the document, you’ll see the file size grow each time you save it. This makes sense: As you add text, place graphics, and create new objects, you’re adding information that has to
be housed in the file. But what may not make as much sense is that when you remove content from the file, it does not shrink in size. You can try this little experiment in cruft-creation yourself. Create an empty document. Save and note the file size. Now place a photo. Again save and note the file size. Now delete the photo. Although the document appears to be back to its original, empty state, if you save and check the file size you’ll see it’s just as big (actually slightly bigger) than when the photo was placed in the file! What gives? The ghost of the photo still haunts the file, lurking in the digital darkness! What you deleted was the rectangle that contained the photo. So it no longer appears on the page. But all the other information regarding that photo, including the proxy image and XMP metadata is apparently still there. That, dear friends, is cruft. The worst thing you can do in terms of creating cruft is to copy and paste (or drag and drop) raster image content directly from Photoshop or a Web browser. You can instantly supersize an InDesign file by doing this. If you open a JPEG from your 10-megapixel camera in Photoshop, copy the whole thing with the selection tool, and paste the pixels into InDesign, that document immediately swells by 32 MB, which won’t disappear even if you delete the picture! One file we worked with was 95 MB large, due to five images that had been pasted in from Photoshop (Figure 1). Deleting the images didn’t make a difference, but when we recreated the file, importing the images using File > Place instead of copy/paste, the INDD file size was only 2.2MB!

Figure 1: How can this empty one-page document possibly take up 95 MB on disk (left)? The answer: cruft! After a Save As, it’s down to a manageable size (right).
Decant, Decruft
The easiest way to de-cruft an InDesign document is to use the Save As command. By choosing File > Save As you can create a duplicate of your document that is cleansed of most of the accumulated cruft. Hidden, leftover data from deleted images is not included in the new file. Not only will you save disk space, you’ll save time too, with faster file transfers and peppier performance overall. Technically, the Save As trick creates a new file. If you use the same name, it deletes the bloated oldie, replacing it with this new slim one. There are other methods for reducing unwanted build-up, but at this point you need to ask how badly you want smaller, more efficient files. If you have a legitimate need to squeeze every last kilobyte of extraneous data out of your files, there’s a lot you can do to trim the fat. But if you have ample disk space, you’re not hampered by slow files, and you don’t suffer from OCDD (Obsessive Compulsive Decrufting Disorder) it’s probably not worth the time and effort to go beyond the occasional Save As. That said, here are some steps you can take to reduce InDesign file size, in descending order of impact. Resize Graphics. Because InDesign generally creates 72 ppi previews of your placed images, at 100% size, it behooves you to properly size those images before you place them into your layout. For example, say you have a little 1350 × 900 pixel photograph that you want to be 4″ × 6″ in a print layout. If you leave the image set to 72 ppi when you place it, then resize it in InDesign, your document will become about 600K larger. If, instead, you resize it to 4″ × 6″ in Photoshop’s Image Size dialog box—with the Resample checkbox disabled, so that it’s increasing the resolution, but not adding or removing pixels—then place it in InDesign, your file will only grow by about 360K (Figure 2).

Figure 2: This 72 ppi image from a digital camera is almost 15 MB (top) and could fatten your InDesign file unnecessarily. Reduce the pixel dimensions to just the amount you need, and increase the resolution before placing it in InDesign (bottom).

Figure 3: Be conservative when telling InDesign to save image previews unless you really make use of them in Bridge.
Reducing Exports
An InDesign file is only a means to an end. It serves to structure and format content, but other file formats like PDF and SWF are actually used to deliver content to print or screen. So the size of files exported from InDesign are just as important if not more so than the size of the file that spawned them. Granted, the size of a PDF file that you’re sending to a printer for output may not matter a lot, but one that you’re putting on a web site for download can be make-or-break for whether your audience reads it. Reducing PDF File Size. The easiest way to reduce the size of PDFs exported from InDesign is to make prudent use of the Export Adobe PDF settings. These options offer you a wealth of controls for choosing what’s included in a PDF (and what’s left behind in InDesign). You can optimize your PDF file size by preserving transparency, downsampling images to the resolution you need, converting unneeded spot colors to your destination color space, and always subsetting fonts. Note that this means that you may have to stray from the beaten path of the PDF presets, or make your own. For example, let’s say you’re putting a newsletter on your website for people to output themselves on desktop printers. The PDF/X-3 preset is a pretty good starting point for this, but you can maintain most of the quality you want and reduce the file size significantly by lowering the Image Quality pop-up menus (in the Compression pane of the Export PDF dialog box) to High, or even Medium, and changing all the “pixels per inch” fields to 150 (Figure 4). Then increase the Compatibility pop-up menu to Acrobat 6 or higher, so that transparency won’t get flattened. (Transparency flattening can add a lot to PDF file size.)
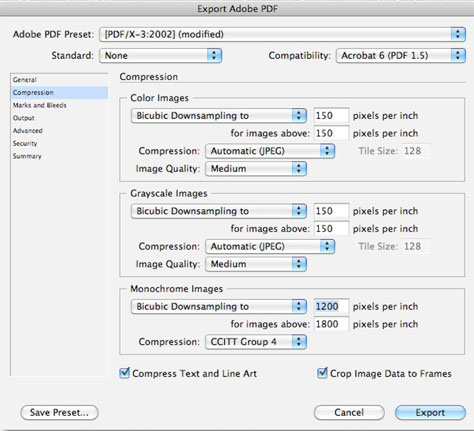
Figure 4: If your document is destined for printing on home laser printers or inkjets, reduce the resolution and JPEG quality to bring down the file size!

Figure 5: The difference between including and not including color profiles is the difference between a PDF file that is 500K and 10K. Which one will your readers like more?

Figure 6: Acrobat Pro’s Optimizer feature can reduce a PDF significantly. If you need even more reduction and control, consider a third-party utility, such as PDFshrink from Apago.
Think Slim, Be Slim
In this age of multi-terabyte hard drives and the “you want fries with that?” mentality, it’s sometimes hard to remember that efficiency is tethered to restraint. It takes a little work and attention to reducing file size—both in InDesign files and the files you export—but the results can be fabulous, from faster processing to a faster promotion at work!
Commenting is easier and faster when you're logged in!

Recommended for you

SOS San Francisco: A Case Study for Collective Visual Brainstorming
This article details the creative process used to develop the graphics for SOS S...

Free Webinar: Super Simple PowerPoint Slides
Learn how to quickly create simple, professional slides that connect with your a...
Creating a PDF from InDesign’s Print Booklet Feature
A step-by-step guide to creating a PDF of printers spreads with Print Booklet.