

Whenever people who work with text discuss the ability to drag and drop text, there’s bound to be strong feelings. Some people really like it, while others hate it. Put me in the first category. I got used to using this feature in Microsoft Word and QuarkXPress, and when it was added to InDesign I was very happy.
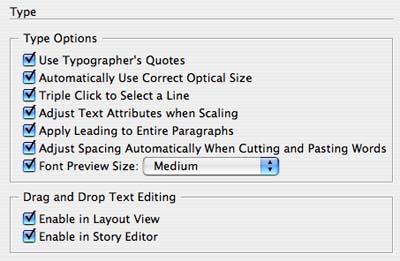
Some of you may not even realize that it exists. That’s because in InDesign, by default, it’s turned off when you’re in Layout View. It is turned on in InDesign’s Story Editor. So if you want to try this out, you first must make a trip to InDesign’s Type Preferences and choose Enable in Layout View.
InDesign is smarter in the way it indicates that you’re in drag-and-drop mode than other applications. When you move over selected text normally, it shows an insertion cursor. When you have drag-and-drop enabled, you’ll see a special drag-and-drop cursor (black arrow with the “T” icon). Microsoft Word (at least on the Mac) doesn’t do that so in Word you may be surprised when you start dragging and realize that you’re moving text when you don’t expect to! (I think that’s why drag-and-drop has gotten a bad rap.)
To drag-and-drop, simply keep the mouse down, drag where you want the selected words inserted, and release. In the paragraph below, when I drag the selected text, the I-beam cursor with the “T” indicates where the text will be moved.

You can add some special tricks to drag-and-drop, also original with InDesign as far as I know:
- To copy, rather than move, hold down the Option/Alt key after you start dragging.
- To create a new text frame, hold down Command/Ctrl after you start dragging and then release the key.
- To copy text to a new frame, hold down Command+Option on a Mac or Ctrl+Alt in Windows.
The last one is my favorite. I call it “pull-quote” mode because it makes it easy to copy text from a story and create a pull quote text frame in one step!
This article was last modified on January 16, 2023
This article was first published on August 5, 2006
Commenting is easier and faster when you're logged in!

Recommended for you

TypeTalk: What Are Web Fonts?
TypeTalk is a regular blog on typography. Post your questions and comments by cl...

50 Free Fonts, Part 1
Summertime, And the livin’ is easy Fonts are free And the kerning is nice...

New Version of Adobe FrameMaker
Press Release Adobe Systems Incorporated has announced Adobe Technical Communica...