
Digital Pop Art: Unleash Your Inner Warhol

Figure 5 shows the last step in the process, which is to turn some of your color fills into dots.

Figure 5
First, go to the Layers palette and select a layer containing a color that you want to replace with dots. Then drag that layer onto the Create A New Layer button in the Layers palette to make a copy of it. Now hide the copied layer and reselect the layer that you just copied. Choose Filter > Pixelate > Color Halftone. In the resulting dialog box, shown in Figure 6, adjust the Max. Radius setting to a number between 4 and 127. Click OK. Keep in mind that the larger the number, the larger your dots will be.
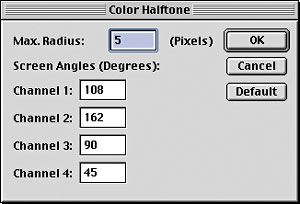
Figure 6
Your color fill should now resemble that shown in Figure 7. At this point if you like the results you can leave your image as it is, but if you want to adjust the coloring of the dots, you can.

Figure 7
To change the appearance of your dots, select the copied version of your layer and make it visible. Then set the layer’s blending mode to Screen, as illustrated in Figure 8.
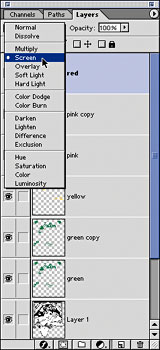
Figure 8
Note: The results of changing the layer’s blending mode are subject to change depending on the original color of your image. To get the final effect that you’re looking for you may have to test out a few of the different blending modes offered in the Layers palette.
Now, simply repeat this step on any other parts of your image that you want to add dots to, until you’re happy with the way the entire piece looks.
This article was last modified on January 3, 2023
This article was first published on May 24, 2002
Commenting is easier and faster when you're logged in!

Recommended for you

The Pop-Up Pinhole Project
They say necessity is the mother of invention, but it’s clear nowadays that Kick...

Building an Underwater Scene in Photoshop, Part 1
The Oscar-winning film The Shape of Water opens with a stunning sequence in whic...

Halloween Photoshop Techniques
Looking to whip up some quick Halloween fun in Photoshop? Over at the lynda...