Diagonal Headings in InDesign Tables

Making headings in a table appear diagonally isn't that hard, but you have to use anchored objects

Jon wrote:

I am seeking a method or tool for creating table header cells at a diagonal using InDesign. Do you have a method or know of a product (script, plugin, magic potion) that would allow me to do this?

Ah, for a magic potion! Unfortunately, I know of only one way to do this, and it involves brute force more than magic. The trick is anchored objects. You can anchor any object into a text cell, including graphics, lines, or even other text frames. So make a text frame with your heading, and rotate it. Here’s a rotated text frame sitting above the table:

(By the way, you can also put rotated text inside a non-rotated frame if you follow the instructions in this PDF tutorial. But it’s definitely not necessary for this trick. In fact, it may just make your life even more difficult. But I thought I’d mention it anyway, in case you hadn’t seen that PDF.)

Now, cut the rotated text frame with the Selection tool and paste it into the first cell with the Type tool:
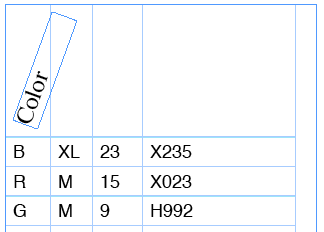
Note that anchored objects can stick out past the edge of table cells, so you can adjust the width of the column in order to “snug” it in a bit. Here’s the final table, after pasting in the header frames and formatting:

Obviously, I’m skipping a few steps, such as: It would be really useful to apply an object style to those headings first! That way you can later tweak them all at once, such as move them to the left or right. I sure wish you could apply transformations, such as rotation, in an object style! That would be an even greater help. Sigh.

Bookmark
Please login to bookmark Close

This article was last modified on December 19, 2021

Comments (15)

Leave a Reply

Your email address will not be published. Required fields are marked *

  1. jo
    January 13, 2012

    BlueK, THANK YOU. I just used this. Like Laura, I had to read it a few times before I figured out that you were giving a formula, not a number, for step 3, but once I caught on to that it was aces! I have one column on the end that is wider than the others, which jacked up the scale factor a bit, but I futzed with the first one manually and then applied that for everything but the last one and it’s PERFECT. I created a “header row” on my original table, merged all the cells, set the insets to zero, dropped this sucker in and anchored it. You are a rock star.

  2. Blue K Design
    August 25, 2011

    Update: August 2011, and this same issue came up again at work. There still is no feature to arbitrarily rotate test in an InDesign table heading. The workaround is still useful.

    @laura – a year late, but an answer for anyone else who is having trouble w/ step 3.

    In step 2, you rotated the frame 45 degrees. We want to skew the frame -90 degress + the 45 degree rotation angle = a skey of -45 degrees.

  3. Blue K Design
    August 25, 2011

    Update: August 2011, and this same issue came up again at work. There still is no feature to arbitrarily rotate test in an InDesign table heading. The workaround is still useful.

    @laura – a year late, but an anwser for anyone else who is having trouble w/ step 3.

    In step 2, you rotated the frame 45 degrees. We want to skew the frame -90 degress + the 45 degree rotation angle = a skey of -45 degrees.

  4. February 23, 2011

    Weeee!
    Late to the conversation as usual… this is how I decided to build my diagonal table header…

    1. Make a table across two text frames (threaded) and make the header row fit in the first frame
    2. skew the first text frame with the header row
    3. copy and paste a rotated text frame into the header table cells, mess around with skew, rotation, text skew, text horizontal scale till the text looks right.

    If i build it this way, I can retain the whole thing as a single table, and can freely add columns, or change column widths.

    https://adobeclass.wordpress.com/2011/02/24/slanted-diagnal-heading-in-indesign-tables/

  5. laura
    October 21, 2010

    Hey guys, I got the same effect by doing the following:
    1) create a separate header table with one column and whatever # of rows corresponds with how many headings you need
    2) Rotate 60 degrees
    3) take the shear tool and drag the bottom right corner to match the top right corner of the other table
    4) drag the far right column border to meet up with the width of the other table, then highlight all the columns of the header table, right click and choose “distribute rows evenly”
    5) type in your headers then skew the text 30 degrees.

    This way might take a little manual adjusting but it worked pretty well as a quick fix.

  6. Sherry
    July 29, 2010

    @BlueK has the perfect solution for what I need to be able to do, but I can’t quite seem to get it right. Step 3 foils me every time. When I go to use Shear to get the angle, it never looks the way it does in his flicker image, (and that’s if indd doesn’t tell me that it can perform the function in the first place.) Maybe I’m just having an off day, but my math challenged brain can’t quite seem to get this one. However since I literally have pages upon pages of these tables, if I can’t figure out how to make this work, I’m seriously going to have to talk the client into something else. What am I doing wrong? anyone have some insight?

  7. Marisa Flores
    May 7, 2010

    you saved me a ton of time. thank you so much!

  8. November 27, 2008

    I have recently purchased indesign and i have a problem with a table and need to create from scratch could tell me i can create a table with preset headings on every page?

  9. Tomas
    September 10, 2008

    What we really need in Illustrator is the wrap around tab that FreeHand had, it makes working on tables easy and efficient. Does anyone out there knows a way, work-around to make a table with multiple rows, columns and lines of text, and keep everything in one text block with preset points before/after, and keep every line aligned – in Illustrator?

  10. September 10, 2008

    Wow, BlueK, that is wicked. Awesome how-to, thanks!

    AM

  11. Roland
    September 10, 2008

    That ‘another option’ method seems far more work, but it appears to have one big benefit: table styles like alternating column colours and slanted cell borders. Pretty cool stuff :)

  12. September 9, 2008

    @BlueK: That is awesome. Thank you! Some folks may not notice that you can click on the “another option” text to see a screen shot of this technique on his Flickr page. Check it out.

  13. Blue K Design
    September 9, 2008

    Another Option:

    How do you make table headings at an angle?

    1. Heading table created as 1 column, 11 rows. Note the frame width.
    2. Rotate frame 45°
    3. Measure horizontal distance from frame corner to opposite edge.
    3. Skew frame -90° + Rotation angle (-45°)
    4. Slant Type Inverse of Skew (+45°)
    5. Scale Row Height to equal column widths.
    If Column width = 0.25? and Scale Factor = Width 2 / Width 1
    then Adjust Row Height = Column Width / Scale Factor
    .25? / (2.6158? / 1.8785?) = .175?

    AngleScale Factor
    30° 0.7664597
    45° 0.625
    60° 0.4395604

  14. Eugene
    September 9, 2008

    Awful pity you can’t insert a custom rotate in the cell options.

    Maybe soon…

    1. guy from future
      January 16, 2024

      still nothing!