
Design Projects: Creating Invitations, Envelopes, and Place Cards

If you’re planning a party, you’ll need to send invitations. Being a creative type, however, prevents you from running out and buying them. That would be like catching Richard Simmons buying a candy bar! No, you’ll have to create your own invitations if you want to save face. While you’re at it, you might as well design the whole package: invitations, envelopes, and place cards, as shown in figure 1.
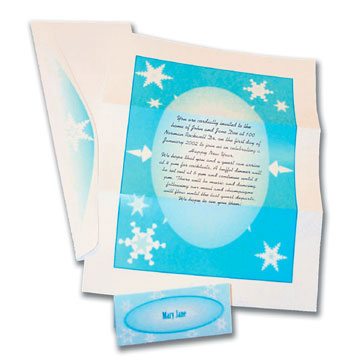 Figure 1: Designing invitations, envelopes and place cards is a fun holiday project you can produce on a desktop printer.
An Open Invitation
In this article, we’ll show you how to set up QuarkXPress documents to design party invitations, envelopes and place cards to print on a desktop or laser printer. We’ll start with the invitations. From there, we’ll show you how to custom design standard, business-class envelopes. Then we’ll show you the setup for place cards. Finally, we’ll tell you how to get your files to output on a PostScript printer.
Coming Up with a Theme
We always preach consistency in these articles and this project is no exception. A professional presentation is made of corresponding parts that match, so the first step in planning your party is coming up with a theme that you’ll carry throughout all your print materials. In deriving a theme, consider what the occasion is and what you can conceivably create.
For example, our invitations are for a party in a corner of the world that sees a lot of snow in the winter, which is when the party is scheduled. Thus, our snowflake theme makes sense. In addition to that, although we couldn’t possibly promise our guests the real thing, creating snowflakes on a computer is fairly simple. You’ll need to create all the graphics you intend to use before you continue with the rest of this project. Take a look at figure 1 again to get an idea of the graphics you’ll need.
Designing invitations. We’ll start off with laying out the invitations. Although invitations come in all shapes and sizes, we chose a standard letter-size layout, which is easy to fold and can be inserted and mailed in standard-size envelopes. No fuss, no muss!
First, launch QuarkXPress and choose File > New > Document. In the New Document dialog box, choose US Letter from the Page Size pop-up and select the portrait Orientation icon. Next, enter “1” in the Columns text box in the Column Guides area. Now enter “1 inch(“)” (or “6 picas”) in the four Margin Guides text boxes and deselect the Facing Pages check box. Then select the Automatic Text Box and click OK.
On document page 1, select the automatic text box. Now, click on the Background Color icon in the Colors palette. Then select Cyan and choose 40% from the Shade pop-up menu. Next, choose Item > Frame. In the Width text box, enter 2 pt and choose Cyan from the Frame Color pop-up menu. Then click OK.
With the text box still selected, choose Item > Content > Picture to convert the text box to a picture box. Then choose File > Get Picture and select the graphic file you created for the background. Lastly, click Open to place it. Reposition the graphic as needed.
To help center the next text box you’ll create, drag a set of guides from both the horizontal and vertical rulers and position them 1″ inside the margin guides, as shown in figure 2. Then select the Oval Text Box tool and draw an oval that fits within these guides.
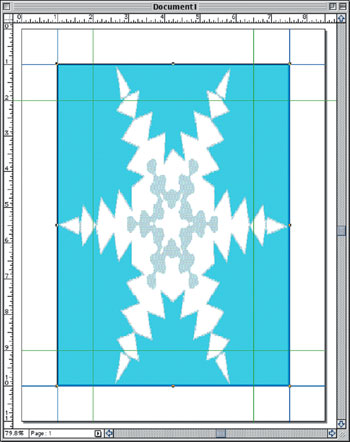 Figure 2: Add a set of horizontal and vertical guides to help center the oval text box you’ll create next.
With this text box still selected, click on the Background Color icon in the Colors palette and choose Full Circular Blend from the fill-type pop-up menu. (If Linear is the only available option, the Cool Blends XTension isn’t enabled.) Then, click on the #1 option button, select Cyan and choose 40% from the Shade pop-up menu. To complete the blend, click on the #2 option button and select White.
Lastly, select the Content tool to activate the insertion mark in the oval text box and enter your message. Use the Measurements palette to format the text with a typeface and point size of your choice. Then click on the Centered icon for a horizontal alignment. To vertically center the text, as shown in figure 3, double-click on the oval text box with the Item tool to open the Modify text box. On the Text tab, the Vertical Alignment area is unavailable because of the text box shape. As an alternative, enter “20 pt” in the Text Inset text box and “2 inches(“)” in the First Baseline Offset text box. Then click OK. Finally, save and close the document.
 Figure 3: Text in oval text boxes can be vertically centered using the insets and baseline shifts.
Designing envelopes. The next part of this project is to create a design that can be printed onto the envelopes in which the invitations will be sent. We’ll base our setup on business-class, white envelopes that have a slightly rounded flap.
First, create a new document with a custom size of 9 inches wide by 4.125 inches high. This will automatically select the landscape Orientation icon. Enter “0” in the Margin Guides text boxes and enter “1” in the Column Guides text box. Deselect the Facing Pages and Automatic Text Box check boxes. Then click OK.
Reserve document page 1 for the address information. If you like, you can add a small graphic in the safe zone of the envelope, as shown in figure 4. Now, choose Page > Insert to add a page after page 1. Then click OK. Go to document page 2, on which you can create a design for the envelope flap, as shown in figure 5.
To create the design on our envelopes, we dragged a guide from the horizontal ruler down to the 1 _” mark on the vertical ruler. We used the Bézier Picture Box tool and drew a closed path in the shape of the flap. To do this, we clicked a point at the upper-left corner of the envelope, then clicked at the upper-right corner and then clicked and dragged to create a smooth point where the center edge of the flap should be (where we placed the guide) and stretched the direction line to shape the curve. Finally, we clicked on the first point to close the path. Then we chose File > Get Picture, selected a graphic to place in our Bézier picture box, and clicked Open. Lastly, we centered our snowflake on the flap by pressing [command][option][shift]F ([Ctrl][Alt][Shift]F in Windows).
 Figure 4: Be careful not to add graphics or text to an area that needs to be empty to meet postal specs.

Figure 5: Customize the envelopes in which the invitations will be sent to further seal the deal.
Designing place cards. The guests who respond to your invitations will be pleasantly surprised when they arrive and see their names on the place cards you’re about to create. (Place cards are another good job for variable data printing.)
First, create another new QuarkXPress document. In the New Document dialog box, choose US Letter and click on the vertical Orientation icon. Enter 0.25″ in each Margin Guides text box. Enter 2 in the Columns text box and 0.5″ in the Gutter Width text box. Be sure that the Facing Pages and Automatic Text Box check boxes are cleared. Then click OK.
Now, select the Rectangle Picture Box tool and draw a rectangle 3.75″ wide by 3.25″ high and position it in the upper-left corner of the page. Then verify that the origins and dimensions match those shown in figure 6.
To create an area in which you can enter text, select the Oval Text Box tool and draw an ellipse that measures 3.25″ wide by 1″ high and position it at 0.5″ on the X axis and 2.25″ on the Y axis, as shown in figure 7. While still selected, apply either a white or shaded background fill. Then add a graphic to the picture box, as shown in figure 8.
 Figure 6: You can use the Measurements palette to position the ellipse.
 Figure 7: Verify you object’s position in the Measurements palette.
 Figure 8: Design your place cards to match the invitations and envelopes.
Finally, select the place card, group the separate items together, and then make enough copies to fill the page. (If using a variable data XTension, you don’t need to make any more copies.) To group the separate items that make up the place card, [shift]-click on each item with the Item tool and choose Item > Group. Now press [command]C ([Ctrl]C in Windows) to copy and then [command]V ([Ctrl]V in Windows) to paste the place card. Position the copy at 4.5 inches on the X origin and 0.25 inches on the Y origin. Use the Measurements palette to help you align the place card precisely. Now, select both place cards and choose Item > Step And Repeat. Enter “2” in the Repeat Count text box, “0” in the Horizontal text box and “3.62 inches(“)” in the Vertical text box. Then click OK. This completes the page setup for your place cards.
Printing
Print your invitations, envelopes, and place cards on a color laser or desktop printer at the highest possible resolution and quality settings. The invitations print out normally and can then be tri-folded. The envelopes require the correct PPD to be selected in order to choose Comm10 Envelope from the Paper Size pop-up menu on the Setup tab in the Print dialog box. Click the Printer button in the Print dialog box, click OK for the warning and then choose Manual Paper from the Paper Source pop-up menu and Center from the Page Positioning pop-up menu. Insert your envelopes manually into your printer. Do a test run to see which way the envelopes have to face to print on the correct side.
As for the place cards: Once you know who’s attending the party, enter the names in the oval text boxes and then print the document as usual. Then cut the sheets, preferably with a table cutter, and fold each place card in half.
R.S.V.P.
All that’s left to do is sit back and watch those invitations return in the mail, so you know which names to put on the place cards. No doubt, the response will be great!
Creativepro.com readers can subscribe to Element K Journals at a discount. Click here to learn more.
This article was last modified on January 3, 2023
This article was first published on November 28, 2002
Commenting is easier and faster when you're logged in!

Recommended for you

Book Excerpt: InDesign Course and Compendium
Steve Laskevitch shows how to work with long document features.

Easy Fixes for Microsoft Word Formatting in InDesign
This article originally appeared on InDesignSecrets.com, which recently introduc...
Linotype's Arabic Type Design Competition Deadline is Extended to November 11, 2005
Due to public demand, the deadline for receiving applications to the Arabic Type...