
One of the things that can trip up even the most experienced InDesign users is a change in behavior brought about by new feature. Such is the case with the polygon and polygon frame tools in InDesign CS5.
In past versions if you wanted to draw a starburst you could choose the polygon tool, start dragging and then use the up and down arrows keys to customize the number of points and the left and right arrow keys to control the inset.
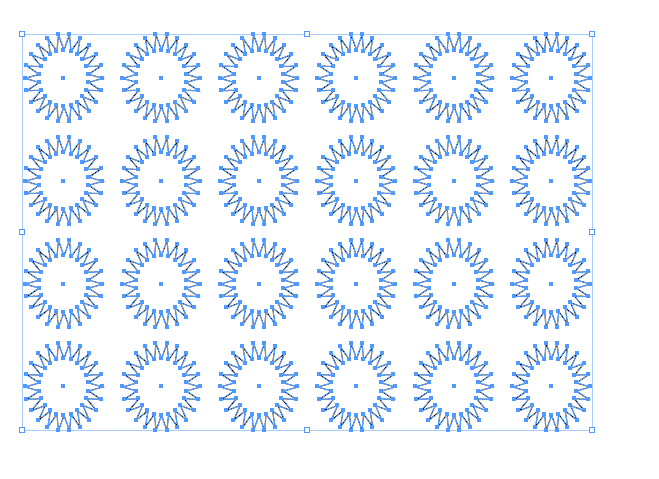
If you try that with InDesign CS5 the new gridify feature will kick in and you’ll get a grid of ploygons/stars with an appearance dependent upon your defaults with no apparent way to recapture the previous behavior.

Starburst and polygon lovers, fear not. Adobe has not forsaken you. Nor has InDesign Secrets.
The Secret is in the Spacebar
After selecting the polygon tool and dragging with your mouse, just press the spacebar to toggle the arrow key behavior. Yup, it’s that simple.
After pressing the spacebar the previous behavior will be restored and you can customize the appearance of your single star/polygon with the arrow keys. But the fun doesn’t end there. Press the spacebar again and the gridify behavior returns to the arrow keys allowing you to change the number of rows and columns. Use the spacebar as many times as you like until you get things just the way you like.
Finally, if you’d like to keep that grid of stars or polygons proportional, hold down the shift key before letting go of the mouse.
This article was last modified on December 20, 2021
This article was first published on May 2, 2010
Commenting is easier and faster when you're logged in!

Recommended for you

Updated Free Live Preflight Profiles for CS4 and CS5
The free preflight profiles available from VIGC have been improved and expanded.
Transforming Pages in CS5
With CS5 you can transform pages with Scale, Shear, Rotate, and Free Transform.
Animation Customization via IDML
Oh no! Not another animation post from Mike! Yep, but this is a good one. It sho...