

6. Continuing coloring on separate layers.
Remember, whenever you start a new thought, start a new layer.
Try coloring something else on your image. If you’re using the supplied Ingrid Lucia image, color the musical notes of the “Rock ‘n Bowl” sign blue. First make another new layer (click the New Layer icon). Keeping the blue on a separate layer will protect the previous color layer from damage, making it easy to backtrack if you don’t like what you do.
Paint in a color that’s darker than your first color. If you’re using the Ingrid Lucia image, choose a new blue color from the Swatches palette that’s darker than the red. With the Ingrid Lucia image, you can set the blending mode of the Blue Notes layer to Lighten to prevent the darker blues from being visible where you already painted the lighter reds on the layer below (see Figure 9). On your own image, you’ll need to play around to see what blending mode works best.
 Figure 9: Into another new layer, color the blue of the notes. With a blue darker than your red, setting this layer to Lighten blending mode will prevent the blue from overwriting the red from the layer below.
7. Breaking the rules.
An important part of being creative is to sometimes break the rules. In the Ingrid Lucia image, on the same layer with the blue notes, I added some highlights for the bowling pins. I could have done this on a separate layer (and probably should have if I was to take my own advice to keep separate thoughts on separate layers!), but because the ivory color wasn’t overlapping the blue, I painted it into the same layer as the blue for the notes (see Figure 10). Of course you can create another new layer, and then paint other areas, such as the bowling pin highlights, on separate layers.
 Figure 10: As often with improvisations, you don’t always do things the “right way.” So instead of starting a new layer to add highlights to the bowling pin, I just used the same layer as the blue notes. Since the colors didn’t overlap, it didn’t do any harm, but of course you can (and probably should) use a separate layer.
8. Reducing the Opacity of layers.
Another advantage to keeping different areas of color (and separate thoughts) on separate layers is that this allows you to adjust the Opacity of each layer separately. Try reducing the opacity of the Blue Notes layer by moving the Opacity slider (on the top right of the palette) to the left (see Figure 11). To replicate the Ingrid Lucia image, reduce the Opacity of the blue notes layer to 50%. When you rename this layer, make sure to include the Opacity of the layer.
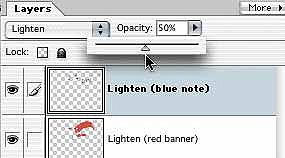 Figure 11: Keeping the blue notes on a layer separate from the bright red allows you to reduce the opacity of the blue separately from the red. To make a selected layer more transparent, move the Opacity slider to the left.
9. Creating separate layers for retouching.
With Photoshop there are a number of tools to help you retouch, such as the Healing Brush, Dust and Scratches filters. I often just use the Clone Stamp tool, which allows you to pick up areas of your image, and then paint over problems with the part of the image you picked up. For the Ingrid Lucia image, I used the Clone Stamp tool to retouch the ghoulish eyes, as well as the occasional white specs in the image.
Always use separate layers for retouching, so start by making a new layer. If you want to retouch using the Clone Stamp tool, when you are working on an image with multiple layers, you must enable the All Layers setting in the Options bar. Next, you need to specify the source (the part of the image you’ll be picking up to paint with). For instance, to retouch a spec of white, define the source as an area in the image next to the problem spot. To remove the ghoulish eyes, I chose as a source a part of the face I thought would work. To define your source, hold Option/ Alt and click on the desired area of your image. Then let go of the modifier key and move to the area that needs retouching (on your blank new layer), and paint with your source info (see Figure 12). If the first source doesn’t work, Undo and redefine the source (hold Option/ Alt and click on another spot), and then retouch the area again. You will most often work with the Aligned option disabled (also in the Options bar), so every time you start a new mark, you’ll be drawing with that original source portion of your image (with the Aligned option on, you will continue to redraw your entire image in the new location). At any time you can reset a new source area (click again with Option/ Alt down), as well as erase or Undo, as you work.


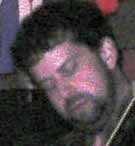
Figure 12: Top, the Clone Stamp tool (found in different spots in the Toolboxes of Photoshop and Photoshop Elements, and in different versions of Photoshop); middle, before applying the Clone Stamp tool; bottom, after applying the image after the retouching at this phase in the project.
That’s it for Part 1. To see the layered Ingrid Lucia image as it is at this point, you can right-click or control-click to download the image here. The next installment will show the final project layers, so stay tuned.
Part 2 of this project will continue next month, and will focus on additional ways to how transform photos. Techniques covered in the next article will include making flat copies of multiple layered documents, being creative when applying filters to your images, more coloring techniques using Blending Modes, and adding Type and Fill layers.
This article was last modified on January 3, 2023
This article was first published on September 9, 2003
Commenting is easier and faster when you're logged in!

Recommended for you

Intelligently Resize Images with iResizer
Content Aware Scale, which allows you to resize photos disproportionally without...

Creative Blöks: The Perfection Fairy
Each step you take on a creative path—whether you’re designing, drawing, or deve...

Top 5 Lightroom 5 Resources
It has been a week since Adobe announced the availability of the Lightroom 5 bet...