
A lot of photographers ask me why their pictures don’t look sharp. Answering them can be complicated, because you affect image sharpness by many decisions you make at all stages of the process — even before you take a photograph. And after you shoot a digital photo, image sharpness is affected by how you manage image contrast. The sharpening settings you apply in software are only the last link in that chain, so the focus of this article is about the steps up to that last link. Follow along and you’ll create a solid foundation for sharp images.
Shoot for Sharpness
Making the right decisions during the shot increases the chances that you’ll capture an image with as much inherent sharpness as possible. This greatly simplifies the sharpening process later.
Shoot with a High-Quality Lens. The lens affects image sharpness more than the camera and its sensor. When you buy a more expensive lens, superior sharpness is often what you pay for. If your budget makes you choose between a great lens and a great SLR body, buy a lens with a reputation for sharpness and spend less on the body.

On the left, the front knobs are not sharp, because the focus point was on the knobs one row back. On the right, manually setting the focus point on the front row of knobs ensured they were sharp.
Stay Focused. No matter what lens you’re using, you can achieve optimal sharpness only when you focus the lens accurately. If focusing isn’t accurate, you get focus blur.
Understand how to use your camera’s viewfinder display to identify which part of the image the camera has in focus, and know how to use your camera’s focusing controls to override it. Few of us look at manuals, I realize, but this is a good time to start.
Your camera may also have a choice of autofocus modes. Typically the default mode is best for still subjects, while it might be better to shoot moving subjects with a different autofocus mode designed for tracking subjects in motion.
Keep Still. When the camera moves or the subject moves, you can end up with motion blur. To avoid it, use a shutter speed high enough to freeze the subject. In low light, you may have to use a low aperture value (a wide aperture) and a slow shutter speed, both of which make focus blur and motion blur more likely. If you can’t steady the camera with a tripod, try increasing the ISO speed setting. While raising the ISO speed can add image noise, today’s better cameras can shoot surprisingly clean images at high ISO speeds.

The photo on the left isn’t sharp because of camera movement. The photo on the right is sharper because I stabilized the camera.
If your camera or lens has an image stabilization or vibration reduction mode, turn it on. This feature cancels out camera shake, minimizing motion blur at slower shutter speeds — but only if you’re the one moving. If the subject is moving, image stabilization won’t help.
It’s vitally important to minimize focus blur and motion blur in the camera because both types of blur essentially waste pixels you paid for. If you’re proud of your camera’s expensive 21-megapixel sensor, but mis-focusing or motion blur smears a four-pixel-wide image detail across eight pixels of the sensor, you’ve cut your camera’s effective resolution in half. That’s lost detail you’ll never recover.
If you shoot in raw mode, keep in mind that the sharpness of the image straight out of the camera depends on the sharpening settings in your raw converter. Raw images (and scans) may need an initial round of capture sharpening, described in the article “Thoughts on a Sharpening Workflow.”
Optimize Image Contrast to Simplify Sharpening
After you copy photos from your memory card to your computer, image sharpness is no longer about optics or camera handling. From now on, it’s all about contrast.
When you see a sharp edge in an image, it’s because the difference between dark and light — that is, contrast — is higher along that edge than in other areas. When you apply a sharpening filter in a program such as Photoshop, you boost contrast only along edges, creating the illusion of heightened sharpness. But it isn’t just edge contrast that affects whether you perceive an image to be sharp. Every adjustment that affects overall contrast contributes to what looks like sharpness. You can apply contrast to the entire image, to specific tonal ranges within the image, and to specific areas. This hierarchy of contrast is easier to show than to describe, so read on.
Shape the Tonal Range to Enhance Details
Sharpening will be more effective if you first enhance the definition of image details by adjusting the photo’s tonal range. You may already know about the following techniques from the point of view of overall image quality, but they’re also important in laying down a proper foundation of contrast for later sharpening.
Set a proper black point and white point. Setting the darkest and lightest tones in the image is the first stage in affecting how much an image pops. In Photoshop CS3 and CS4, you do this by dragging the black and white triangle sliders in the Levels or Curves dialog box or panel (in Photoshop CS2 or earlier, the sliders are in Levels only). In Adobe Lightroom and Adobe Camera Raw, the black point is controlled by the Blacks slider and the white point is controlled by the Exposure slider. In all cases, you can Option-drag (Mac) or Alt-drag (Windows) a slider to preview which tones are clipped.

Drag the black point and white point sliders at the bottom of the histogram to define the initial tonal range and contrast level.

The black and white point settings in the Photoshop CS4 Curves Adjustment panel.
Now, I’m definitely not saying that adjusting the black point and white point is an actual sharpening technique, because it doesn’t directly affect the edges within the image. But it does demonstrate that what we perceive to be sharpness is ultimately about contrast, even at the macro level.
Now we’ll look at enhancing image contrast at finer levels until we get to the image details themselves.

Fine-tune the tone curve to optimize contrast for specific tonal ranges.
Shape the Tone Curve for Details. The next level of contrast adjustment involves shaping a tone curve, which lets you boost or cut contrast in specific ranges of tones. If you want to make certain image details more distinct and you can isolate that part of the image by tone, steepening that part of the tone curve will help differentiate image details in those areas. Again, while this is not strictly sharpening, the improved tonal separation creates a better foundation for sharpening.
In Photoshop CS4, create a new Curves adjustment layer by clicking the Curves button in the Adjustments panel. In Photoshop CS3 and earlier, click the Create New Adjustment Layer button at the bottom of the Layers panel and choose Curves. To increase contrast within a specific range of tones, click two points on the curve where that tonal range begins and ends, and drag the points to steepen the curve there.
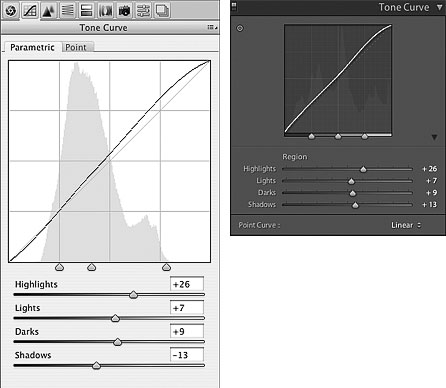
The Tone Curve features in Adobe Camera Raw on the left, and Lightroom on the right.
In Camera Raw, click the Tone Curve tab to view the Parametric curve. In Lightroom, use the Tone Curve panel in the Develop module. In both programs, drag horizontal sliders that control four segments of the tonal range. In Camera Raw, you can edit the curve as in Photoshop by clicking the Point tab.
Enhance Local Contrast
Earlier, I said that sharpness is ultimately about contrast. More specifically, sharpness is ultimately about local contrast. Unlike a tone curve, which lets you adjust contrast among different ranges of tones within an image, a local contrast adjustment affects areas of tones within an image. When you boost local contrast, you boost the difference between all adjacent dark and light areas in the image. Boosting local contrast is useful when a tone curve that helps in one area kills contrast in another important area, or when you’re trying to compensate for a cheap lens. (One of the ways in which more expensive lenses produce sharper images is by rendering superior local contrast.)
Because local contrast is a fundamental component of sharpening, the way you control local contrast in Photoshop is by applying the Unsharp Mask or Smart Sharpen filters. However, you use different values than those you’d use to sharpen details.
The basic technique is simple: Set a high Radius value and a low Amount value compared to those you would use for sharpening edges. These values provide a subtle contrast boost in areas extending some distance from the edges of image content, instead of at edges as in normal sharpening. (In normal sharpening, the Amount is closer to 100% and the Radius is closer to one pixel.) The Radius value controls how far from an edge the contrast boost is applied.

Boosting local contrast brings out details even more.
Local contrast changes are most effective in the midtones. You may want to keep local contrast adjustments from affecting highlight detail. If you’re using Smart Sharpen in Photoshop, click the Advanced button, click the Highlights tab, and increase the Fade amount. If you use Unsharp Mask, after applying the filter, double-click the layer thumbnail in the Layers panel, and in the Layer Style dialog box, drag the white Underlying Layer slider to the left to hide the effect of the layer from the highlights. Option-drag (Mac) or Alt-drag (Windows) one half of the white slider to split it, feathering the transition.

The Blend If controls in the Layer Style dialog, set to lessen the effect of the local contrast edit on the highlights in the image.
In Camera Raw and Lightroom, controlling local contrast is much simpler. Just increase the Clarity value. Applying Clarity is like applying the high-Radius/low-Amount technique above but includes automatic protection of image quality so that there’s much less need to manually protect highlights.
Notice how much clearer the image details now appear, even before you’ve applied any traditional sharpening settings.

On the left, the final image after applying Unsharp Mask for screen display; on the right, the same amount of sharpening applied to the starting image but with none of the contrast adjustments.
And Finally, Ready for Sharpening
If you’ve performed the previous steps correctly, you should have images that respond easily to the sharpening features in Photoshop, Camera Raw, Lightroom, and other image editors. Here’s the final image after sharpening was applied, compared to the same amount of sharpening applied to the image in the beginning where no contrast optimization was applied. You can see that manipulating contrast contributed as much to better definition of image details as sharpening did.
For best results, combine the ideas in this article with the three-stage sharpening workflow advocated by the late Bruce Fraser in one of his CreativePro.com articles.
If you want to dive deep into the sharpening controls in Photoshop, Camera Raw, and Lightroom, I recommend the upcoming Real World Image Sharpening with Adobe Photoshop, Camera Raw, and Lightroom (2nd Edition) by Bruce Fraser and Jeff Schewe.
Conrad Chavez is the author of Real World Adobe Photoshop CS4 for Photographers.
This article was last modified on January 5, 2023
This article was first published on June 18, 2009
Commenting is easier and faster when you're logged in!

Recommended for you
Working with Illustrator’s Color Libraries
Illustrator has more options for adding colors to a document than just mixing co...

Photoshop How To: Retouch Eyes With Photoshop CS6
When it comes to portrait retouching, a person’s eyes can be the most impo...

Compositing a Scene into a Head in Photoshop
However much you may toy with people’s expressions using the Liquify filte...