


Our colleague and contributor Pariah Burke came up with this fun trick (works in CS2 and CS3) for making transparent text in the article he and Anne-Marie wrote in the last issue of InDesign Magazine.
First, make a sandwich: Background image in back, then a frame with a fill of some color (such as Paper), then a text frame on top.

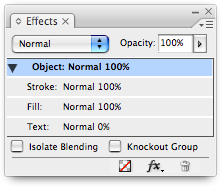
Select the text frame with the Selection tool and, in the Effects panel, set the Text Opacity (not the Object opacity!) to zero percent. The text will disappear. Don’t panic.
Group the text frame and the opaque colored frame together (Object > Group).
Turn on the Knockout Group checkbox in the Effects panel and you’re done!
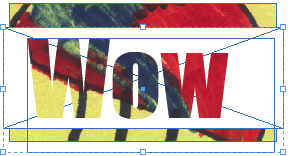
Of course, you can easily go back and change the size of the opaque frame, or change its blending mode, or whatever. For example, here I’ve used the Direct Selection tool to make the frame larger (so that it covers the background image), then set its Opacity to 80% and its blending mode to Screen.

Note that you don’t have to use a separate colored frame. You can do this same effect with two frames: The background image and the text frame. Just set the background color of the text frame to Paper (or whatever color you want), change the opacity of the text, and then turn on Knockout Group. It still works, even though the “group” is just one object. But I don’t find this as useful because it’s hard to position the text inside the frame properly.
Of course, Branislav Milic also came up with another great way to do this using the Registration color and the Lighten mode in CS2, which he also wrote up for InDesign Magazine a year or so ago. But hey, we’re in CS3 now and this is sweet, easy, and flexible.
This article was last modified on December 18, 2021
This article was first published on April 26, 2007
Commenting is easier and faster when you're logged in!

Recommended for you

Sound Advice: Thinking in Audio
Good audio in a video or film isn’t a theoretical, feel good, groovy sort...

Spellchecking Tracked Changes
Here’s an obscure InDesign fun fact related to spell checking: sometimes y...

Creating Custom Shadows in Photoshop
Learn how to create shadows that add a whole new layer of meaning to a photo.