
Creating Org Charts in InDesign
With the Gridify feature and two key paragraph style settings, you can create org charts in a flash!


This article appears in Issue 137 of InDesign Magazine.
Organizational charts—or org charts, for short—are critical to nearly every competitive project pursuit. Among the myriad of requirements marketers address in each project submittal, org charts can be one of the most frustrating and time-consuming tasks on your list.
But here’s a secret: They don’t have to be.
Read on to explore the auto-mated org chart process and how to create a chart like Figure 1 in just seconds—yes, seconds!

Figure 1. The basic org chart. How long does it take you to create one of these?
Step One: Create Object and Paragraph Styles
Creating object and paragraph styles are key to your org chart wizardry. Let’s start with the Object Styles panel (Window > Styles > Object Styles). For this example, you’ll need to create two new object styles: Org Chart Box and Org Chart Line.
In the Object Styles panel, press the Option/Alt key while you click the plus sign in the bottom right of the panel to create a new style and open the Object Styles Options dialog box. Name this style Org Chart Box, base it on [None], and change the following attributes from the area on the left side of the dialog:
- Fill: [Paper]
- Stroke: Black; Weight: 0.5 pt
- Size and Positions Options: Size: Adjust: Width Only: 2.1875 in
- Text Frame General Options: Inset Spacing: 0.0625 in for all four sides; Vertical Justification: Align: Top
Next, for the Org Chart Line object style, simply create a new style and apply a black stroke with a weight of 0.5 pt.
Now, you’re ready for the real magic: paragraph styles. Before I design any long document or proposal in InDesign, I create two
master paragraph styles: Body and Header. I style Body with the main text content attributes that reflect my brand—in this case, Proxima Nova 11-pt Regular. The Header style reflects the headers and subheads throughout the document, generally styled in a typeface that complements the Body style. In this example, I chose Acumin Pro ExtraCondensed. (Both of these fonts are available as Adobe Fonts, so go ahead and grab them if you like!) Every other paragraph style in the document is based on one of these two styles or is based on a style that is based on one of the master styles. By using this method, you have complete flexibility when it comes to future typeface changes, such as responding to a Request for Proposals that requires you to use Times New Roman or Arial.
Once you have your Body and Header styles, it’s time to create two new paragraph styles to indicate the two data points in each org chart object frame as illustrated in Figure 1. These are Org Chart Role and Org Chart Name.
To create the Org Chart Role paragraph style, Option/Alt-click the plus sign at the bottom right of the Paragraph Styles panel. Name the new style Org Chart Role and choose Header in the Based On menu. Next, set the following attributes:
- Basic Character Formats: Size: 14 pt
- Indents and Spacing: Alignment: Center
- Paragraph Rules: Choose Rule Below in the menu and select Rule On; Weight: 3 pt; Color: [Black]; Tint: 50%; Offset: 0.0625; Left Indent: –0.0625; Right Indent: –0.0625
- Paragraph Shading: Color: [Black] Tint: 100%; Offsets: Top, Left, and Right: 0.0625, Bottom: 0.0325
- Keep Options: Start Paragraph: In Next Frame (Figure 2).
- Character Color: [Paper]

Figure 2. Selecting the In Next Frame option automatically places this paragraph in the next threaded text frame. This is the key to getting the automation to work.
Next, create a new paragraph style named Org Chart Name, and base it on Body. In the Next Style menu, choose Org Chart Role. Then set the following attributes:
- Basic Character Formats: Font Style: Bold
- Indents and Spacing: Alignment: Center
- Character Color: [Black]
After that, edit the Org Chart Role style by right-clicking it in the Paragraph Styles panel. Choose Org Chart Name in the Next Style menu.
Beyond creating paragraph styles, we added two key features:
- A Next Style loop from Org Chart Role to Org Chart Name back to Org Chart Role and so on. This loop could go on forever (or until InDesign runs out of text to format).
- An automatic column break. In the Org Chart Role style, the Keep Options: Start Paragraph: In Next Frame (or In Next Column) attribute automatically places that paragraph style in the next threaded text frame of a story.
Step Two: Gridify for the Win
Now I bet you’re wondering, “How do I quickly create a bunch of threaded text frames?” The answer is to use Gridify. It allows you to tap the Right and Up Arrow keys on your keyboard to create multiple frames in a tidy grid. Gridify works when you’re drawing frames with the Rectangle Frame tool or the Rectangle tool, but it’s even more powerful when you use the Type tool because it automatically threads the text frames from left to right, and top to bottom. That’s right: You can use the Type tool to create multiple frames at once!
Using the Type tool, click to drag a frame from the left margin to the right margin, roughly five inches tall. Before you let go of your pointer, press the Right Arrow twice and the Up Arrow three times… and then release. If you did the finger ballet right, you should now have a three-column, four-row grid of threaded text frames (Figure 3).
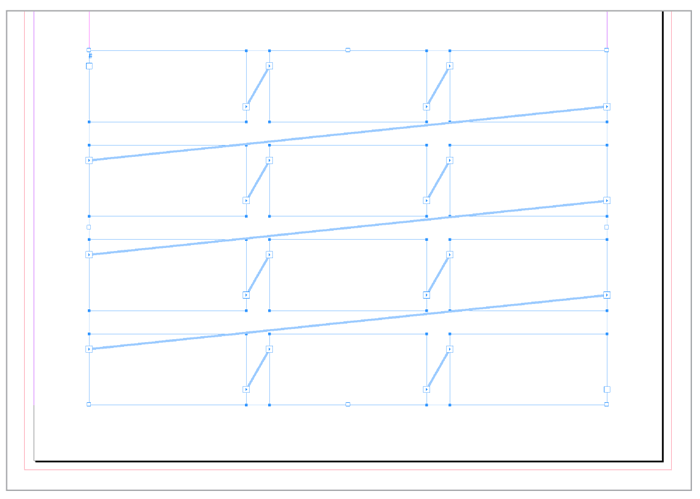
Figure 3. With the Type tool, draw a frame, but before releasing, press the Right Arrow twice and the Up Arrow three times to create a 3 × 4 grid.
To create the structure of the org chart in the example above, delete the top-middle frame as well as the left and right frames on the second row (Figure 4).

Figure 4. This is where the chart begins to take shape! Don’t worry about the threading. As you delete unnecessary frames, the others stay threaded.
Using the Selection tool, select all of the frames and assign the Org Chart Box object style to the whole group.
Now, place your text. The text should be in a paragraph- separated list with the role followed by name followed by role… and so on. Notice how it automatically threads through the frames (Figure 5). Beautiful, isn’t it?

Figure 5. The text automatically threads through the text frame grid.
Next, return to the Type tool and select all of the text with Command/Ctrl+A. Right-click the Org Chart Role paragraph style and choose Apply Org Chart Role then Next Style. Boom—the hard part is done (Figure 6)!

Figure 6. Be sure to Apply Org Chart Role then Next Style.
The Org Chart Role style automatically gets pushed into the next threaded text frame thanks to the In Next Frame attribute we selected in Keep Options earlier.
To fit the frames to the text, use the Selection tool to select all of the frames, then use the shortcut Command+Option+C/ Ctrl+Alt+C.
If you want to adjust the spacing between the columns of frames, select all the frames with the Selection tool, click and hold one of the side handles, then press Option/Alt+spacebar, and drag left or right. Similarly, if you need a little more space between each row of frames (you probably will to fit the lines), again select all the frames with the Selection tool, then click and hold on the bottom-middle handle, press Option/Alt+spacebar, and drag down. In both cases, be sure to release the drag before you let go of the keys.
Now to connect the boxes: We need to draw lines of authority and communication from each frame to the Project Manager. If you don’t want to manually join lines to craft the “trees” for the bottom two rows, use this handy hack: Draw a rectangle with the Rectangle tool and assign the Org Line object style. With the Direct Selection tool active, deselect the frame, click the bottom line, and press Delete (Figure 7).
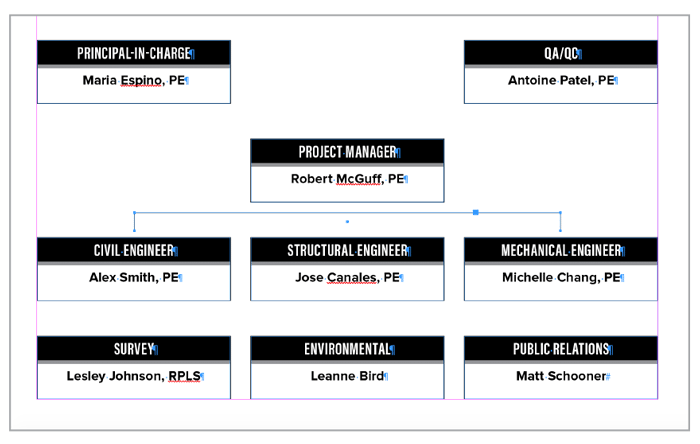
Figure 7. By starting with a rectangle, you can make easy work of creating the connecting lines.
Press Option/Alt and drag the tree to duplicate it. Draw the remaining lines, and you’re done (Figure 8)!

Figure 8. The finished org chart is a thing of beauty.
Bonus tip: Save your styles in a CC Library or as an InDesign file that you can load into your next InDesign project. Now you can work your org chart magic anytime you want!
Commenting is easier and faster when you're logged in!

Recommended for you

InDesign Magazine Issue 60: The Color Issue
We’re happy to announce that InDesign Magazine Issue 60 (April, 2014)...


InDesigner: San Francisco Bay Brand
How consistent design and efficient processes make for a successful product pack...