
Creating Custom Brushes in Illustrator
Using custom brushes with the Paintbrush, you can quickly create highly detailed artwork—whether you need to draw from scratch or apply embellishments to existing paths.

This article appears in Issue 2 of CreativePro Magazine.
In my recent article at CreativePro.com about Illustrator’s Paintbrush tool, I noted that its true power comes from the brushes it can use. Using custom brushes with the Paintbrush, you can quickly create highly detailed artwork—whether you need to draw from scratch or apply embellishments to existing paths. Let’s look at how to make your own custom brushes and get the most out of them.
Starting Out
Reveal the Brushes panel by choosing Window > Brushes. The + button at the bottom is for creating new brushes, or you can choose New Brush from the panel menu (Figure 1).
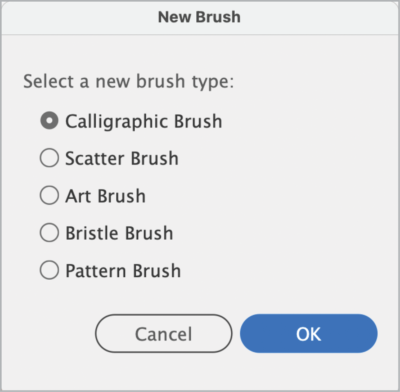
Figure 1. The five types of custom brushes you can create in Illustrator
- Calligraphic brushes enable you to draw and apply lines with rounded or angled strokes. These work particularly well in conjunction with a pen tablet for creating hand-lettering.
- Scatter brushes distribute copies of a pre-made object along a path. They’re great for designs depicting a multitude of items, such as foliage or confetti.
- Art brushes stretch a single shape along a path. The beginnings and endings can be fixed so they remain proportional. These are well suited for brushstrokes that simulate charcoal, chalk, or ink.
- Bristle brushes create brush strokes with multiple bristles using 10 preset shapes that are each fully configurable. These brushes impart a natural media look to your artwork.
- Pattern brushes also distribute artwork along a path like Scatter brushes, but with more control. These brushes use individual tiles with optional separate designs for corners, beginnings, and endings. Pattern brushes are great for making borders.
As you create new custom brushes, Illustrator saves them with your document, so they remain available to someone else who opens your file on a different computer.
A Showcase of Brushes from the Libraries
Illustrator’s libraries offer many brushes in every category. Using these is a great starting point for exploring how brushes behave and how their settings work. Here are some of my favorites.
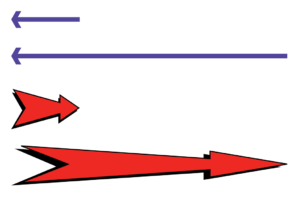
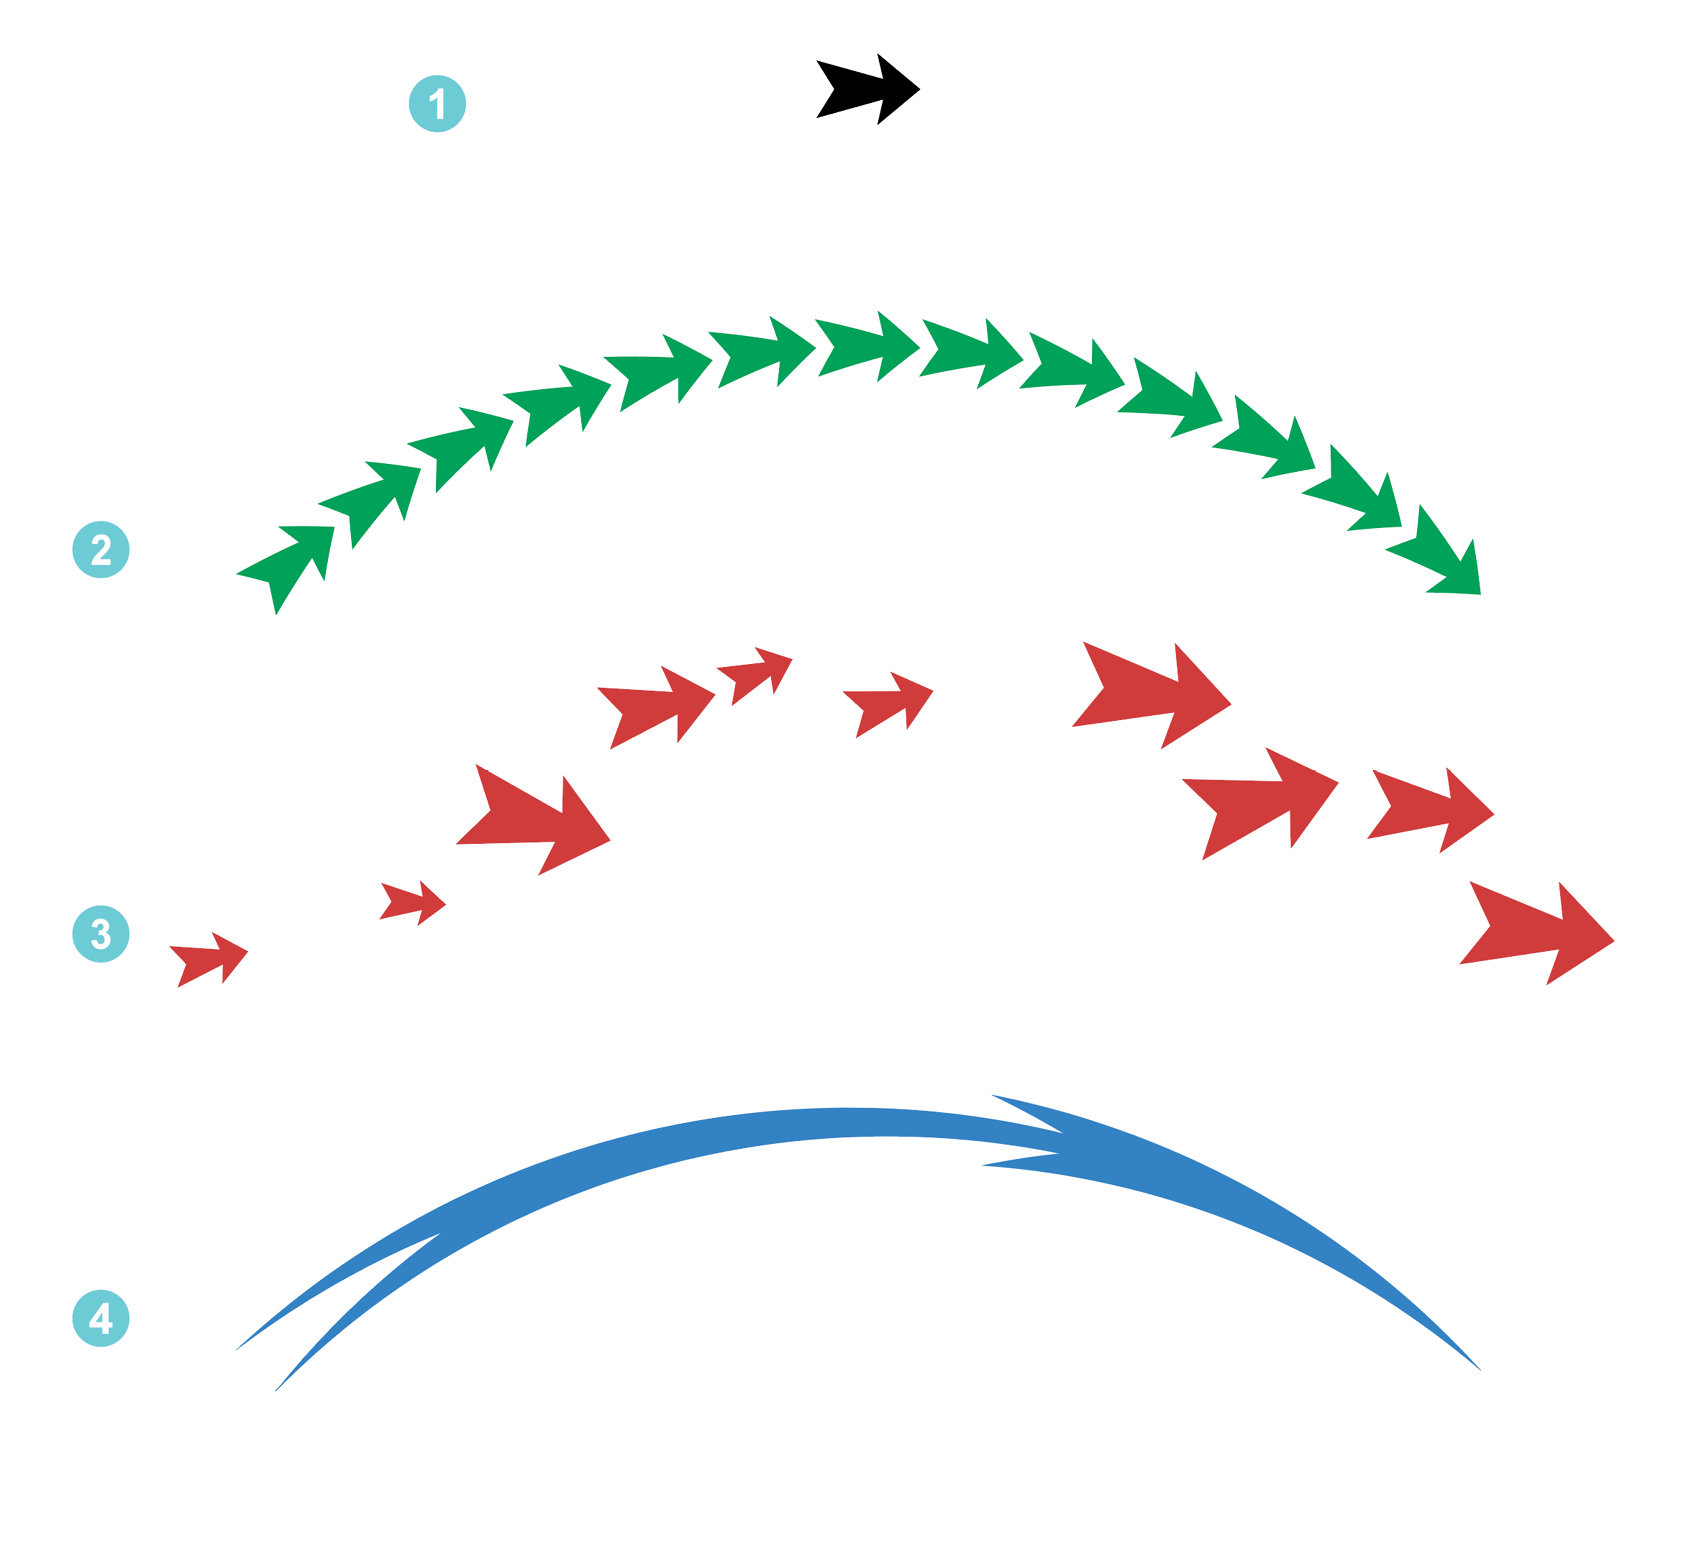
- Arrows: Standard and Special: Arrows are useful for diagramming and annotating artwork. Most of the brushes in these libraries are built as Art brushes. Some maintain their appearance regardless of a path’s length or weight, while others stretch or resize proportionally. This makes arrows great for exploring brush scale options (figure 2).
- Artistic Brushes: The Artistic Brush libraries are diverse. The first set are Calligraphic brushes, and I load these regularly to use the Flat brushes for handwriting. The second library includes 19 Art brushes simulating marks from chalk, charcoal, and pencils. Then there are ink, paintbrush, scroll pen and watercolor brushes. I love using brushes that simulate softer media like chalk and watercolors to create natural-looking backgrounds (figure 3).

- Bristle Brushes: The Bristle Brush library contains 14 brushes. To see how a Mop brush differs from a Deerfoot, or what a Stippler stroke looks like, simply start painting (figure 4).

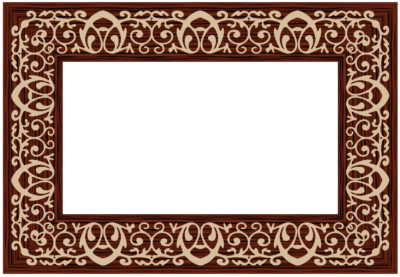
- Borders: The seven Border libraries showcase the power and beauty of pattern brushes. Try overlaying two identical rectangles and assigning different borders to each to create unique combinations. Border brushes are also great for experimenting with tints and shades, so you don’t have to settle for the given colors (figure 5).
- Decorative Scatter Brushes: It’s a lot of fun to play with this library in the Decorative category. Who doesn’t love adding confetti and stars to their artwork? Apply the Star 1 brush to a simple path (set the Brush panel to List view to find it easily), and you’ll see what a very random scatter looks like. Click the brush repeatedly and watch the results (figure 6).

Creating Calligraphic and Bristle Brushes
Let’s start with two brush types that don’t require pre-made artwork. You’ll find all the brush configuration options in the dialog boxes that appear after you select New Brush and choose either Calligraphic Brush or Art Brush.
Calligraphic brushes
Calligraphic brushes are perfect for artists who love drawing, writing, and lettering with pens that offer an endless choice of nibs. The options for Calligraphic brushes (Figure 7) let you set the Angle, Roundness, and Size of the brush. In the Brush Shape Editor area of the Calligraphic Brush Options dialog box, you can click or drag to set the Angle (hold Shift to constrain to 15° increments) and/or drag the small black dots to set the Roundness.
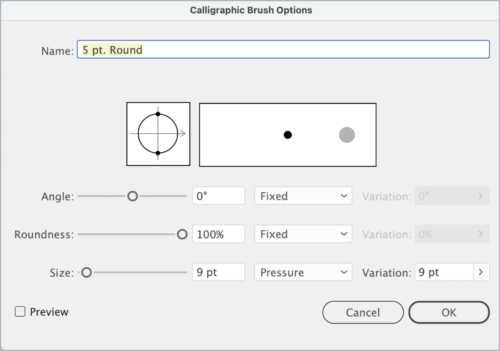
Figure 7. Calligraphic brush options
Bristle brushes
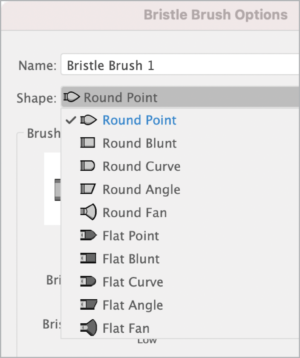
Figure 8. Bristle brush shapes
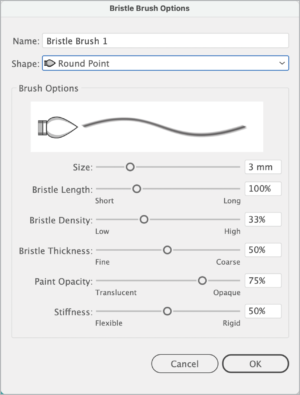
Figure 9. Bristle brush options
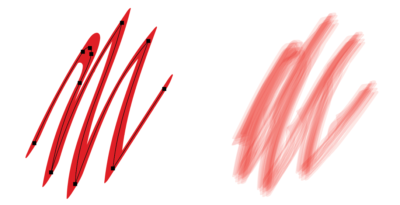
Figure 10. Two identical paths, one with a Calligraphy brush applied (left) and the other with a Round Fan Bristle brush (right). Stroke color is also the same for both, but the Bristle brush has a lowered opacity value.
Brushes Based on Artwork
You will need a path or object to create one of the next three brush types: Scatter, Pattern, and Artwork. You can use multiple paths with any solid color fills and/or strokes, but gradients and patterns won’t work. Both vector artwork and embedded (not linked) raster images can serve as the basis for one of these brushes. You can also use text that has been converted to outlines. To create one of these brushes, start by selecting your artwork and choosing New Brush or by dragging the artwork directly into the Brushes panel.
Scatter brushes
You can magically paint with a multitude of shapes—precisely or randomly—using a Scatter brush. The Size, Spacing, Scatter, and Rotation values can be fixed, or they can vary (Figure 11). When you choose any of the options for varying the brush (Random, Pressure, Tilt, and so on), you can set ranges with maximum and minimum values. In addition, you can set the scattered artwork’s rotation relative to the page or the path. The Path option makes scattered artwork directional. Again, to get a sense of how to combine all the options to make the look you want, you need to spend some time playing around with them (Figure 12).
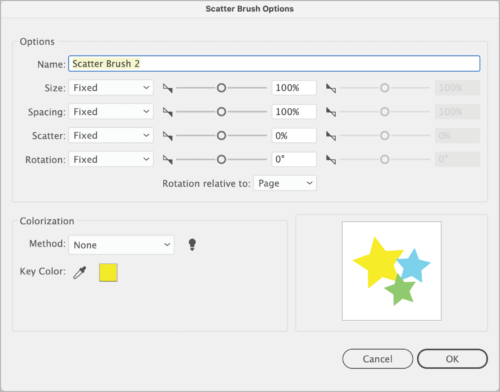
Figure 11. Scatter brush options

Figure 12. A Scatter brush applied along a path and the settings used to make it
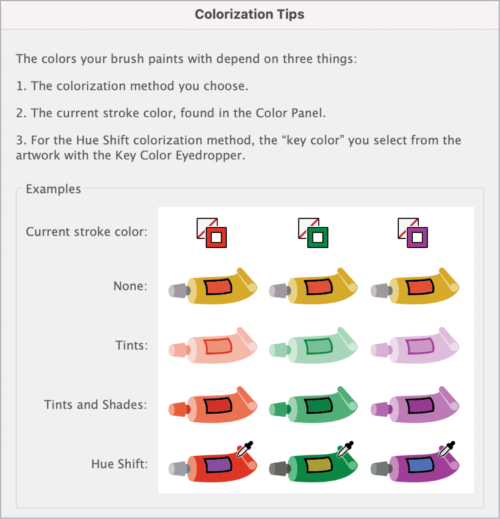
Figure 13. Colorization tips for brushes based on artwork. The brush thumbnail of your selected artwork appears in the lower right of the Options dialog box and cannot be modified. There is no live preview, so save your brush and try it out.
Pattern brushes
There is no better brush for borders and ornamentation than a Pattern brush, as it lets you paint with repeating tiles while offering a variety of appearance options for corners. Start creating a new Pattern brush with your selected artwork by setting the Scale and Spacing options at the top of the dialog box (Figure 14). Below that, you’ll find a row of five sets of controls for the various pattern tiles. The main pattern tile used by the brush is second from the left; it’s the artwork you selected when you started. The remaining tiles are optional for inner corners, as well as the beginning and ending of the path.
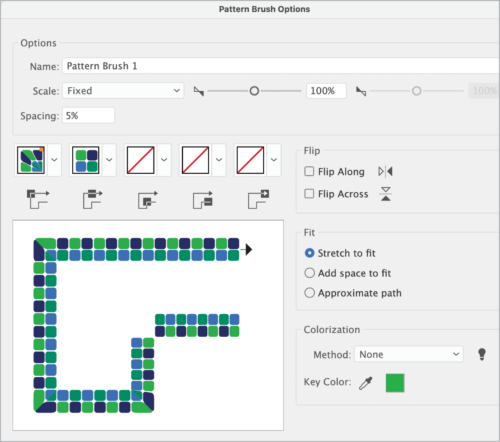
Figure 14. Pattern brush options
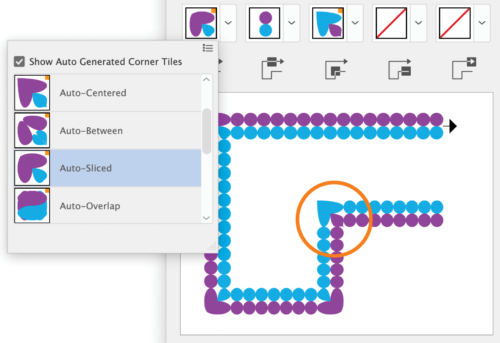
Figure 15. The auto-generated corner tile options, shown from the outer corner tile’s menu. The inner corner (circled) is set to Auto-Centered.
Art brushes
For ultimate control over the appearance of a stroke, create an Art brush from anything you can draw or scan. As for Pattern and Scatter brushes, you can use any selected artwork in your document to make Art brushes. Because the strokes they produce stretch the art along a path (see the sidebar “How Brush Types Affect Your Artwork”), however, they work particularly well when you start out with a linear shape (Figure 16). This can be a mark you create directly in Illustrator.

Figure 16. Art brush options
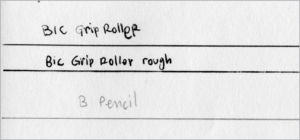
Figure 17. Pen and pencil lines drawn on paper and scanned

Figure 18. Word written with an Art brush, created from the scanned pen line that Illustrator auto-traced in one color
Bonus Tips
Here are a couple extra tips to enhance your experience with custom Illustrator brushes.
Create a multicolor brush
After creating or applying a brushstroke to a path, you can drag it into the Brushes panel and create another brush. You heard that right: You can build custom Scatter, Pattern, and Art brushes with artwork to which other brushstrokes were previously applied. Using brushstrokes to build other brushes enables you to create complex, unique images. With this technique, you can create a multi-colored brush. Here are the steps:
- Draw several straight brushstrokes with Art brushes.
- The Artistic_Paintrush library included with Illustrator has a number of good brushes for this purpose. Access it from the Brushes panel menu by choosing Open Brush Library > Artistic > Artistic_Paintbrush.
- Apply different colors to the strokes.
- Move the strokes close together, stacked however you like.
- Select all and create a new Art brush. Set the options, save the new brush, and try it out! (Figure 19)
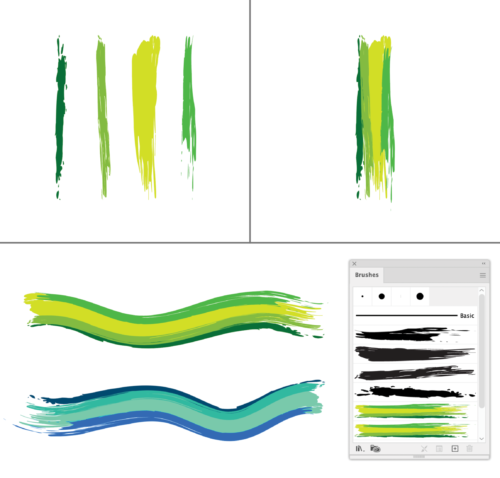
Figure 19. Steps 1 and 2 for creating a multi-color brush (top); the result (bottom), also showing a copy of the brush modified with Colorization Method set to Hue Shift
How to share custom brushes via CC Libraries
Given Adobe’s focus on getting users to adopt Creative Cloud services into their workflows, you wouldn’t think it would be difficult to add and share a custom brush via a CC Library. And in truth, it’s not hard, but it is obscure, because you can’t add brushes directly to a Library. Simply dragging or choosing Place Linked will not add the object’s brush to the Brushes panel. Instead, you need to drag an object with the brush applied to a CC Library. To access the brush in a new document, right-click the Library item and choose Place Copy (or Option/Alt-drag to the artboard). Note that this also adds any color swatches used in the brush to the document’s Swatches panel.
Brushing Up
With five types of brushes at your disposal, and many options for customizing them, you can draw, paint, and decorate in any style. Create your own brushes, explore the brush libraries and don’t be afraid to modify the brush options. Remember that brushes and their modifications are saved with your document, and you can share them in CC Libraries or as brush library files. Go forth, and brush up your artwork!
Commenting is easier and faster when you're logged in!

Recommended for you

Image Tracing in Illustrator
How to use Image Trace in Adobe Illustrator to convert pixel-based images into v...
How to Use Illustrator’s Star Tool
Learn how to make stars and starbursts using Illustrator's appropriately named S...
Meet the Neo SmartPen: A New Way to Draw
As an artist who specializes in combining traditional and digital tools, I’m alw...