
Creating a Cookbook with InDesign
Chad Chelius reveals his recipe for efficiently producing distinctive cookbooks.


This article appears in Issue 73 of InDesign Magazine.
Humans have always had an infatuation with cookbooks. Almost as far back as the invention of the printed word, you’ll find cookbooks in all their sticky, stained, and dog-eared glory. My parents and grandparents have stacks of cookbooks containing pages with folded corners marking their favorite recipes for easy access the next time they want to make that particular dish.
In this InStep, we’ll detail the process of creating a cookbook.
But first, let’s ask the question: What exactly makes a good cookbook? Aside from a pleasing design and good recipes, a cookbook has to be easy to read so information can be obtained at a quick glance. And if you can’t prop it up or lay it flat on your countertop, it’s not functional. So above all else, choose a layout and size that is functional. Avoid compact layouts and small trim sizes.
Cookbooks also contain a lot of measurements, and here in the United States, that means a lot of fractions. So it’s important to choose a font that is easy to read and that contains plenty of well-designed fractions. Start by picking your preferred font, and then check to see if it’s available as an OpenType font, as they contain extended glyph sets. Sometimes I’ll begin my font search by filtering my fonts to displaying all OpenType fonts and then going from there. Adobe’s Typekit service is a good resource for OpenType fonts.
To Whet Your Appetite
Here’s a look at what we’re cooking up. Each recipe in the body of the cookbook will be a two-page spread, with a full-page photo of the completed dish on the left, followed by the description, ingredients, and steps on the facing page. To accomplish this, we’ll make use of master pages, styles, text
variables, OpenType font features, and more.

Best of all, you can click here to download a template for this cookbook project that you can open with InDesign CS4 or later and adapt to your needs.
1. Set up master pages
Begin by creating a document configured for the size of your cookbook. Set up your margins, bleeds, and columns for the general structure of the cookbook. Create as many master pages as you’ll need to efficiently format the different page types you’ll be using. Cookbooks can have a lot of pages and categories, so you want InDesign to do as much work for you as possible.

You can see in the figure above that I’ve configured three master pages. First, a “base” master containing all of the elements common to every page—in this case, the page numbers. Then, I created a master for the chapter or section opener and one for the interior pages, both based on the A-Base page. I might need more as I build my cookbook, but InDesign makes it easy to apply master pages to any or all pages in a book later on. The less manual formatting you need to do, the better. In this cookbook, I made sure to enable the primary text frame on each of the master pages so the pages will easily adapt to the look of any master page I apply to them.
2. Create styles
Add all the styles that you’ll be using in the cookbook. My templates usually begin as a test document of sorts, where I’ll experiment with headings, subheads, fonts, sidebars, and other elements. As I’m experimenting, I’ll create styles that will be used throughout the cookbook. This includes character styles for bold, italic, and bold italic—you know you’ll need them at some point. After the styles have been created, delete any extraneous text from the document to keep it clean.
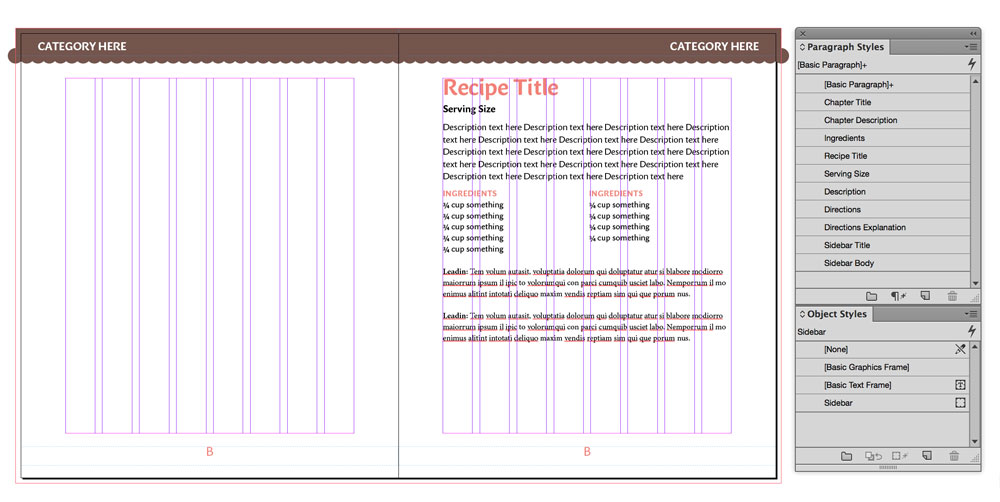
There are several options in InDesign’s text styles that can be particularly useful in cookbook production. The first one you’ll notice in this design is the Span Columns feature, which is used with the Ingredients paragraph styles.
Most cookbooks list recipe ingredients in multiple columns to avoid wasting a lot of space on the page. But the description and steps are usually in one column. The best solution to this problem is to enable Split Columns in your Ingredients style(s).
In the Paragraph Layout menu, choose Split Columns, and then the number of sub-columns and spacing that you want. This way, you can set the whole recipe in one text frame, and just the ingredients will automatically flow in multiple columns.


As I mentioned earlier, another common issue with cookbooks is fractions. You should definitely adopt a strategy for efficiently making good-looking fractions, since almost every list of ingredients (especially in baking recipes) will include at least one fraction.
Most professional quality OpenType fonts have at least some fraction glyphs for common fractions like ½, ¾, and so on.

But what do you do when you need an uncommon fraction like 3/10? You could use the fractions feature of an OpenType font. Some fonts contain special glyphs of numbers specifically sized and scaled to be numerators and denominators, as well as the fraction bars to separate them. This allows you to build up any fraction, simply by typing the fraction in normal text, selecting it, and choosing Open Type > Fractions from the Control panel or Character panel menu.

Quick Conversion Help
Need to convert Fahrenheit to Celsius? Ounces to milliliters? Just search Google for the term “unit converter.” At the top of the results window you’ll see pop-up menus where you can choose the type of conversion (temperature, mass, volume, etc.), and enter the number you need to convert.

The main problem with making fractions this way is that they are not supported by most e-reading devices. So your beautiful fractions will not look so beautiful (in fact, they’ll look downright ugly) in an EPUB.
A third method that will create fractions that do work in EPUBs is to use Dan Rodney’s script, Proper Fraction 2. The Pro version costs US$70, but it will save you so much time that it will pay for itself over the course of producing just one cookbook.
For more about creating fractions for ebooks, check out Anne-Marie Concepción’s article “Fixing OpenType Fractions in FXL” in InDesign Magazine issue 67.
3. Add text variables
If you really want to save time and avoid forgetting to add the appropriate header information to a page, take advantage of text variables in InDesign. I’ve designed this cookbook so that each section starts with an intro page displaying the name of the section (Meats, Vegetables, Desserts, Appetizers, and so on) and I want the name of that section to appear at the top of each page in that section. You could of course create a master page for each section (and each variant of the section), but text variables allow you to set up the document more efficiently. In order for text variables to work, you need to use styles to format the text in your document.
Choose Type > Text Variables > Define to open the Text Variables dialog box. Click the New button to create a new variable, and give the variable a name. I called mine “Cookbook Header,” but you can use any name that you wish. Choose Running Header (Paragraph Style) from the Type drop-down menu, and in the Style drop-down menu, choose the style that contains the text that you wish to repeat on every page (in the example here, the style is called Chapter Title), and click OK. That completes the first part of using text variables.

The second part to using text variables is to insert the variable where you want it to appear on the page. In this example, I’m inserting the variable on my B-Interior master page, which is used for the majority of the pages in the cookbook. Place your cursor where you want to insert the variable, and choose Type > Text Variables > Insert Variable > Cookbook Header.

4. Create a template
Choose File > Save As, and choose InDesign Template from the format menu at the bottom of the dialog box. This template provides the foundation for all documents that will become a part of the cookbook. Remember, each chapter of the book will be its own document. When you open the template file, a new untitled document will be created containing all of the elements that you put into it, giving you a jump-start on the formatting and layout for each chapter.
It’s not important that you get everything perfect in the initial template. You just want a solid foundation that will be used to produce the rest of the book. We’ll use the Book panel to manage all of the documents in the book. This makes it incredibly easy and efficient to add or modify elements later on.
5. Build the book
Choose File > New > Book. In the New Book dialog box, give the book a name, and choose a location to save the file. InDesign book files use the .indb (InDesign Book) extension. Once the file is saved, you’ll have a new panel visible in InDesign that can be moved, resized, and docked like any other panel in InDesign.

Now you need to populate the Book panel using InDesign documents that make up the contents of the book. I started by creating new documents from the template file for several sections of the book, including the cover. Add those documents to the Book panel by clicking the + button at the bottom of the panel. Navigate to where the individual InDesign documents are saved, select one or more files, and click OK. All of the documents in the book will appear in the Book panel—unfortunately, in alphabetical order. This is the default method by which the order is initially determined when adding files to the Book panel. Because of this, some users will name their chapters using a prefix system such as 1_cover, 2_TOC, etc. I prefer to adjust my order manually, as it gives me more versatility later on should I need to add or remove a chapter.
Drag the documents in the Book panel to rearrange them to appear in the order you want them in the final book. You’ll notice that as you do this, the page numbering for the documents gets updated automatically.
This cookbook is designed so that each chapter starts on the right-hand (odd) page. We could go into each document and add the appropriate number of pages to each one so that each chapter starts at the correct location, but instead we’re going to change the settings in the Book panel so that this happens automatically. From the panel menu in the Book panel, choose Book Page Numbering Options. This opens the corresponding dialog box where you can control how pages in the book should be handled. Select Continue On Next Odd Page, and select Insert Blank Page, so that each chapter starts on an odd page and to allow InDesign to add pages at the end of each document to maintain the correct page structure.
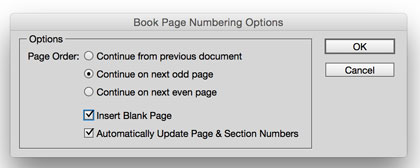
When you click OK, InDesign will get to work modifying the documents and renumbering the pages so that the book is properly structured.
Throughout your workflow, you can also take advantage of InDesign book features to preflight, synchronize, and output your documents with maximum speed and ease.
Creating a cookbook is a lot like cooking a great meal. It requires careful planning and preparation. But if you take advantage of InDesign’s powerful typographic and long document features, you’ll be able to produce your cookbook with the speed and confidence of a master chef. And best of all: there are no dirty dishes to deal with when you’re done!
Commenting is easier and faster when you're logged in!

Recommended for you

PerfectPrepText: A smart way to style local formatting
This combination of two free scripts creates and applies character styles to loc...

InDesign Magazine Issue 73: The Food Issue
We’re happy to announce that InDesign Magazine Issue 73 (May, 2015) is now avail...
This Week in InDesign Articles, Number 111
I’m not sure which is more amazing, that Anne-Marie and I just finished ou...