

Illustrator has a powerful tool that can change one thing into another: The Blend tool. It works on shapes, colors, and open paths. Illustrator automatically renders all the intermediate steps of a blend for you, so you can produce smooth results. Let’s learn all about the Blend tool.
Starting Out with the Blend tool
You’ll find the Blend tool in the toolbar under Gradient tool. The default keyboard shortcut for the Blend tool is W.

The Blend tool on the Toolbar
To test it out, draw two different shapes on your artboard, and for added fun, fill each one with a different color. You can use solid or gradient fills. Put some space between the shapes so you can see what happens next. With both shapes selected do one of the following:
- Click each shape with the Blend tool
- Press Cmd+Option+B (Mac) or Ctrl+Alt+B (Windows)
- Choose Object > Blend > Make
Voila! You now have one or (many) more shapes between the two originals. The new shapes are automatically rendered and colored by Illustrator to create the blend.
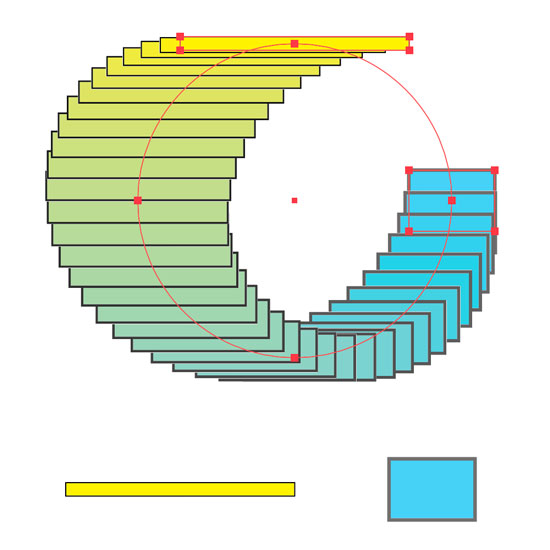
For an even more impressive result, use three shapes to create the blend. There’s no limit to how many shapes can be blended.

A circle, star, and square make up this blend. The intermediate sizes, colors, and shapes were created automatically by the tool.
Modify the Blend with Options
With your blend selected, double-click the Blend tool, press Return/Enter while the tool is active, or choose Object > Blend > Blend Options. The Blend Options dialog box appears. Click the Preview box to see your changes live as you adjust the options.
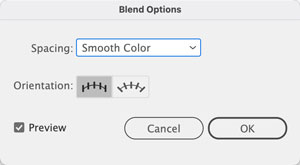
The Blend Options dialog box
Here’s what each option will do:
Spacing is where you control how many steps are used to make a blend. Choose Smooth Color to let Illustrator auto-calculate the number of steps for the blends. Don’t be fooled by the name of this option, it works on unfilled paths too. It’s labeled this way because for colored objects Illustrator calculates the optimum number of steps for a smooth transition. For uncolored or same-color objects Illustrator creates a number of blend steps based on the longest distance between the bounding box edges of the objects.
To set the number of blend steps yourself, select Specified Steps. You can enter a number in the field or use the Up and Down Arrow keys on your keyboard and watch the changes live on your artboard.
Choose Specified Distance for precise spacing. The distance specified is measured from the edge of one object to the corresponding edge on the next object.
The Orientation option aligns all objects in the blend to the page edge ![]() or perpendicular to the path.
or perpendicular to the path. ![]()
A blend’s path or spine is a straight line by default, but it can be altered – more on this below.
Modifying Your Blend Further
Your blend is live so you can modify any of the shapes in it, and see changes applied to all the blend steps instantly. Use the Direct Selection tool to edit any original shapes within the blend.
Reversing a Blend
The blend can also be restacked. Choose Object > Blend > Reverse Front to Back to reverse the stacking of the all the blended items.
Replace a Blend’s Spine
To create your blend, Illustrator draws straight lines between blended objects. This single path is known as the blend’s spine. You can modify it: Draw a curved line or shape on your artboard. Select it along with your blend and choose Object > Blend > Replace Spine. Intriguing results are possible as seen here, where the straight spine of a blend between two rectangles was replaced with a circle:
Experiment further by choosing Object > Blend > Reverse Spine to see what happens when you change the direction of the spine’s path.
Finally, as with the blended objects, you can use the Direct Selection tool to select the spine, then use the Reshape tool (![]() , under the Scale tool), and the blend will update as you modify the path.
, under the Scale tool), and the blend will update as you modify the path.
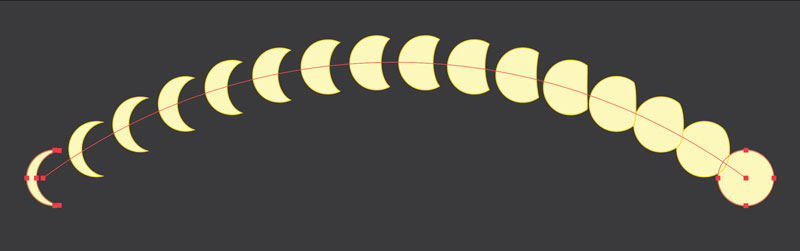
This blend’s spine was curved by using the Direct Selection and Reshape tools
Blending for Colors
Blends are great for creating color palettes and complex color mixtures. Draw two or more objects filled with different colors. Blend them, then adjust the blend options using Specified Steps. Illustrator will create intermediate colors. This works with linear and radial gradients too: Blend two different gradient-filled shapes. Increase the number of steps until the blend looks completely smooth. You can quickly create complex color mixes that are much harder to render manually with other tools such as the Gradient Mesh.
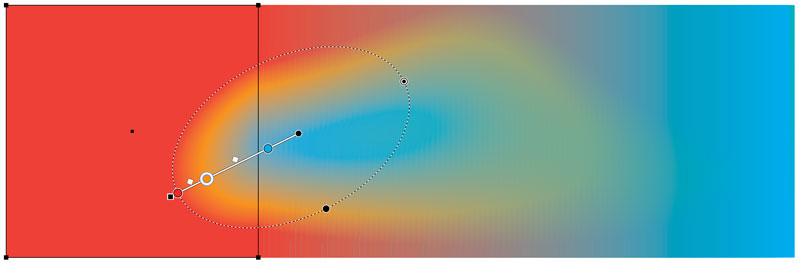
This artwork was created using a radial gradient fill in the left square, blended into a square on the right with a linear gradient fill.
This article was last modified on August 26, 2022
This article was first published on April 22, 2022
Commenting is easier and faster when you're logged in!

Recommended for you

An Introduction to Working with Patterns in Illustrator
Learn the basics of creating, using, and editing repeating patterns

CreativePro Video: Fill Live Illustrator Text With a Gradient
In this week’s CreativePro video, Mike Rankin shows us how to quickly fill text...

CreativePro Conference Speaker Spotlight: Michael Ninness, Designer, Dad & Beachcomber.
Welcome to our new series of posts called Speaker Spotlight, designed to highlig...