
Creating Accessible PDF Forms
Making fillable PDF forms accessible is possible if you take the right approach.

This article appears in Issue 4 of CreativePro Magazine.
Despite the popularity of HTML-based web forms, fillable PDF forms are still quite common for certain applications. But adding accessibility to the job of making fillable form fields in a PDF can seem like an insurmountable task for some users. The problem stems from the fact that Adobe Acrobat doesn’t do anything to facilitate the process. If you’ve ever added form fields to an existing PDF file and ran the Acrobat Accessibility Checker, you were probably greeted with a slew of new errors that hadn’t existed prior to your adding the form fields. This can feel overwhelming, but I’m here to tell you that making accessible forms is not only possible, but once you have the knowledge, it’s not even that hard. So, let’s dive in and take a look at how to create accessible, fillable form fields using a couple of different approaches.
Methods for Creating Fillable PDF forms
There are two main approaches you can take to create fillable and accessible PDF forms. One typical approach is to start with an existing PDF file, add the appropriate form fields in Acrobat, and make the document accessible from there. This is a common (and, obviously, necessary) approach when you’re not the designer of the form and, instead, are relying on someone else to do that work. Another approach, which is much more proactive and provides more control and efficiency, is to use Adobe InDesign to construct your form. InDesign not only provides amazing design capabilities, it also allows you to add fields that become live, fillable form fields when exported to the PDF format. I know of no other application that provides the ability to export to a fillable PDF form.
Create a Fillable PDF Form from an Existing PDF
When you begin the process of creating a fillable
form from an existing PDF file, my first recommendation is to make sure that the PDF is accessible before you get started (Figure 1). Check that the document is tagged appropriately and contains all of the elements to make it accessible. Doing this streamlines the process and makes it easier to continue from there. Failure to do this can create a seemingly insurmountable task, especially for beginners.

Figure 1. Make sure your document is tagged and accessible before adding form fields to the PDF document.

Figure 2. By default, Adobe Acrobat has form field auto-detection enabled, but you can turn this off by clicking Change.

Figure 3. Either click or click and drag to add a form field to the PDF document.

Figure 4. Give the form field a name immediately after adding the form field to the document.
Accessibility requirements
So, you’re making good progress, your form is looking good. It’s functional, and it’s doing what you want, but now you need to make sure that it’s accessible. If you run the Acrobat Accessibility Checker on the file now, you’ll be greeted with a mountain of errors (Figure 5).

Figure 5. You’ll see several errors in the Acrobat Accessibility Checker after adding form fields to your document.
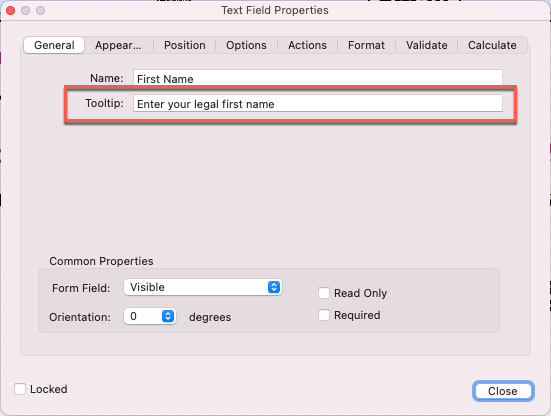
Figure 6. Adding a tooltip (field description) to a form field

Figure 7. Tagging a form field using the Reading Order panel
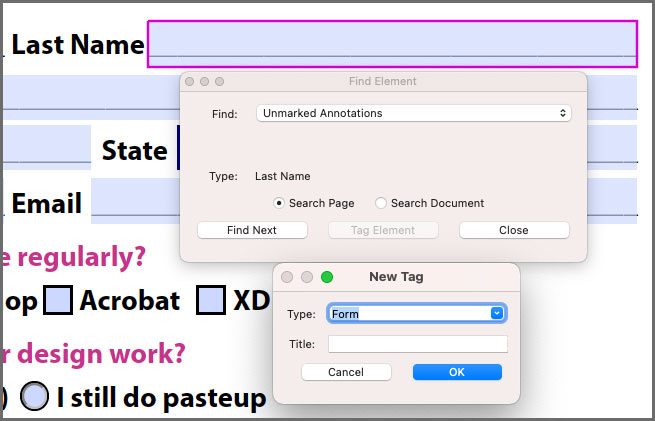
Figure 8. Clicking the Tag Element button allows you to tag an object using the tag of your choosing.
Reading Order Panel Selection Tricks
If you’ve spent any time selecting content in the Reading Order panel, you’ll discover that it can be challenging to isolate your selection to a specific object without inadvertently selecting other elements in the process. Fortunately, Adobe Acrobat offers some hidden tricks to help you isolate what you’re trying to select. If you’ve created a selection and have too much selected, you can hold down the Option/Ctrl key and click and drag to remove elements from a selection. Conversely, if you need to add an item to an existing selection, you can hold down the Shift key and click and drag to add items to an existing selection. Keep in mind that you can’t select just part of an object to select it. Your drag must fully encompass an object in order for that object to be selected, added to a selection, or removed from a selection.
Finishing touches
At this point we’re almost finished. The only remaining issue is one that the Acrobat Accessibility Checker won’t flag: the order in which the tagged form fields appear in the tag structure. Remember, the most common assistive software applications (JAWS and NVDA) use the tag order as the order in which content is voiced. Currently, all your <Form> tags are at the bottom of the tag structure, which means all of the content will be read first and then the app will go back and read all of the form fields. For proper reading of the document, you need to nest the <Form> tags at the appropriate locations within the tag structure (Figure 9). For example, the First Name form field needs to appear after the First Name text in the document. To do this, drag the form tag so that it is located after the text that the form field is associated with.  Figure 9. Nest the
You may notice in your form that any underlines used in the form will appear as objects within the tag structure of the document. Although it’s not strictly necessary, I like to mark these elements as artifacts to improve the reading experience for the end user and to clean up the tag structure of the document.
Create a Fillable Form with InDesign
InDesign offers a number of advantages in the form building process that put more control in the hands of the form author and that automate some common tasks to streamline the form-creation process. You should follow the best practice of ensuring that all the other content in the document is made accessible before adding all of the form fields. For more information on how to do that, see my article 10 Steps to Accessible PDFs.
Prepare your form
To begin, lay out your form as you wish, leveraging the formatting and layout features that InDesign has to offer. There’s no right or wrong way to do this, only personal preferences. I, for example, like to build my forms using a single text frame when possible. This reduces the number of container tags in the tag structure of the exported PDF file. If, however, you prefer to build your form using individual frames for each component of the form, you’ll need to use the Articles panel to set proper tag order in the exported PDF file, and you’ll end up with more <Sect> container tags. This is not ideal, but it’s acceptable in most cases. From here, you can begin adding the form fields in InDesign that will become fillable form fields when the layout is exported to PDF. Start by drawing a frame to the size of the form field that you’d like to create. You can use a graphic frame, text frame, or unassigned frame for this process. Open the Buttons and Forms panel by choosing Window > Interactive > Buttons and Forms. With the frame selected, choose the type of form field you want by selecting the appropriate option from the Type menu. The frame will now have a heavy dashed border indicating that it is an interactive form field (Figure 10).

Figure 10. An InDesign frame converted to an interactive form field

Figure 11. Use the Articles panel to specify the tag order of objects in the InDesign layout.

Figure 12. Drag the blue square of the form field to the point in the text where you want the form field to appear in the tag structure of the PDF.
Generate the PDF
The final step in the process is to generate the PDF file. Although InDesign gives you two choices when exporting a PDF file, only the PDF (Interactive) option will include the interactive form fields in the final PDF. The PDF (Print) option does not include the form fields. Choose File > Export, and choose PDF (Interactive) from the Format menu. Click Save, and in the Export to Interactive PDF dialog box, be sure to choose Include All in the Forms and Media section. Do the same for Create Tagged PDF and Use Structure for Tab Order. In the resulting PDF file, you’ll notice that not only is the content tagged, but so are the form fields and those form fields already contain tooltips (descriptive text) (Figure 13).
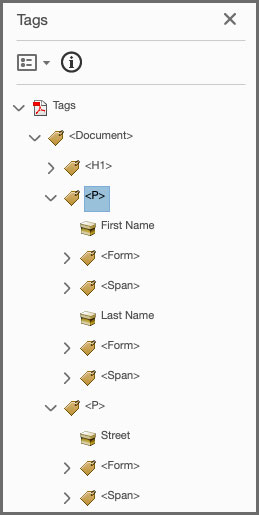
Figure 13. After exporting to a PDF from InDesign, content is tagged, form fields are tagged, and form fields contain the necessary tooltip text for full compliance.
Reading Forms Using Assistive Technology
It’s helpful to understand that both leading assistive software applications (JAWS and NVDA) provide a unique mode when reading a PDF form. The default mode in both applications is called Browse mode. This is the standard mode used when reading a document, and it’s why it’s important to organize and nest tags in a document appropriately so that as a user is reading the content, the elements will be read logically and in order. Both JAWS and NVDA also contain a Forms mode that changes the behavior of the screen reader so that it reads only the form fields and allows a user to enter text into those form fields. In this mode, the user skips over the content (static text) in the document and focuses on only the form fields for easier browsing. As document authors, we have no control over which mode someone will use when reading a PDF form, which is why it’s important to make sure that the tags are ordered and structured appropriately in the event that the user chooses to read the form in Browse mode instead of Forms mode.
The Path to Accessible PDF Forms
There’s no single correct workflow for how you should create your PDF forms. Your path may very well be determined by factors out of your control. Regardless of your approach, I hope you’ve learned that there are several methods to achieve the desired result and approaches to address common errors encountered during the process. **** Don’t miss the Design + Accessibility Summit, a CreativePro Online Event coming November 29–December 2, 2022. See the event page for details. 
Commenting is easier and faster when you're logged in!

Recommended for you

Share My Screen missing in CS6
The File > Share My Screen option is missing in action in InDesign CS6. Here'...

InDesign and Acrobat: PDF Partners
This article appeared in Issue 134 of InDesign Magazine. While the app...

Quick Wins: Building Print Production Skills
Use these five resources to boost your prepress knowledge and skills.