
Create a Short Video Using Premiere Rush CC
When I was working at a contract writing gig a few years ago, the company had some raw video footage about a big project that had never been edited. They essentially said to me, “You’re creative, why don’t you cut this together into a set of interviews we could post on the blog?”
That’s the thing about being known as a creative person: sometimes you’re asked to do things outside your experience. In my case, I jumped in with both feet — and found myself neck-deep in learning Adobe Premiere Pro. It was a great chance to expand my knowledge, but I’m sure it took three times longer than someone already familiar with the software.
If you’ve been tasked with creating a short video or blog post for a client or your employer, and you’re in a similar situation, there’s a better alternative. Adobe recently released Premiere Rush CC, a video editor unapologetically designed for people who operate YouTube channels and create short form content without a lot of editing expertise. Instead of being a scaled-back version of Premiere Pro, which is the philosophy behind Premiere Elements, Premiere Rush is a ground-up reimagining of what an easy video editor can be.
Premiere Rush is available as a desktop app under macOS and Windows, and as a nearly identical mobile app under iOS; an Android version is in the works.
Here’s how to get a head start.
Collect and Sync
One of the best experiences using Premiere Rush is one you won’t even see. When you start a new project, all you need to do is locate the video files you want to use. No need to wonder which format, resolution, or size they are, because the app handles all those details.
On the desktop, Premiere Rush can import clips from anywhere, including cloud storage such as Google Drive, Dropbox, iCloud Drive, and, of course, Creative Cloud. On an iPad or iPhone, you can also pull media from Photos and iTunes.
Click Create a New Project. In the mobile app, choose Add Media for existing clips, or Take Video or Photo if you want to use the device’s camera to create new material.
Next, choose a location from the sidebar at left and select the clips you want to include on the project’s timeline.
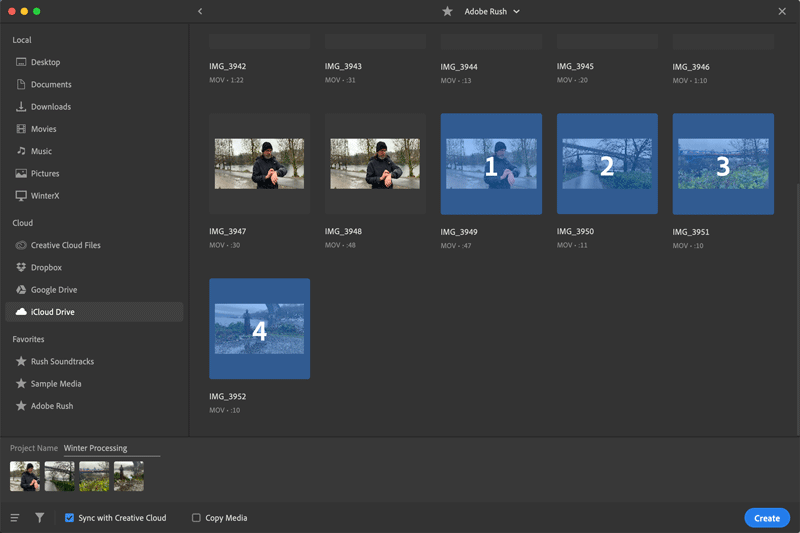
If you plan to edit on multiple devices, make sure the Sync with Creative Cloud option is selected, and then click Create. Synchronizing projects and media is an advantage Adobe learned from developing Lightroom CC; you’re not limited to editing on just one computer or device.
Organize
Premiere Rush opens the Edit environment and puts the selected clips on the timeline at the bottom of the screen. Press the spacebar at any time to play the video, or drag the playhead to any portion of the assembled series of clips.
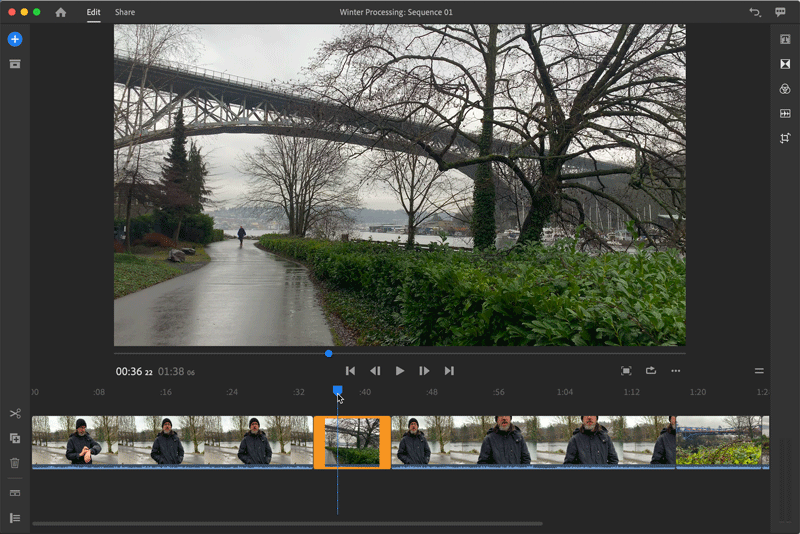
To rearrange the order of the clips, drag them into place from left (the beginning) to right (the end). There’s just one visible video track initially to keep things simple. At this point, don’t worry about tiny details; focus on getting the raw materials into place.
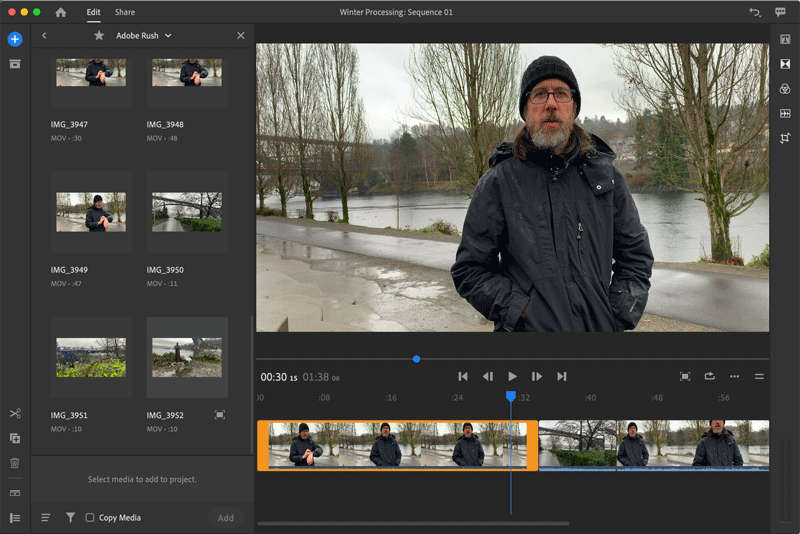
You can add more clips by clicking the Add Media button and choosing the Media option (versus Title or Voiceover), which opens the Location sidebar. Select one or more clips and either click the Add button or drag them to the timeline or to the video preview.
Trim
Once you have a rough assembly of clips in place, it’s time to refine them. The easiest method is to select a clip and drag the left or right edge. As you do, the preview displays the point at which you’re trimming the selected clip, and the frame from the adjacent clip. (This split view doesn’t appear on the iOS version.) You can also click the Split Clip button (the scissors) to slice clips into pieces.

Depending on your video, this may be as straightforward as you need it to be. But even as Premiere Rush is a simplified editing experience compared to Premiere Pro or Premiere Elements, sophistication lies just beneath the surface.
For example, you can stack clips onto several tracks that appear when you drag them above the existing tracks; the top-most clip is the visible one. This is an easy method of intercutting footage while keeping the audio from an existing clip, such as when someone is talking and you want to cut to the subject they’re discussing, or you want to insert another person’s reaction shot.
Clicking the Control Tracks button at the lower-left corner of the window reveals multiple video and audio tracks, plus buttons for locking, muting, and hiding individual tracks.

Fine Tuning
With the main clips in place, you can start to dress the sequence up a bit by adding titles, transitions, and background music. Although Premiere Rush includes only three transition styles, they’re the least offensive options: cross dissolve, dip to black, and dip to white. Click the Transitions button to open the panel, select a clip, and then click the transition style to add it to the beginning and end of the clip.
You’ll find more pre-made options for titles. Click the Titles button to view its panel, and double-click a style to add a title at the current playhead position, or drag a style to a point on the timeline. It appears on a new video track.

To add music, go back to the Add Media panel and locate audio files on disk, or look for the Rush Soundtracks item that includes free-to-use instrumental tracks. Select one or more and click Add, just as you did with video clips.

Premiere Rush also includes a decent set of color controls. Select a clip and click the Color button. The panel that appears initially shows a bunch of presets, which you can click to apply, but clicking the Edit button reveals tone and color controls. Unfortunately, you cannot select multiple clips and apply the same settings, so the workaround is to save the settings as a new custom preset, and then apply that to the other similar clips in the project.

Share
When your video is edited, the Share panel includes presets for YouTube, Facebook, Instagram, and Behance, as well as settings for saving a local version. You don’t need to worry about which resolution is best for each service (though there are controls for specifying resolution, frame rate, and more, if you prefer).
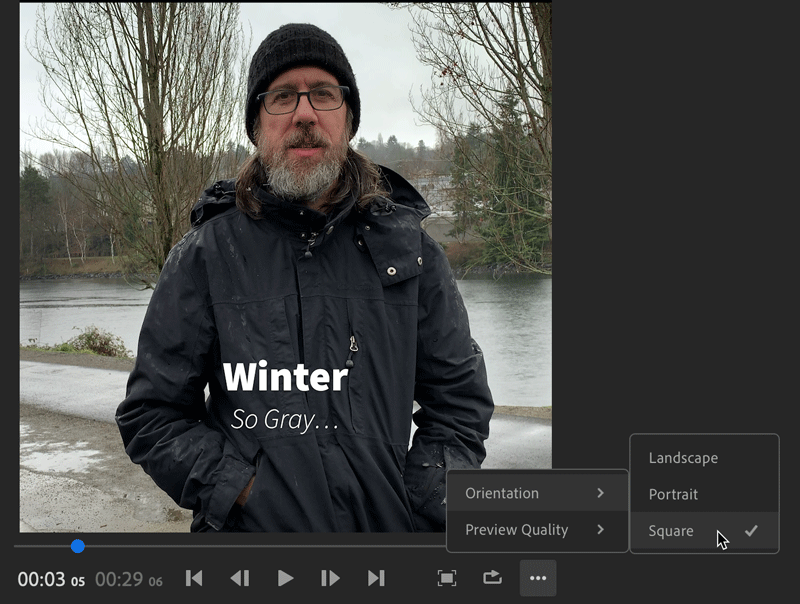
Of course, not all sharing services are tailored for the same output. One of Premiere Rush’s semi-hidden secrets is the ability to easily change the project’s orientation, such as the Instagram-friendly square aspect ratio or portrait orientation. Click the ellipses button (…) on the desktop, or the Orientation button on mobile, to switch perspectives.
You’ll likely need to go back through your video and adjust it for the new boundaries, such as shifting clips in the preview area so your subject aligns within the frame (double-click the preview to reveal adjustment handles). You may want to duplicate the sequence you’ve just edited: click the Project button at the top-left to reveal all the assets in the project, locate the existing sequence (likely called Sequence 1 if you haven’t renamed it), tap the ellipses button (…), and choose duplicate.
Choose a service (or more than one), make sure you’re signed in to it if needed, and click the Export button. In the mobile version of Premiere Rush, choose a preset from the Quality Settings options and export the video to the camera roll. From there you can share the video in the social media app of your choice.

Premiere Rush Pricing
The application is available in a few pricing configurations. The Premiere Rush Free Starter plan gives you 2 GB of Creative Cloud storage for syncing, access to Adobe fonts and Adobe Portfolio, and lets you export just three times.
The Premiere Rush Single App plan includes 100 GB of online storage (upgradeable to up to 10 TB), Adobe fonts and Portfolio, and unlimited exports. It costs $9.99 per month. It’s also available as part of the Creative Cloud All Apps plan.
This article was last modified on October 21, 2020
This article was first published on February 9, 2019
Commenting is easier and faster when you're logged in!

Recommended for you

8 Tips for DSLR Video Beginners to Shoot Great Video
Video is more accessible today than it has ever been. DSLR cameras with intercha...

Free Webinar: Unlocking the Potential of AI in Video
Discover how AI in video can elevate your creative output while streamlining you...

Premiere Pro Tutorial: Simple Color Correction for Video
Adobe Premiere Pro can feel a bit intimidating if you are new to the program and...