

Recently, Reader’s Digest magazine asked me to design a photorealistic picture frame into which they could drop a different photograph every month. It occurred to me that, using Photoshop’s Smart Objects and an Action to drive the process, it would be possible to create a variety of frames from two different angles, and have them all generated automatically simply by dragging the image onto a Droplet.

In Part 1 of this tutorial, I’ll explain how to create the photorealistic frame and give it a right- and left-facing perspective. In Part 2, I’ll get into the automation aspects.
Step 1: The basic frame
Start by drawing a rectangle with slightly rounded corners on a new layer, and fill it with any color you like. Then make a smaller rectangular selection inside it. You can hold the spacebar as you’re drawing it to move it around, which helps to align it with the frame. When it’s centered, delete this area to make the basic shape of your frame.

Step 2: Add Color
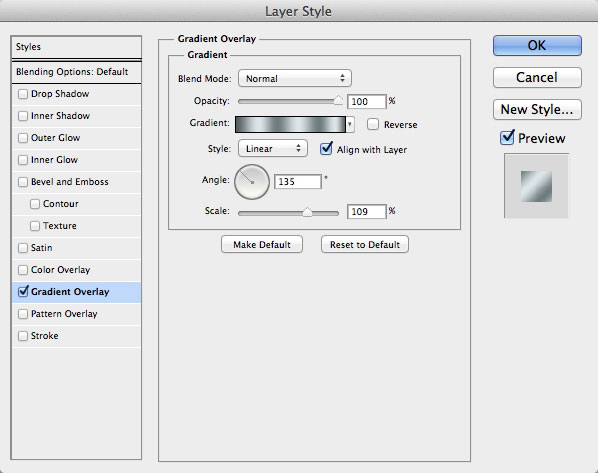
To bring color to the frame, it’s easiest to add a new Layer Style (Layer > Layer Style). Choose Gradient Overlay and click the Gradient sample to open the Gradient Editor.
Click the image below to see a larger version:
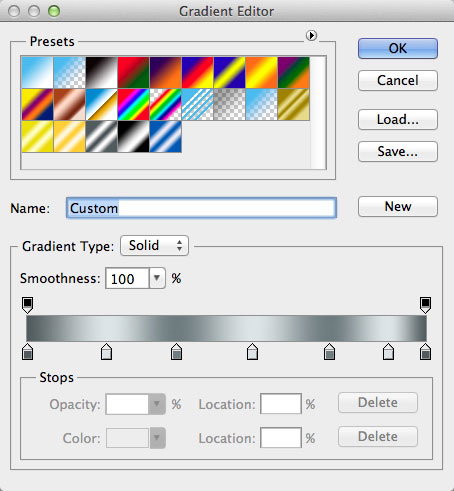
Step 3: Build the gradient
Click the left color stop under the gradient bar and choose a dark gray color, then click the right color stop and make it light gray. Next, hold Option/Alt as you drag each one to duplicate it. Intersperse a few of these along the length of the gradient bar.
Step 4: The gradient effect
Set the angle of the gradient to around 45 degrees so it isn’t purely vertical, and you’ll get the beginnings of a shiny frame.

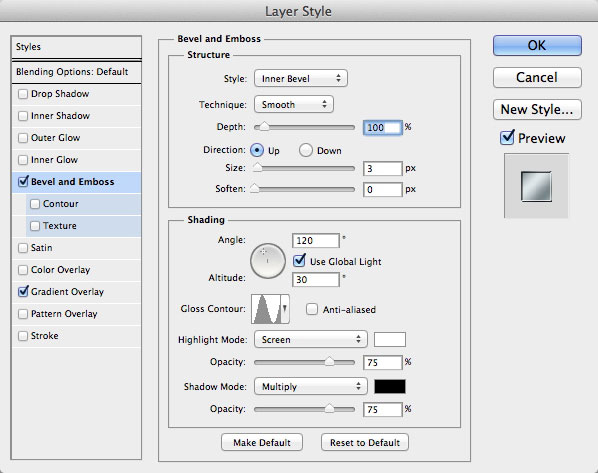
Step 5: Add a bevel
Switch to the Bevel and Emboss section of the Layer Style dialog, and add an Inner Bevel. Choose a small size — just a few pixels wide. In the Gloss Contour section, choose an N-shaped contour to add detail to the edge of the frame.
Click the image below to see a larger version:
Step 6: The bevel effect
This is how the frame should look now:

That bevel adds a shine to the inner and outer edges of the frame, making it look much more three-dimensional.
Step 7: Add a contour
Nested beneath the Bevel and Emboss section title on the left side of the Layer Style dial is the word “Contour”. Check the box next to it and then, on the right side of the dialog, choose an N-shaped contour for even greater frame edge detail.
Click the image below to see a larger version:

Step 8: The contour effect
This is how the contour looks when it’s applied:

You don’t have to add this step if you prefer the look of the frame without it — entirely up to you.
Step 9: The inner mount
Well-framed photographs have a mount that steps the picture away from the frame. To create this, duplicate the outer frame, make it smaller, and move it behind the original. Fill with a light cream color and change the Layer Styles setting so it has only an Inner Bevel and a small Drop Shadow.

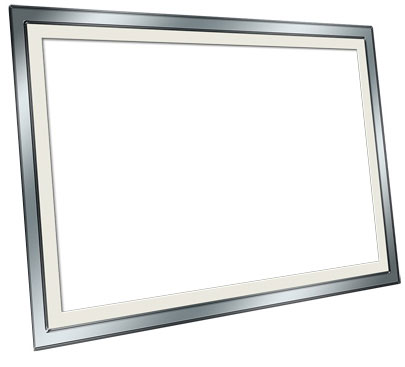
Step 10: Add perspective
To make the perspective view, first hide the white Background layer, Select All, and choose Edit > Copy Merged. When you Paste, you will create a composite of the frame and its mount. Hide the originals. Now, go to Edit > Free Transform and make a perspective view of the frame by holding Command/Ctrl to drag each corner handle independently.
Step 11: Draw the shadow
To make the shadow, first use the Lasso tool to trace the area it will take up. Hold Option/Alt to get the Polygonal Lasso temporarily, so you can just click each of the four corners. Choose Select > Modify > Feather to soften the edges. I chose an 8-pixel feather, but your setting will depend on the size of your artwork.

Step 12: Fill the shadow
Make a new layer, move it behind the composite frame layer, and press Option/Alt-Delete to fill the selection with the foreground color. (It should be black: if not, press D to set the default colors.) If the edges look too soft, undo a couple of steps and use a smaller Feather radius.

Step 13: Soften the shadow
You only need a faint shadow fading away to the left of the frame, and a slight line underneath. Lower the opacity of the Shadow layer and use a large, soft Eraser to fade the shadow away. I’ve also deleted it from behind the picture area, but this isn’t necessary as it will be covered up anyway.

Step 14: Add an edge
That frame really needs an extra side so it has more realistic depth. Select the left side of the frame and copy it, then distort the copy using Free Transform to fit the shape of the side. Darken it a little to make it look as if it’s turning the corner.

Step 15: Color variation
Merge the edge with the frame, and duplicate the layer. (It’s a good idea to give them names at this point.) If you wish, you can use Image > Adjustments > Color Balance to add red and yellow, turning the frame from silver to gold.

Step 16: Texture variation
You can make the frame look like anything you want. Here, I’ve added wood texture over the top, set to Multiple mode, to turn the original silver frame into mahogany. I saved all three variations as separate layers in a single Photoshop file.

Step 17: Add a photo
You now need a sample photograph to fill the frame. The subject doesn’t matter, but size does : Make it a memorable width, such as 1,000 pixels. Then choose Layer > Smart Objects > Convert to Smart Object. This is an essential step, as it will allow you to edit the contents later.

Step 18: Change perspective
Move the picture behind the frame layers, and use Free Transform to distort it into perspective: Simply hold Command/Ctrl as you drag each corner so it’s just outside the corners of the mount.

Step 19: Duplicate and flip
Duplicate all the frame layers, together with the shadow layer, and use Edit > Transform > Flip Horizontal to make the duplicated layers face the opposite direction.

Step 20: Adjust the photo
Duplicate the photo layer, but don’t flip it horizontally — that would look all wrong. Instead, enter Free Transform mode again. Because the photo is a Smart Object, it will load up with all the controls exactly as you last left them; all you need to do is move them to their new location behind the mount.
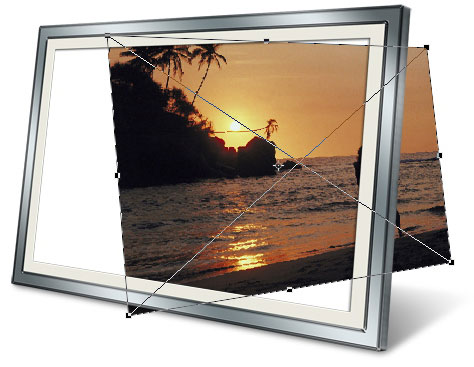
Step 21: The photo, adjusted
This is how the photo will now look: not flipped, but reconfigured to match the perspective of the new frame and mount.

Step 22: Try out the frames
You can turn each frame layer on and off to see how they work. Here’s the image with the wooden frame instead of the silver one.

Step 23: Swap the photo
Let’s try changing the photo for a different one. Open a new photo, Select All and Copy, then double-click either of the Photo layers in your document. Because they’re Smart Objects, they’ll open a new .psb window. Paste your new photo in here, size it to fit the frame, then choose Save to save the Smart Object.

Step 24: The photo, swapped
And this is the result: the new photo will distort itself to match the perspective of the scene. Because of the way Smart Objects work, the version facing the other way will have updated itself to the new image, as well.

In part 2 of this tutorial, I’ll show you how to create a Photoshop Action and Droplet that automatically generate six different versions of any single photo.
This article was last modified on January 6, 2023
This article was first published on February 3, 2012
Commenting is easier and faster when you're logged in!

Recommended for you

Photoshop Fun: A Hole in the Hand
Creating surreal images is all about the idea. So what does this image mean? As...

Out of Gamut: Photoshop, Previsualization, and Print Prediction
In my last column, I addressed the question, “How can I get Photoshop to m...

Working with Live Shapes in Adobe Illustrator
Adobe Illustrator has always been the go-to application for drawing vector-based...