Convert Portrait to Landscape with Layout Adjustment
There's no substitute for the human eye to redesign a page, but InDesign has some tricks that can help!

One of the most pressing needs in publishing today is converting a document of one size to another — often even going as far as turning a portrait page sideways to landscape orientation. You can see this with a flick of the wrist when viewing most iPad magazines, of course. For example, these two pages both show the same data, and are laid out in InDesign:
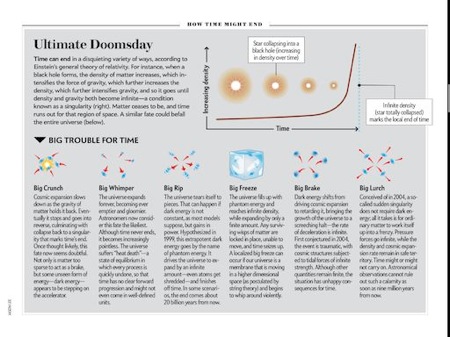
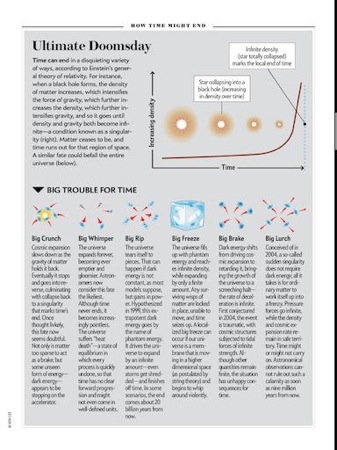
(These images are from the nifty and new Scientific American Beginnings & Endings iPad app and are used here for educational example only. The black line along the right edge is a scroll bar.)
Let me be really clear about something: There is no easy way to redesign a landscape page into portrait, or vice versa. It takes human eyeballs and brains. However, there are some good tricks that can help the process. And one of the best tricks is to make use of the Layout Adjustment feature in InDesign.
Layout Adjustment has come up in previous blog posts, such as this one by Cari Jansen, where she talks about using it with CS5’s Page Tool to change the size of ads. But here I want to explore the most important aspect of Layout Adjustment: Guides.
To make layout adjustment work for you, you need to position your objects next to guides (such as the margin guides), or position your guides next to objects! Layout Adjustment just sort of flails around with your objects unless they’re abutting guides.
You can drag out page guides from your rulers and snap them to the edges of your objects. (In CS3 and earlier, you need to select the object first and snap the guide on one of the side or corner handles.) Then, when the guide moves, the object will move with it.
For example, in the image below, you can see I’ve added two frames to a landscape page (left) and then changed the orientation to portrait (right):


Even though Layout Adjustment is on, the objects are pushed off the page — InDesign can’t “manage” them because they weren’t touching (or very near) a guide. However, if I add a single vertical guide along the left edges of the objects before I change to portrait orientation, I get a much better result:

This is because guides are moved proportionally with the rest of the page. As the page width got smaller, the guide moved with the page, and the objects moved with it.
But, um, why did the space between the objects get larger? I don’t have any good explanation for this besides perhaps InDesign was trying to be helpful. By placing the guide on the left edges, layout adjustment figured you wanted to move the objects around in all kinds of ways. I personally think this is a bug. Of course, if you group the objects first, they’ll stay together.
What if you want to keep the green frame near the top of the page and lock the magenta frame down near the bottom? In that case, add guides along the top and bottom of the (individual, ungrouped) frames:
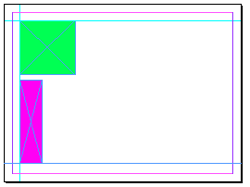

By the way, if the frames appear at slightly different sizes in the images above, it’s because I’ve scaled them… they remain the same size in the actual document. They just get moved around differently.
But what if you do want the shapes to change size as well as move? You can do that by adding guides on two or more sides of the frame. For example, here I’ve added frames on all four sides of the frames:
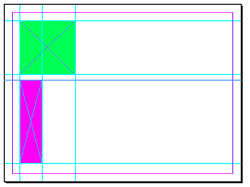
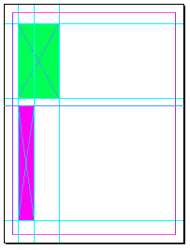
You can see that the frames move and scale. If there were text inside the frames, it would not get scaled, but images do get scaled along with the frames. Here’s a very simple example with text and graphics:
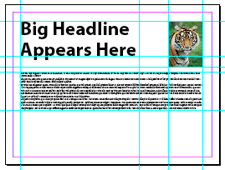
Now here are two versions of the same layout, one with layout adjustment turned off and then again with it turned on:

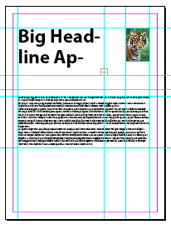
Which is better? There is no “better”! It’s just a matter of which suits your needs more. Nothing is going to save you from having to do additional work to make the new page size look right, but one might save you more time than the other, depending on what your final design. In the example above, it might have saved me a bit more time if I had left the guides off the headine frame, for example.
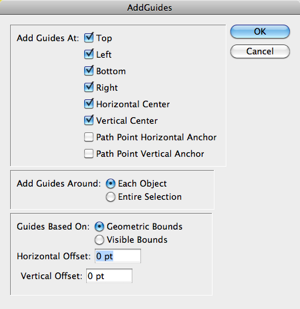
By the way, if you find yourself adding frames to all four sides of a lot of frames, do yourself a favor and use the AddGuides.jsx script instead. It comes with InDesign (look in the Scripts panel, inside Applications/Samples/Javascript). Just select all the objects you want to apply guides to and double-click on the script:
There are some other great layout adjustment tricks, including setting up page column guides, but I’ll have to cover that in a future post.
This article was last modified on December 20, 2021
This article was first published on December 22, 2010
Commenting is easier and faster when you're logged in!
Recommended for you

Resizing pages with Page Tool and Layout Adjustment
In InDesign CS5 you can resize document pages from any reference point using the...

InDesign Magazine Issue 71: Fine Art
We’re happy to announce that InDesign Magazine Issue 71 (March, 2015) is now ava...

Getting Started with Photoshop on the iPad
Take your favorite Photoshop tools and techniques on the go.


