
Commercial Printing with Microsoft Publisher

Programs such as QuarkXPress, InDesign, and Illustrator are the most common tools on a graphic designer’s utility belt. But when circumstances cause us to use less common applications, we have to adapt to get the best results.
Microsoft Publisher is one example. It’s possible to produce high-quality printed pieces from Publisher files, but you may have to take different steps during the production process. And that’s where this article can help, with Publisher-specific tips for preparing files to be commercially printed.
Regardless of the commercial printer you choose, your Publisher files won’t output correctly unless you meet certain requirements. You’ll have to make sure your layout file is in the appropriate color space, set up bleeds if anything on the page goes to the edge of the sheet, and supply the fonts and images used in the design. Without these key pieces, you may be faced with unplanned additional costs and wasted time before your job can print.
Color Options
By default, Publisher works in the RGB color space, but of course, commercial presses don’t print in RGB. Before sending off a Publisher file, go to Tools > Commercial Printing Tools > Color Printing and select the correct color space (probably CMYK or Pantone). You can change the color space at any time; for ultimate control, do it before you begin your design.
Publisher limits your Pantone choices to two colors plus black. After you load those two spot colors, the color palette displays them in 10-percent increments plus white. Publisher uses the Pantone CVC color library. If you need a different library, talk with your commercial printer first. They may recommend you build it differently to accommodate the color changes after file submission.

Publisher’s color palette displays the most recent colors used in the layout. Each icon for fill, line, and text uses the same color palette.
You can also create a specific color formula. Publisher has icons for line, text, and fill color. By selecting any of these icons, you can select the feature More Colors and choose the tab Custom. Enter your specific color build here and it will become a square of color in your palette.

Access the More Colors option from the color palette to create a specific color formula that you can then load into the color palette. Simply click the All Colors radio button, enter in the specific Color Model and Build, then click Apply.
Creating Bleeds
Publisher doesn’t accommodate for bleed, so you’ll have to do it yourself. Ask the commercial printer for their bleed requirements and acceptable trim limits, then build those into your design. Let’s say the printer requires a .125″ (1/8″”) bleed. If you’re working on a 4″ x 6″ postcard, your custom page size should be 4.125″ x 6.125″.
Remember to keep all content you don’t want cut off .125 inch inside the trim edge. In the postcard example, all content should be inside a designed space of 3.875″ x 5.875″.
Fonts, Fonts, Fonts
To find out which fonts are in your completed project, go to Tools > Commercial Printing Tools > Fonts. Send copies of the fonts to the printer along with the layout file. Your printer will have all the fonts that came installed on your computer, so there’s no need to send those. For a list of fonts that come with Windows XP, see this page from Microsoft. Other versions of Windows may have slightly different fonts.
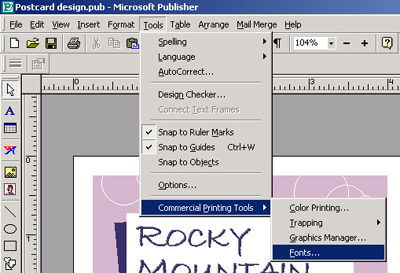
To see a list of the fonts used in your layout, select the Fonts menu option under Commercial Printing Tools.

Remember to supply the press with the fonts that you bought or downloaded for the layout.
Images and Clip Art
As with fonts, your commercial printer must have the images in your design to print your job correctly. But unlike fonts, Publisher embeds images in files by default. Unless you unembed them, you can send just the layout file. To make sure all images are embedded, go to Tools > Commercial Printing Tools > Graphics Manager.
It’s not enough to embed images. For clear and crisp printing, all CMYK images should be 300dpi at the final size in the layout. You can check resolution in the Details area of the Graphics Manager.
You’re Almost There
Right before you send your files to the printer, run Publisher’s Design Checker by clicking Tools > Design Checker. This utility checks your layout for accuracy, including text cut off within a text box, information flowing off the page, overlapped items, and so on. Running this utility ensures that the necessary items for your design are in place, that extra items are removed, and your content is displayed correctly.
You may also want to check the file size of your layout. The larger the file, the longer it will take to upload to the commercial printer’s site. To cut down on upload time, do a Save As just before you send the file. Save As rewrites the code structure and potentially decreases the file size.
Send It Off to the Printer
Now that you’ve properly prepared all files, you can send everything to the printer. There’s just one last question to answer.
Many commercial printers accept files in native Microsoft Publisher (.PUB) file format, but some printers require a PDF file instead. Publisher doesn’t save files in PDF format, so you’ll have to save a PostScript file and process it using Adobe Acrobat Distiller to create a PDF file. Before you do so, call the printer and ask for their PDF requirements; for example, some printers want you to use their Acrobat Distiller job options file.
This article was last modified on January 10, 2022
This article was first published on October 28, 2005
Commenting is easier and faster when you're logged in!

Recommended for you

This Week in InDesign Articles, Number 121
PePcon is coming and there is so much more to do! So I’d better get this list of...

The Power of Scripts
Scripts are little engines that can supercharge your workflow. Here’s how to fin...