

WiziWYG lets you scan the target directly into the application if your scanner uses a TWAIN driver, and EZColor supports scanners that use Photoshop plug-ins, but both applications also let you load a TIFF file from disk. (See Figure 4).
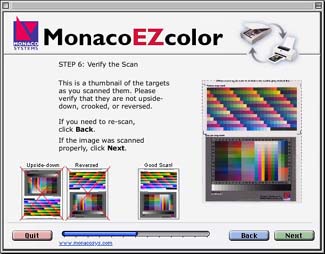
Figure 4a
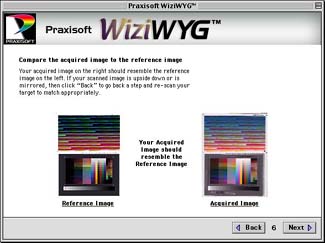
Figure 4b
Figure 4: Both EZcolor (a) and WiziWYG (b) provide visual guidance as to what the proper scan should look like.
Once you’ve loaded the image, the applications step you through the process of locating the crop marks on both the photographic IT8 and the printer targets. (See Figure 5). Both apps are quite tolerant of slightly skewed scans, so you needn’t obsess about placing the target perfectly square on the scan bed. The final step before building and saving the profiles is to load the target description file (TDF) that contains the measurements for the IT8 target supplied with the application: The lot number is printed on the target, and you simply choose the TDF that has the same lot number.
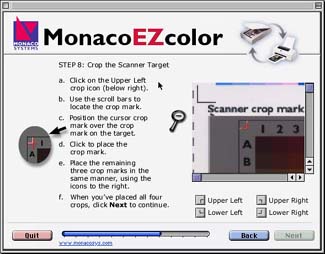
Figure 5a
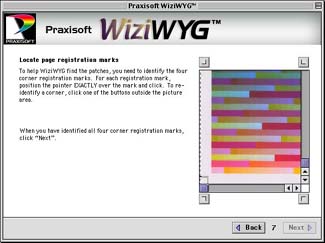
Figure 5b
Figure 5: Cropping the scanner target ensures that the applications measures the right colors. Again, EZcolor (a) gives more on-screen information than does WiziWYG (b).
Next, the applications ask you to name the scanner and printer profiles. Once you’ve done so, it builds the profiles and saves them in the appropriate directory for your platform — the ColorSync Profiles folder on the Mac, the Windows/System/Color directory on Windows. Apart from determining the settings for your scanner, the whole process is very easy and takes longer to describe than to actually do. (See Figure 6)
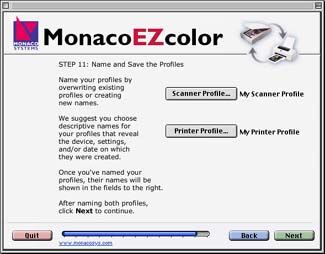
Figure 6a

Figure 6b
Figure 6: Saving and naming the profiles is the final step in both EZcolor (a) and WiziWYG (b).
MatchLock’s Approach
MatchLock Profiler II works differently from the other two already discussed. It doesn’t use a scanner target at all, and it works as a Photoshop Automate plug-in. There appears to be some magic involved — or perhaps it’s just that any sufficiently advanced technology looks like magic — but even though we’re not sure how it works, it does seem to work quite well, although it seems more vulnerable to the vagaries of the scanner than do the other two packages.
Using Profiler II is, if anything, even easier than using the other two packages. First, you launch the plug-in from Photoshop’s File>Automate menu and choose step a: Load Calibration Chart. This creates a file in Photoshop that you can print to the printer you’re trying to profile, and also save for further use. (See Figure 7)
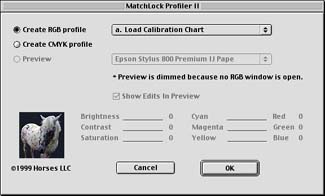
Figure 7a
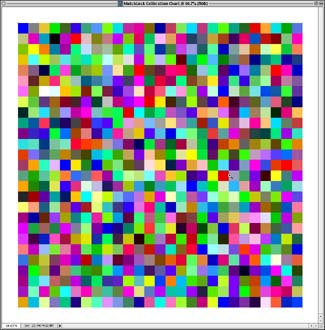
Figure 7b
Figure 7: Matchlock Profiler is a Photoshop plug-in (a) that automates the profiling process by creating a file (b) that serves as a calibration chart.
Next, you scan the printed target, incorporating a little bit of white space around it. As with the other two packages, setting the scanner to a stable, repeatable state by turning off all automatic adjustments is vital here. We also found that we got the best results from scanners that had good neutral balance: The online help recommends scanning at the scanner’s default settings (which is actually a recipe for disaster with those scanners that do some kind of autocorrection by default), but we found that we could improve the results significantly with some scanners by setting them so that they captured neutral grays as neutral grays.
This article was last modified on January 18, 2023
This article was first published on May 10, 2000
Commenting is easier and faster when you're logged in!

Recommended for you

Buying a Color Printer
There’s something compelling about seeing your work in print. That holds true ev...

Scanning Around With Gene: PageMaker Memories from 6 to 72 Point
There is a Salvation Army store that happens to be on the way to my bank, both o...

TypeTalk: An Interview with Ray Nichols of Lead Graffiti Letterpress
Ray Nichols is a man who follows his passion. Ray, along with his wife and partn...