
A Clever Trick for Making Custom Arrowheads

InDesign has a very limited choice of arrowheads, and when my editor asked for double arrows with a vertical bar at each end to indicate measurements in a math book, I had to come up with my own. The technique that I settled on can be adapted for lots of different looks and uses. Here’s what I did. I searched for a capital K that was geometric, i.e. that looked like a left arrowhead centered on a vertical line. I ended up using Frutiger 55 Roman. This content is available exclusively for CreativePro members. Already a member? Please sign in at the top of the page. CreativePro membership keeps you up to date with resources, solutions, and community to strengthen your professional development. For just $6.50/month (billed annually), you’ll get access to valuable benefits, including: Get $10 off with the discount code: TEMPLATE
This content is available exclusively for CreativePro members. Already a member? Please sign in at the top of the page. CreativePro membership keeps you up-to-date with the technology, solutions, and resources to strengthen your professional development. For just $6.50/month (billed annually), you’ll get access to valuable benefits, including: Get $10 off with the discount code: TEMPLATE
 I converted the K to outlines (Type > Create Outlines). Then to add an “arrow” pointing to the right, I held Option/Alt and clicked the Flip horizontal the button in the Control panel.
 I created a new text frame, and to make it exactly fit the height of my arrowheads, I went to Object > Text Frame Options, and in the Auto-Size tab of the dialog box, I chose Height Only). I pasted both Ks into the text frame, and put a right-indent tab between them (Type > Insert Special Character > Other > Right Indent Tab).
 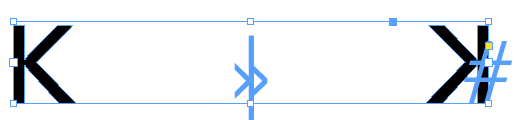 Then I added a paragraph rule to make the line connecting the arrowheads, adjusting the Weight, Offset, and Indents until I was happy with the effect.
 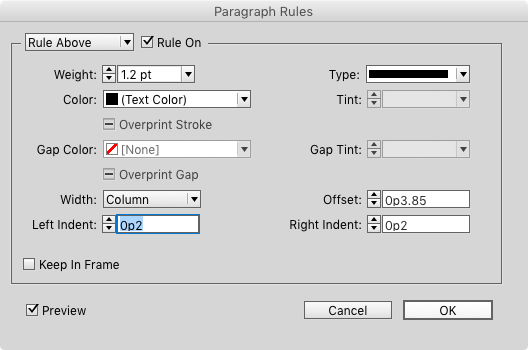 Voilà!
  Now the text frame can be rotated to any angle, and resized as needed, with no complicated adjustments to make! To create different looks, you can replace the arrowheads with other characters from the same font (or any other font), or other shapes or objects. Tip: converting characters to outlines makes it easier
to have the text frame fit snuggly around the arrow.  Editor’s notes: This idea was first shared in the user forums, but it was so cool that we had to make it into a post so more people would see it. If you like this tip, definitely check out the Workarounds issue of InDesign Magazine!
  And as a bonus, Premium members can download a snippet file (.IDMS) of the custom arrows shown above. If you’re currently logged in to InDesignSecrets.com as a Premium member, the download link appears below. Enjoy! Click here to download a snippet file of the custom arrows.
No
Your Subscription to Members-Only Content Has Been Cancelled
This could be due to one of the following reasons:
Don't want to upgrade to our full service?
You can still access our free content, including articles and templates, below.
CONTINUE WITH FREE ACCOUNT
No
Your Subscription to Members-Only Content Has Been Restricted
This is due to a recent failed payment on your account. To remove the restrictions, please go here to update your billing details and pay your recent invoice.
No
BECOME A MEMBER
BECOME A MEMBER
Commenting is easier and faster when you're logged in!

Recommended for you

A Spanning Headline and a Line Between the Columns of Text
A solution to Bonnie's layout question involving rules, splits, spans, and more
Highlighting an Entire Paragraph with Color
With the right combination of paragraph rules and an underline, you can create a...

How to Add a Rule Around a Paragraph
At the InDesign Conference in Denver, I showed attendees how to add an automatic...