Building an Org Chart or Flowchart in InDesign, Part 2
Aligning objects in a flow chart is easy when you know how to use the tools

In the first part of this series, I discussed how to build some flowchart or orgchart shapes. Now we need to move them around the page to line them up.
?Align with Smart Guides
InDesign CS4 introduced the Smart Guides feature, an ?incredible tool for aligning objects on a page. As you drag an object around, Smart Guides looks at the edges and centers of every other object on the screen. (It ignores objects on the page that are not currently visible on screen.)
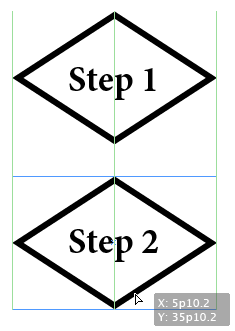
For example, in the following image, I’m dragging the lower shape. The smart guides display in light green when the left, right, or center (or all three, in this case) edges line up:

You can also use smart guides when creating new objects. For example, here I’m drawing a new ellipse and the smart guides tell me that the new object will be the same width and height as another object on my page.

?Note that the two objects are not aligned yet; they’re just the same size. After I draw the elipse, I would drag it down until the smart guides tell me that they’re aligned.
Smart Guides also works when distributing objects. If you have three objects in a row, and you want equal space between them, first set the space between the first two the way you want it. Then, drag the third one until you see the smart guides indicate that the spaces are equal. Here we can see that all three objects have equal space between them and are aligned vertically along their centers:

By the way, if you’re not seeing smart guides while you drag objects around, they may simply be turned off in the View menu. Press Command/Ctrl-U to toggle them on or off. Oh, another trick: If you’re dragging an object and you don’t want to see the smart guides (perhaps their snapping behavior is getting in the way for a moment) you can also temporarily turn them off by holding down the Control/Ctrl key while dragging.
The smart guides also treat your page as an object, so if you want to center an object (or a group) to the page, you can just drag it until you see a magenta smart guide appear. That means it’s centered on the page.
Align with the Align Panel
Another way to align and distribute objects on your page (and your only option if you’re using CS3 or earlier) is to select each object you want to align and ?use the Align buttons in the Control panel or the Align panel:
![]()

Tip: If you don’t see the Distribute Spacing features at the bottom of your Align panel (as above), you need to choose More Options from the panel menu. The Distribute Spacing feature is really important because it’s the only good way to set a specific distance between two objects. For example, if you want exactly 1cm between the bottom of one object and the top of another, select the objects, turn on the Use Spacing checkbox at the bottom of the panel, type 1cm in the field, and click the Distribute Vertical Space button. For more on distribute spacing, see this post.
??Remember that when aligning along top edges, the objects align to the top-most object; when left-aligning, the objects align to the left-most object, and so on. You can also specify whether you’re aligning to other objects or aligning to the page, spread, or margins.
Use Gap Tool
InDesign CS5 offers a new feature called the Gap Tool, which lets you adjust objects on your page based on the gaps between them. For example, in this image, the Gap tool has been placed in the column between two objects:

Notice how the column gets highlighted in gray and the cursor changes. If you now drag to the left or right, the objects on either side of the gray column will be resized — the shape changes! That’s probably not what we want in the flowchart. So instead, press Option/Alt while dragging to move all the objects touching the column left or right. Or hold down both the Option/Alt key and the Command/Ctrl key to move the objects closer or farther apart.
Note that the objects must be exactly aligned for the Gap tool to work, so make sure you drag or resize them until you see the smart guides show up. If the objects are off just a little, the Gap tool fails. So, for example, placing the cursor between “Step 1” and “No” in the above image wouldn’t adjust the “Step 12” object, because the top of the “No” and “Step 12” are not lined up exactly. The Gap tool would only adjust the space between “Step 1” and “No”. For this reason, it’s usually a good idea to ensure all your flowchart objects are the same width and height when possible.
In the next article, I’ll discuss how to draw lines and format the shapes on the page.
This article was last modified on December 20, 2021
This article was first published on October 28, 2010
Commenting is easier and faster when you're logged in!
Recommended for you

This Week in InDesign Articles, Number 114
It’s always more quiet during the holidays, but there are still some excellent v...

Pasteboard Notes
These days everything has a running commentary alongside. Shouldn?t your InDesig...

Reveal Your Fonts’ Hidden Secrets with Wakamai Fondue
This magical tool will show everything your fonts can do with a simple drag and...


