
Building a 3D Scene
When you want to recreate an iconic image with photorealism it’s time to round up the usual suspects.

This article appears in Issue 8 of CreativePro Magazine.
Full-featured 3D programs are famous, perhaps notorious, for being complex and difficult to master. Photoshop had somewhat-less-challenging 3D features for years, but in 2022 they disappeared. Illustrator has had 3D effects for a long time, but they were more like fancy blends and subject to quirky behavior—until 2022. Coincidence? Probably not. Now, Illustrator’s 3D effects allow you to apply materials and some lighting to extruded shapes, for example. But, as of this writing, Illustrator’s 3D effects cannot compose scenes with objects of different materials (Figure 1). Fortunately, other Adobe apps can. And best of all, those other apps can create scenes with 3D models you built in Illustrator!
Figure 1. Adobe Illustrator 2022 3D & Materials Effects allow you to apply materials to shapes you extrude or revolve to create volumes. Lighting and shadows, beveling, and other details are possible, too. Unfortunately, objects with different materials cannot be assembled, nor can objects with different materials be assembled realistically in a scene.
One of those other apps is Adobe Dimension, part of the Creative Cloud suite of programs. Dimension has never been a 3D modeling program per se, but rather has many built-in models of common objects as well as geometric shape templates. What it does easily and well is allow you to apply various textures and materials to these models and shapes and compose scenes in custom environments. You import a photo of a setting, and Dimension will figure out the lighting and perspective in it so the model will look like it’s part of the scene (Figure 2). If you have access to 3D models, textures, or lighting made elsewhere, you can import them into Dimension, too.
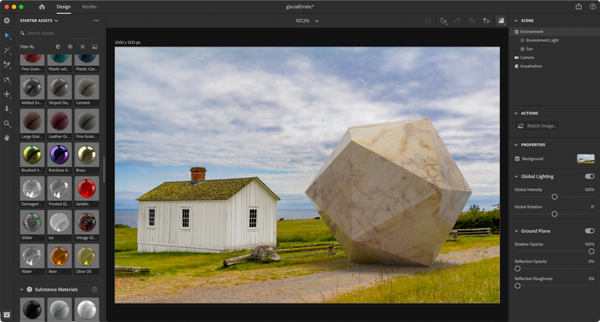
Figure 2. Adobe Dimension, very much like the new Substance 3D Stager, enables you to construct 3D scenes. Here, I placed a marble icosahedron into one of my own photos. Dimension figured out the perspective (the camera’s field of view) and lighting.
If you’re anticipating a big “however,” here it is: Adobe has a new subscription package of applications called the Substance 3D Collection. This is totally separate from Creative Cloud, and you’ll have to pony up an extra $50/month for the Substance apps, even if you already have an All Apps subscription. The Substance 3D Collection includes a near twin to Dimension called Substance 3D Stager. With its introduction, Adobe nearly killed Dimension. Luckily, there was a swift and loud pushback, and Dimension currently remains available. Adobe recently said that Dimension has not been “end-of-lifed” and will receive support updates. Many of us remain worried that the future of this app is uncertain. But, while we’ve got it, let’s use it! And if you’re lucky enough to have access to Stager, what I’m about to show you in Dimension is easily transferable.
3D Modeling in Illustrator
One of the most difficult parts of using “proper” 3D programs is the creation of the 3D objects themselves. Luckily, Illustrator 2022 lets you easily create 3D objects, then export them to Wavefront OBJ format, which is supported by other 3D programs. You can then load your objects in Dimension, Stager, or similar and assemble them in a scene.
First, picture the object you want to create. The cylinders in Figure 1 are actually circles extruded to create depth. Another method of creating a 3D object from 2D art is to revolve it around its left or right edge. This sweeps out a volume from a single object or even a group (Figure 3). The shape in Figure 3 is built from two rectangles, each with its right two corners rounded, plus two line segments with a Zig Zag effect applied (Effect > Distort & Transform > Zig Zag).

Figure 3. After grouping the four paths, I chose Effect > 3D and Materials > Revolve. Note that the effect is applied to a group, so it’s one coherent result.
I grouped those four items, and then applied Effect > 3D and Materials > Revolve. If you don’t recognize the resulting object, that’s okay. I have no idea what it is either; I just liked the geometry. If I’d wanted a donut (who doesn’t?), I would have chosen to revolve a circle with an offset (Figure 4) to create a donut whose hole has a radius equal to the offset.
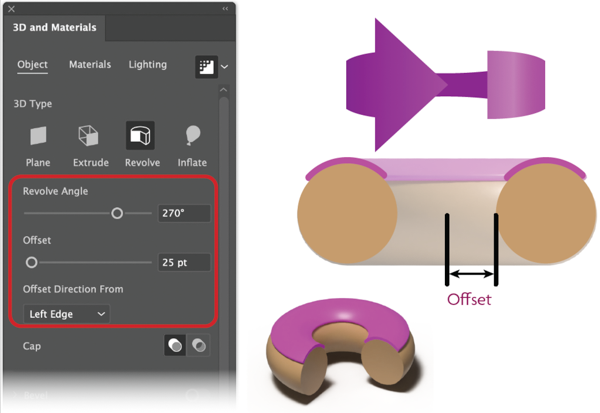
Figure 4. I started with a circle filled with light brown (the cake) and a quarter circle with a hot pink stroke (icing). To get both to create one donut, I grouped them, and then chose Effect > 3D and Materials > Revolve. Note two settings in particular: Offset is the radius of the hole, and the Revolve Angle of less than 360° means the donut will be missing a wedge.
Adding a material and lighting to a single object within Illustrator is fun and rather easy. So, if I needed only the weird revolved object of Figure 3 with one material applied, I’d do that in Illustrator using the steps in the next section. To create a scene in Dimension (or Stager or other app) in which this shape interacts with others, I’d skip to the “Exporting an OBJ File for 3D Programs” section of this article, because materials and lighting don’t export with the 3D model.
3D Materials and Lighting in Illustrator
Although materials and lighting don’t export with the 3D model format (OBJ), if you export as a 2D image in PNG or JPG format, for example, the result will look pretty much as it renders in Illustrator.
In the 3D and Materials panel (Window > 3D and Materials), click Materials at the top. The Adobe Substance Materials section offers a few dozen choices, including metals, fabrics, and wood (Figure 5), as well as two easy-to-miss buttons that access additional materials. The first leads to assets that require a Substance 3D subscription. The second button accesses mostly free Substance community assets (Figure 6). You can access that resource directly here.

Figure 5. Illustrator comes with close to 40 materials to choose from, plus you can get more—many for free! Click the button for community assets to open a website to search for them.
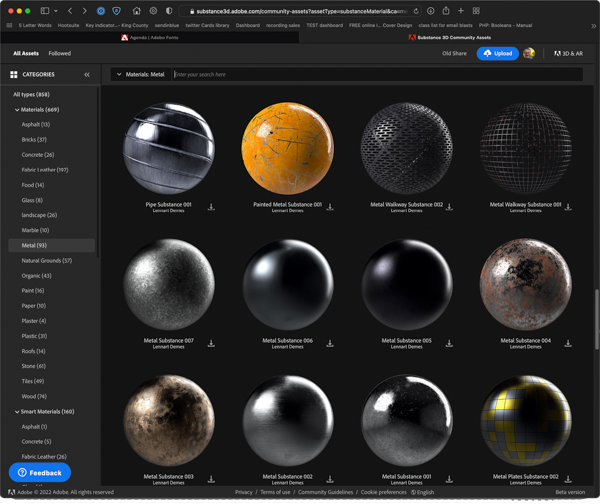
Figure 6. Search and browse the community assets for more materials.
When you adjust Lighting, keep in mind that settings like Rotation and Height are affected by the Position setting in the Shadows section, whether Shadows is enabled or not (Figure 7). The default is for the lighting to behave as if the object were attached to a wall (Shadow Position Behind Object). If you change Shadow Position to Below Object, it’s as if the object were on a tabletop. So, the rotation and height are relative to that wall or table.
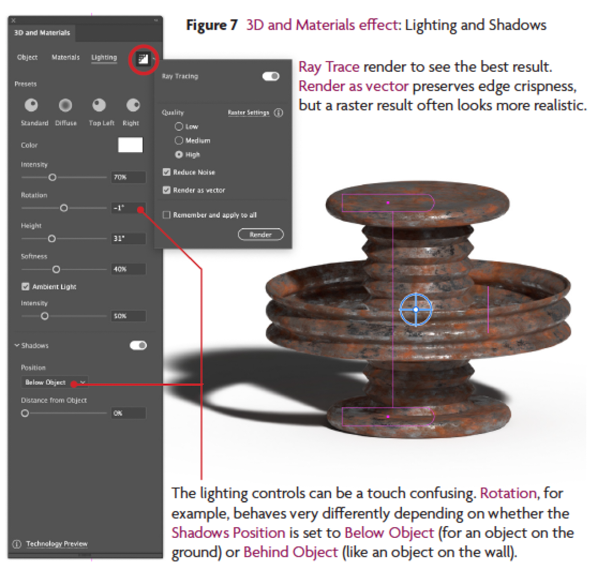
Figure 7. 3D and Materials effect: Lighting and Shadows
A few other tips for working with shadows: Ambient Light makes the shadows less dense. If you set Height fairly low, the shadows grow long, as they would when the sun is low in the sky.
Exporting an OBJ File
for 3D Programs
Drag the object or group with the 3D effect to the Asset Export panel (Window > Asset Export). Be sure to choose OBJ for the Format in the lower, Export Settings section of the panel (Figure 8). Then, when you’re ready, click the asset thumbnail then click the Export button to choose where the file should go. Although the 3D model could be imported into many applications including Substance 3D Stager or Blender (Figure 9), we’ll focus on Dimension in this exercise.
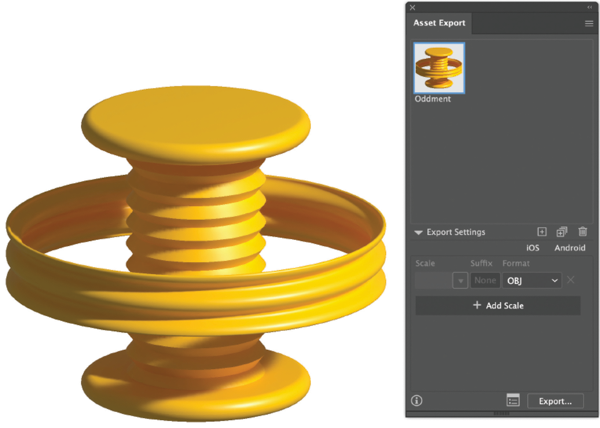
Figure 8. Drag the object or group with the 3D effect to the Asset Export panel. Be sure to choose OBJ for the format in the lower, Export Settings section of the panel. Then, when you’re ready, highlight the asset thumbnail then click the Export button to choose where it should go.
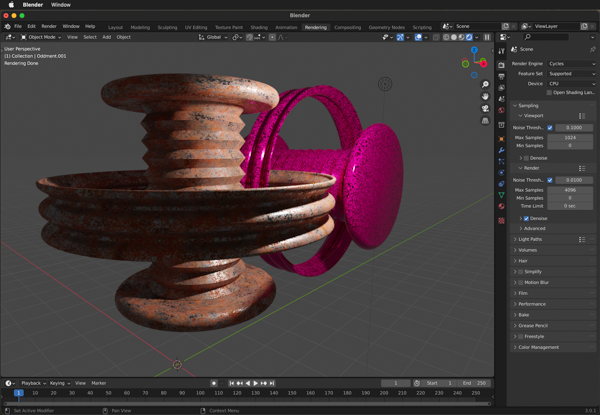
Figure 9. The object (and a copy) in Blender
Using Adobe Dimension
Over in Dimension you can create a new document, then choose File > Import > 3D Model or press Command/Ctrl+I. Choose the OBJ file you exported from Illustrator. If needed, use the command View > Zoom to Fit Selection to see the whole object.
Dimension has a Select tool, very like Illustrator’s Selection tool (Figure 10). Sometimes I use that to target an object, sometimes I click on the object’s name (likely “model”) in the Scene panel (upper right). When an object is selected, you can move or scale it and choose materials for it.
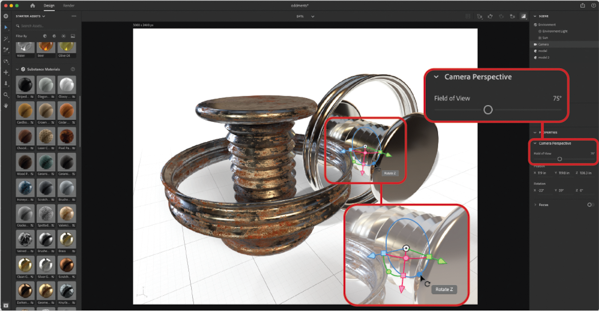
Figure 10. The view in Dimension
To get the right camera angle, highlight Camera in the Scene panel. Set Field of View to a desired angle. Angles near 55° appear natural, where higher angles exaggerate perspective and lower ones minimize it.
Camera movements can be achieved with tools in the Tools panel, the buttons of a three-button mouse, or by dragging while holding down a number key:
- Orbit the camera around objects: Drag while holding down the 1 key, or right-button drag.
- Pan side to side or up and down: Hold the 2 key and drag, or middle-button drag.
- Dolly the camera (move closer to or farther from your model): Hold the 3 key and drag, or scroll.
To manipulate an object, I usually use the Gizmo (yes, it’s really called that). That’s the bit with the red, green, and blue arrows. Those well-known colors correspond to the well-known coordinates X, Y, and Z. So, to move the object horizontally along its X axis, drag the red arrowhead (Figure 11). If you want to scale it in that direction, drag the red square (holding Shift scales in all dimensions proportionally). The circles on arcing segments are what you drag to rotate around an axis. You can set the Gizmo to the top, bottom, or center of an object in the Properties panel to control around which part it rotates.
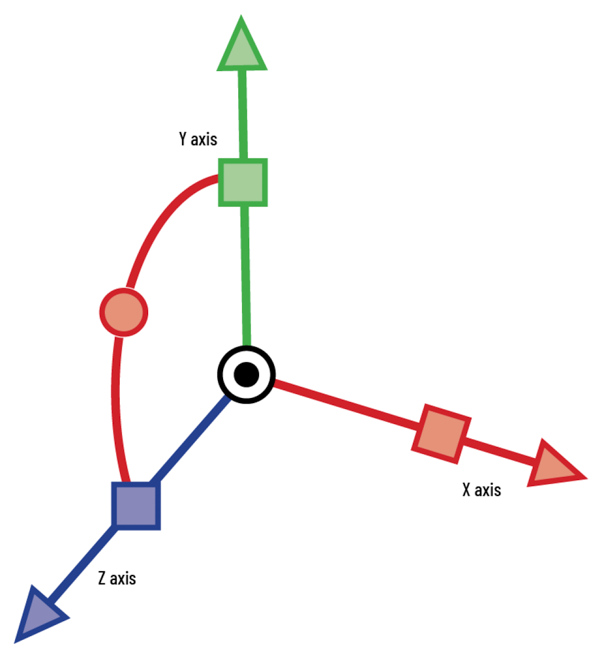
Figure 11. Using the Gizmo: Drag the reddish square to scale along the X axis or drag the triangle to move in that direction. Drag the reddish circle to rotate around the X axis
I Option/Alt-dragged the blue arrow to move a copy of my model along the Z axis. I set the Gizmo to the center then rotated the copied object around its Z axis, holding down the Shift key to make it snap to a 90° rotation.
To one copy, I applied a Substance Material called Silver Glossy that comes with Dimension (Figure 12). To the other, I used a material I downloaded from the community assets web page. I simply dragged it from my downloads folder right onto the model itself. To edit the properties of a selected object’s material, click the Select Material button at the right side of the Actions panel.
To get a somewhat better look at how the light and shadows will look, click the Render Preview button at the upper right of the document window (or toggle that preview with the \ key). In this example, I could see that each object was reflected in the other.
Regarding lighting, you can edit the light properties by clicking Environment in the Scene panel, then the light you want to adjust. You can add more or different lights from the sizable Starter Assets panel (at left). When I have multiple lights, I find it useful to hide one or more to see the effect of what remains. To “turn off” a light, hover over its name to show the eyeball, then click it. Click it again to turn the light back on.
When ready, switch to Render mode (Figure 13). On the right, in Render Settings, specify a name for the rendered image in the Export Filename field, choose settings for Quality and Format, and specify a location for the Save To field. Because I’m comfortable in Photoshop, I usually prefer a high-quality PSD (Photoshop document) at 16 bits/channel. The PSD even has extra layers to help select different parts of the scene for further work in Photoshop. When you’ve chosen options, click the Render button and enjoy a break, because the process can take time. When it’s complete, hover your pointer over the thumbnail in the Render Status panel to see an ellipsis. Click it, and you can choose to open the result in Photoshop.

Figure 12. In Dimension, I used the Silver Glossy material for one copy and the downloaded rusting metal for the other.

Figure 13. Render mode
My Motivation: Recreating an Iconic Image
What prompted me to puzzle out this workflow was a pet project—actually, an obsession. Like many, I’m very fond of the movie Casablanca, released 80 years ago this year. One of the publicity shots for the film is of the exterior of a major location in the film, Rick’s Café Américain (Figure 14).
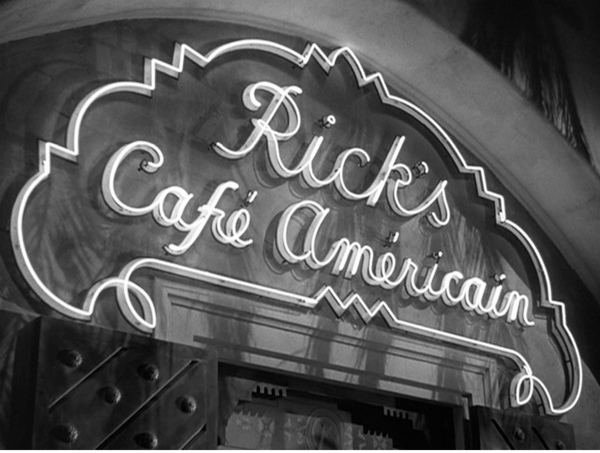
Figure 14. Rick’s Café Américain (Source: Original promotional photo for the 1942 film Casablanca)
At first, I tinkered in Photoshop only to colorize the neon and give it more definition. Other projects needed attention, so, to procrastinate, I opted to recreate the image completely from scratch. Of all the gin joints in all the towns in all the world, I wanted to recreate that one. I used Illustrator to create the archway, neon light tubes, and neon backing.
I made a few other details in Illustrator as well, then brought them into Photoshop as Smart Objects: the clavos (decorative nails in the doors), the wooden inner doorframe, and the initial shapes of the palm leaves. I assembled all the pieces in Photoshop… after a render in Dimension.
Because I had access to an image of the movie studio’s construction plans, creating the archway and neon to scale was easier (Figure 15). The neon tubes were the most time-consuming, using a combination of Illustrator’s Pen, Curvature, and Direct Selection tools—the usual suspects.
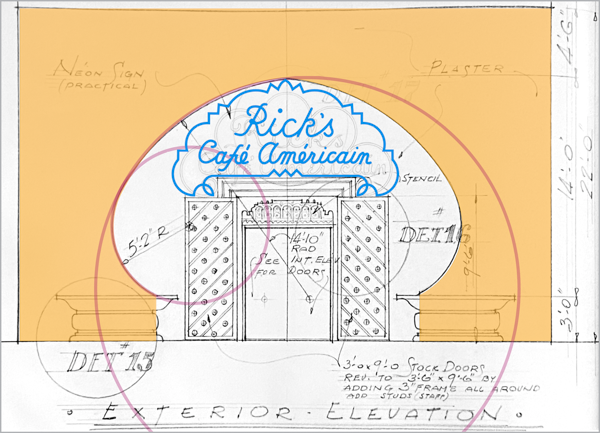
Figure 15. Geometry building in Illustrator was aided by the movie studio’s original set plans.
By setting Bevel Shape to Round using the Stroke panel, getting those stroked paths to look like tubes was easy. I grouped them all then applied a 3D and Materials Extrude effect (Figure 16). I added a Bevel with the Width set to 100% then reduced the Extrude Depth to 0.

Figure 16. An Extrude with 0 depth, but round, full-width bevel of both sides for the neon.
I exported the three groups (neon, the backing, and the arch) as OBJ files via the Asset Export panel then imported those models into Dimension where I added one of the Basic Shapes (Plane) to serve as a wall behind the neon. I applied a concrete material found in the community assets site to the arch and the plane. I used Dimension’s default material for the neon itself, but changed its color to red and used its Glow property to light it up. Much tinkering with position, orbit, field of view, and zoom followed (Figure 17). Then it was off to Render mode, which took a while. For long renders, it’s best to have something to do as time goes by.

Figure 17. Applying a concrete material to the wall and arch and the Glow property to the neon model helped a great deal.
Once I exported the image as a PSD, I could use Photoshop’s familiar tools to create the remaining elements (especially the palm shadows, doors, and door frame) to finish the image (Figure 18).
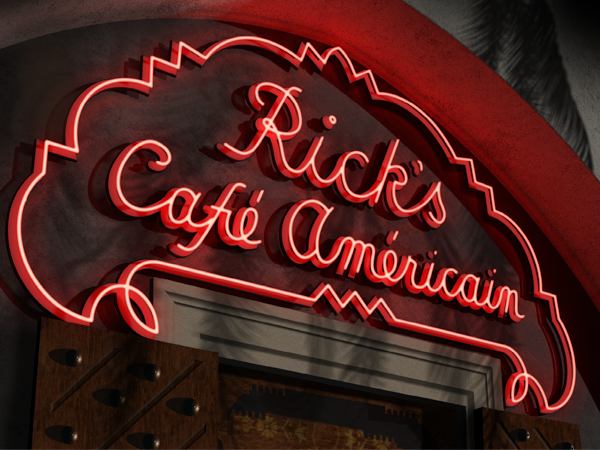
Figure 18. The finished image
Happy 80th, Casablanca!
Commenting is easier and faster when you're logged in!

Recommended for you
CreativePro Video: Illustrator View Tips
Learn the different ways you can view an Illustrator document to speed up your w...

Illustrator Downloadable: Art Deco Borders and Brushes
Custom patterns and brushes to add a sleek and swanky style to your designs
How to Create a Stylized Palette From an Image in Illustrator
Learn how to quickly create a color swatch palette from an image in Illustrator...