Build a Tilt-Shift Camera Lens for Peanuts

One of the fancier lenses in the world of SLR and digital SLR (DSLR) photography is the tilt-shift lens. You might not know what these lenses look like, but you probably have seen their effects. Architectural photographers use tilt-shift lenses to eliminate the perspective distortions that sometimes give buildings the appearance of falling over. Aerial photographers use them to make large cities look like toy models. Art and portrait photographers use them to control exactly where the focus falls (Figure 1).

Figure 1. This image was captured with a tilt-shift lens. Photography by Dennison Bertram.
Tilt-shift lenses cost $1,000-plus, which is far beyond what most photographers will pay to experiment. Fortunately, building your own tilt-shift lens is easy, and doing so will open up a remarkable array of creative optical effects.
To build your own tilt-shift lens, you start with a spare lens that’s built for a film format larger than that of the camera you’ll use the lens on. For example, I used a 6×6 lens (designed for 6cm film) to make a tilt-shift lens for a 35mm camera body. With 35mm or APS format digital SLR cameras, you’ll need a lens built for 6×6 film or larger. The oversized lens gives you extra room to move and distort the image that lands on the film or CCD, while still filling the frame. (You could use this hack to mount a 35mm lens on a 35mm camera, but it would only work with a macro lens, for very close objects.)

Materials

SLR (single-lens reflex) or DSLR (digital SLR) camera body with interchangeable lens mount.
Oversized lens. I used an old Carl Zeiss made for the now-obsolete Pentacon 6 camera format. Millions of these were manufactured, and eBay is full of good deals on them.
Rubber plunger with bellows design. Any will do, so long as it’s flexible and not too large.
Stiff cardboard (non-corrugated) or stiff, black plastic. Plastic body cap to fit camera body. I use a lot of these in my work. They’re the perfect way to attach your camera to your own hacked-lens creations, and they’re also cheap.
Hot glue and glue gun or other adhesive. You need to bond the body cap to the cardboard/plastic and the cardboard/plastic to the plunger rubber. If you want a more robust setup, skip the glue and attach the pieces with small hobby nuts and bolts.

Assembly

Using a rotary tool or hobby knife, hollow out the middle of the camera body cap (Figure 2), then grind or file it down smooth, so there are no rough spots or burrs (Figure 3).

Figure 2. The hacked lens begins with a standard plastic body cap.

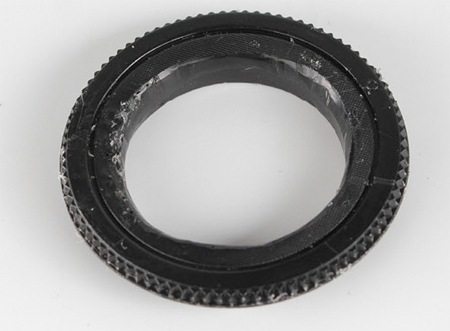
Figure 3. Hollow out the body cap.
The plunger will act as a flexible camera bellows, allowing us to tilt and shift the lens to our heart’s desire. Cut a hole in the top of the plunger, where the stick is (Figure 4), making it just large enough to stretch around the base of your lens (or make it a bit smaller and enlarge it later).

Figure 4. A humble plunger becomes the camera bellows.
Go ahead and stick your lens onto the plunger to see if it fits, and trim the rubber as necessary. Don’t worry about gluing the lens down yet, but the hole should be tight enough so the lens fits snugly (Figure 5). I even cut grooves in the rubber to let me screw the precious lens into place. Keep holding onto the lens, though; don’t expect the rubber to hold so tight that you can let go.

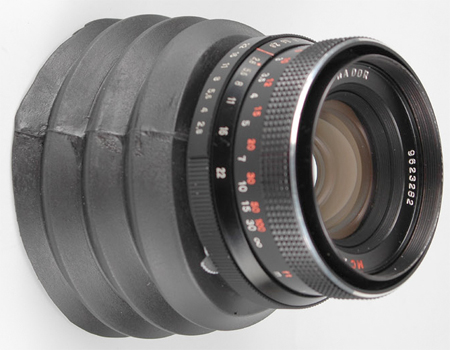
Figure 5. The plunger bellows should fit tightly to the lens.
If you’re really enterprising; you could buy a bayonet adapter for the lens you’re using, attach it to the plunger bellows, and then screw your lens onto that when needed.
Next you need to build the backing. To do this, I cut a ring out of cardboard with the inner circle the same circumference as the body cap and the outside matching the bottom of the plunger (Figure 6). Although not shown here, it helps to paint one side of the cardboard black, to cut down light refraction inside the bellows.

Figure 6. Cardboard backing ring.
Then I hot-glued the parts together, body cap into ring, and ring, black side in, onto bellows (Figure 7). The hot glue is for expediency; if, after some experimenting, you think you’ll use this lens setup often, I recommend finding something sturdier than hot glue and cardboard to hold it together.

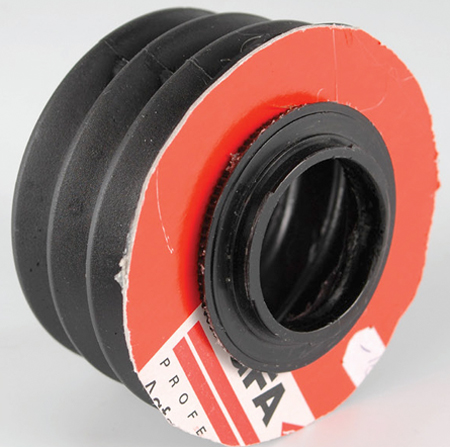
Figure 7. Finished assembly.
You’re all done! Attach your lens, and you’re ready to shoot (Figure 8).

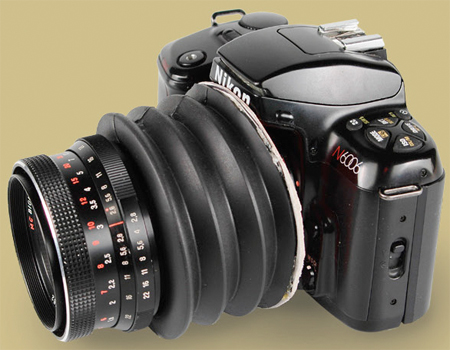
Figure 8. The lens attached to a camera.

Shooting

This hack works surprisingly well. The image quality of the Zeiss is awesome, and I didn’t get any optical interference between it and my Nikon DSLR’s CCD chip. But there are a number of things to keep in mind while shooting. First, automatic exposure modes will not work with this lens, so you have to shoot manually. The apertures will still work, but in general you want to shoot with the lens wide open, or it will be far too dark to focus.
Needless to say, auto-focus also won’t work. With this lens, you focus (or selectively un-focus) by squeezing the lens and plunger down, bending it, and twirling it around to get the cool effects you want. To give a “miniature” effect to a city-scape, tilt the lens forward or backward so that the only things in focus are in the middle ground, in mid-frame horizontally. The blurred foreground and background simulate the look produced by a macro lens taking a close-up of something small (Figure 9).

Figure 9. The bendable lens makes Prague look miniature. Click on the image for a larger version.
If you want to use a lens like this in low light conditions, where you’ll need to hold the lens in one position for a long time, you might augment this design with an adjustable mechanical frame that controls the lens’ range of motion. If you build a tilt-shift lens with a frame, a photographic bellows will be more flexible than a plunger.
A note to digital camera users: dust is a common problem with most digital cameras. Projects such as this one can exacerbate the situation. Before using this lens, be sure to clean it out with some strong puffs of air, to get rid of any loose dust particles that might be inside.
Dennison Bertram is a fashion and beauty photographer who lives in the Czech Republic.
 

Bookmark
Please login to bookmark Close

This article was last modified on July 11, 2023

Comments (41)

Leave a Reply

Your email address will not be published. Required fields are marked *

  1. April 19, 2019

    Thanks for an amazing tutorial, I would implement these skills in my wedding photography business.

  2. I will definitely try this! McGiver styles!

  3. Erika
    October 28, 2016

    Hi!
    I tried to make it with a 135mm f/2.8 lens, mounted on a D90, but everything is blurry. Can it be due to the distance between the camera and the lens? Can anybody please help me!
    Thanks

  4. November 15, 2015

    Thanks for the instructions. I had only some problems due to a large distance between lens and camera sensor. After I had reduced the bellows on 2 folds, everything worked beautifully. See my first shot at:
    https://www.flickr.com/photos/kuchenbaecker/22485675518

  5. Anonymous
    March 16, 2012

    Hi! Can you tell me please, which lens are suitable for this? I made one with 50/3.5 and couldn’t see a thing through it, because it was all blurred. Maybe the distance between the camera and lens was too big, or is it only the problem of lens?

  6. Anonymous
    December 27, 2011

    I was just playing with some lenses from the Diana F+ line and I think this home-made system would with some of those. I haven’t had a chance to make the full mount yet, but by taking the lens off my Canon EOS Rebel and holding the Diana lenses at a short distance I could get a reasonably good focus with a few of them, in particular the 110mm telephoto lens. Keep in mind that they are plastic ‘lomography’ lenses, so the focus is on the soft side, but they’re a lot cheaper than most of the Zeis lenses I’ve seen.

  7. Anonymous
    November 19, 2011

    I cannot find a medium format camera lens that’s under $100 anywhere, including Ebay or Shop Goodwill online. I was hoping to make this tilt-shift lens, but I just cannot afford it. :-(

  8. Anonymous
    October 4, 2011

    What lens did you use? A friend of mine gave this hack a try with a 80mm Carl Zeis PentaconSIX lens (that some people say you’ve used here) but the effects weren’t as good. In particular, he said the lens did its job on short distances but for landsapes when the TS capabilities would be most prominent it didn’t work (images came out normal or blurred). It may be that his photographic skills weren’t as good, but from a recent chat about it we came to the conclusion that it was either some construction flaws in his DIY project or the lens.

    I’m preparing to use M42 photo bellows + m42-canon adapter with some Pentacon6 lens (120mm BIOMETAR?)… Do you think it will do the trick?

    j1a2s3h4i5u6 at w3p4.p000l (please do remove the numbers 123456 34000 and put @ instead of “at”)

  9. Anonymous
    May 13, 2011

    Made one using a 80mm lens that came with my Salyut-C (older kiev 88 model) , used a grease boot for a c.v. joint instead of the plunger as most of the new plungers are not of a bellows design, and instead of cardboard back i used a modified Plastic Tea cup for thermos flask to make it more rigid and also to extend the mounting out past the built in flash of my nikon D70 . I also made a suitable sized hole in the cap that came with the lens (camera side of lens) and mounted that on the front so i could detach the lens from the bellows and possibly replace with different lens. At the minute works great as a macro lens (equivalent lens with extension tubes) . Tried some other lenses just holding them and got fantastic macro capability with all the lens i tried even lens for APS sized sensors , although need to figure out another way of connecting these to my improvised cap mount on the front of the bellows. Still have to test the tilt/shift capability even if this doesn’t work i’m well happy with the macro capability especially since it cost me a total of 17 euros , and has turned a 6×6 medium format lens which was sitting in its case into something i can use with my Digital SLR , not to mention the joy you get when you make something like this and it actually works , Thanks Dennison :-)

  10. Anonymous
    January 23, 2011

    This s a great and simple design using a decent lens. Using a poor quality lens might get the user even closer to what Lensbabies produce.

    However, I noticed that many questions and some of the negative comments here are mainly due to the fact that the article author assumed some knowledge and understanding of how the camera optics work. Of course not every amateur photographer (like myself) has to know that, but then the author could not include the textbook knowledge in a blog article on a specialist website.

    A medium format lens is specified with explanation why this should be done, so why are you using 35mm lenses (for shallower camera bodies with much smaller distance from the back of the lens to the film/sensor) and then say it does not work?

    Please, fellow amateur readers, before you make a negative comment you may be ashamed of later, first read the text carefully, then ask or even try to check yourself anything you do not understand. Look at the name of this website – the author can assume some expertise of the readers. Sorry to be critical … we all need to learn things sometimes.

    Best wishes,
    TC

  11. Anonymous
    January 7, 2011

    Great article. Re: “I recommend finding something sturdier than hot glue and cardboard to hold it together”: Are you using something other than cardboard and hot glue now? If so, what? Thanks.

  12. Anonymous
    November 20, 2010

    I thought this tutorial was excellent. I’m going to give this a try for fun before purchasing the real deal. Thanks! https://www.tomhallphotography.com.au

  13. Anonymous
    October 17, 2010

    you sure this gonna work??

  14. Anonymous
    September 10, 2010

    Hi!
    I’ve loved your article and I would like to build my own tilt-shift lense.
    So I would like to know wich Carl Zeiss lense you have used to built yours.
    Thank you!

  15. Anonymous
    August 2, 2010

    Before going through the whole process of making the diy tilt/shift bellows, it could be a good idea to get comfortable with it in 1 minute by just detaching any lens you choose from your camera body and applying tilt/shift hand-held – you can also get really good results, some examples here.

    eyenorth.co.cc

  16. Anonymous
    July 14, 2010

    i agree, i want to make one of these for a magazine spread, but i have no idea what lens to get. help!

  17. Anonymous
    June 8, 2010

    hello there. can you explain me what do you mean by “Oversized lens”.???? please reply to katambe@iol.pt. thanks!

  18. Anonymous
    May 30, 2010

    i’ve tried this hack with several lenses… a Nikon 50mm 1.4, a Sigma 28-90mm 3.5-5.6, and a 80mm 2.8. None of the lenses work. Nothing is in focus in any of the lenses, and no matter how much I tilt, shit, or focus, nothing is in focus. The lens is about 4 inches from the CCD on my Nikon D90. Any help??

    A

  19. Anonymous
    May 8, 2010

    i have a lens baby composer which is already a tilt lens… can i use that instead of the improvised tilt lens? if your familiar with that kind of lens, can you give me tips on how to achive this kind of photos.. than you very much!

  20. Anonymous
    April 23, 2010

    brilliant thank you for this advice !!

  21. Anonymous
    April 14, 2010

    Hey, does this MOD easily detach? If not would it fit inside of this case with the lens on?:https://www.pelicanonline-ralphs.com/1200-case.htm

  22. Anonymous
    February 26, 2010

    It reminds me of the make-do elemental cameras of Miroslav Tichy, but much nicer, of course. Very hands-on and a good hack! I’ll be trying it someday when I have access to the lens you are using.

  23. Anonymous
    February 18, 2010

    A brilient articel and I will be trinnig it soon.Paul

  24. Anonymous
    January 13, 2010

    Mike (12/25/2009) – The lens cap glues to the bellows, which fits to the lens. The Lens cap (with a cener cut out) is what attaches to the camera body. I have a Yashica ML 50mm 1:1:9 I’m going to use for this. Wish me luck y’all!

  25. Anonymous
    December 25, 2009

    I’m confused on one part. Does the original lens actually screw back into the camera body, or does the plunger take up space between the back of the original lens and the camera body? If the latter, how do you attach the entire thing to the camera?

    Thanks,
    Mike

  26. Anonymous
    November 25, 2009

    mir38 60mm at 3.5 work for this?

  27. Anonymous
    November 10, 2009

    That’s really neat! I’m linking to it from my blog, chrishokeblog.com.

  28. Anonymous
    October 30, 2009

    I just made this. I spent a lot of time on it only to be disapointed. It seems like the farther away I get the more in focus it becomes. Any help?

  29. Anonymous
    September 12, 2009

    You have to use a mid-format lens (a Biometar 80/2.8 is an ideal one; it’s the one used by the author here).
    There are 2 ways of focusing: by lengthening/shortening the bellows and by turning the focus ring on the lens itself.

  30. Anonymous
    September 5, 2009

    aso_70@hotmail.com
    Hi from Spain, i bought a m42 pentacom 50mm for my slr pentax and i try to do it.
    well, i´ll see that it i separate the lens from camera, i obtain a blurry image, more distance more blurry, i dont know how i can focus whith this tecnic.i only focus if i have a object very closer, if fact i have a rings for macro that do this, but i cannot use your tecnic.
    Can you help me?
    thanks

  31. Anonymous
    July 16, 2009

    I will build this!

  32. Anonymous
    July 16, 2009

    Yes,, but the lens baby is either tilt OR shift…not both…. ??

  33. Anonymous
    June 23, 2009

    Very cool DIY, when I have the time I am going to try this out!

  34. Anonymous
    May 11, 2009

    thanx

  35. Anonymous
    April 27, 2009

    Very neat and cheap , Nice job !

  36. Anonymous
    April 12, 2009

    exellent

  37. Anonymous
    April 7, 2009

    What do you mean by oversized lens?

  38. Anonymous
    March 17, 2009

    Do you recommend any particular focal length for this hack? Wide angle, normal, telephoto?

  39. odyn
    September 29, 2008

    Very interesting. But doesn’t the bellows change a lens into a close-focus macro lens? Can you tell what kind of lense did you use (focal lenght)?
    Thanks

  40. benh
    April 28, 2008

    I love a DIY how to – even if I did read it years late!

  41. anonymous
    May 2, 2007

    I use a $150 Lensbaby lens and have had great results with it. I would think that would be a lot sturdier than something handmade.