
Book Excerpt: How Do I Do That In InDesign?
Highlights from Dave Clayton's book of more than 250 fundamental tips and tricks that every InDesign user should know.
This article appears in Issue 130 of InDesign Magazine.
How Do I Do That in InDesign? by Dave Clayton is packed with more than 250 fundamental tips and tricks that every InDesign user should know.
We’ve gathered a dozen of our favorites in this excerpt. From swatches and libraries to tables, PDFs, and more, this is a superb sampling of essential InDesign knowledge.
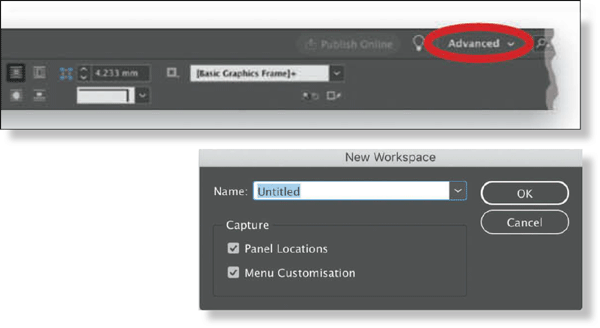
How Do I… Save, Delete, or Reset a Workspace?
When you have your InDesign workspace laid out to your liking, you can save the setup by going to Window > Workspace > New Workspace. In the dialog that appears, give your custom workspace a name and use the checkboxes to save the Panel Locations and/or Menu Customization. Once you click OK, you can select this saved workspace, or one of the default workspaces, from the menu near the top-right corner of the interface. The default workspaces include: Advanced, Book, Digital Publishing, Essentials, Essentials Classic, Interactive for PDF, Printing and Proofing, and Typography. You can delete a custom workspace by selecting Window > Workspace > Delete Workspace. If you alter any of the default workspaces, you can reset them by going to Window > Workspace > Reset [current selected workspace].
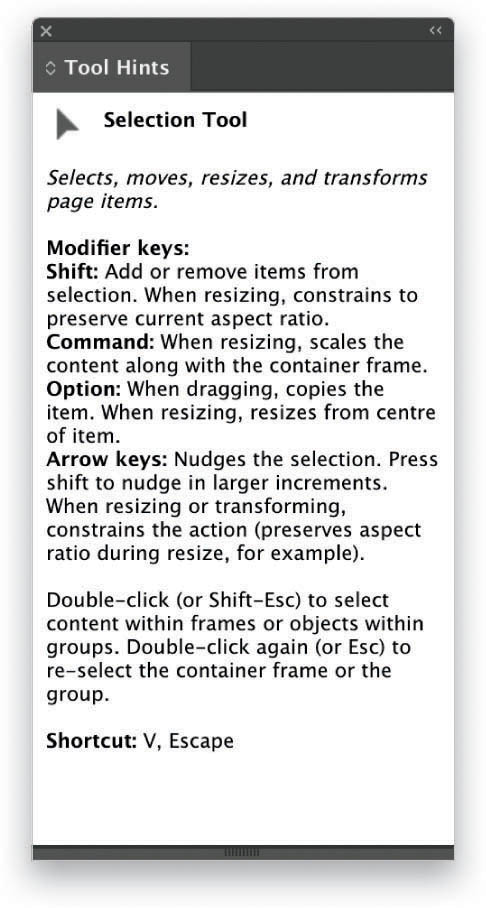
How Do I… Turn Tool Hints On and Off?
If you are still finding your way around InDesign, it might be a good idea to have Tool Hints switched on. To open (or close) the Tool Hints panel, go to Window > Utilities > Tool Hints. There is a hint for each of the tools in the Toolbar—the hint for the currently selected tool will be displayed in the Tool Hints panel. Once you become familiar with the tools you can turn this feature off.
However, even when you think you know everything about a tool, you may be surprised every once in a while when you discover another action it can perform.
How Do I… Add a Grid to My Document?
Sometimes you might prefer to work with a grid to help with precise placement of text and objects. Grids can be set up according to whatever preferences you choose. To do this, just go to Preferences (Command-K [PC: Ctrl-K]) and click on Grids in the column on the left. Here, in the Document Grid section, you can adjust the grid color; the horizontal and vertical grid spacing and subdivisions; and whether the grid sits on top of the document—meaning it will be visible on top of anything placed in the document—or at the back of the document where it will be hidden underneath anything solid.

How Do I… Color Code My Pages?
When you have a lot of pages in a document it’s useful to color-code them. Start by selecting the pages to which you want to apply a color code in the Pages panel. To select a continuous series of pages, click on the first page you want to select, and then hold down the Shift key and click the last page in the series. This will select the first and last page and all pages in between. To select numerous nonconsecutive pages, hold down the Command (PC: Ctrl) key as you click on each page you want to select. Once you have selected the pages, click on the Pages panel menu, select Page Attributes > Color Label, and choose your color from the list. This will apply a color tab to each of the selected pages in the Pages panel.

How Do I… Find Similar Fonts?
Choosing fonts is one of the hard parts of designing something with text, particularly when you start with no guidelines and a blank canvas. So let’s say you start with a font that’s not quite right, but you want to find something similar. Just select your text and open the font pop-up menu in the Control panel, Properties panel, or Character panel. Next to your chosen font are a couple of little wavy lines. When you hover over those lines, it will say Show Similar Fonts—click on this to see a list of fonts that are close in style to the one you started with. You can then go ahead and click on a different font to select it. Remember, if you change the font, you may find that your text no longer fits your text frame. In this case, click-and-drag a corner of the frame outward to adjust it.

How Do I… Adjust the Shade of My Color Evenly?
If you’ve created a new color using the Color panel and you decide you want to try a darker shade of that color, you can do so by adjusting the sliders. For example, with the CMYK sliders, you can drag the K (black) slider to the right to make the color darker, or to the left to make it lighter. For both the RGB and CMYK sliders, there is a little trick you can use to make an even adjustment to the color. All you have to do is press-and-hold the Shift key as you drag a slider to the left or right, and the other sliders will move with it until the one closest to the end hits its maximum. This adjusts the shade of the color evenly. Moving the sliders to the lighter end will lighten the color until it hits white.

How Do I… Merge Swatches?
What does “merge swatches” actually mean? It doesn’t mean you get a bunch of swatches and merge them all into one big ugly color. Rather, when you merge swatches, you remove a group of swatches (maybe duplicates or swatches that are similar) and replace them with a single color swatch. Here’s how it works: Select the swatch you want to keep, and then Shift-click or Command-click (PC: Ctrl-click) on the swatches you want to merge. Now when you Right-click and choose Merge Swatches, you will keep the first swatch you selected and remove all the others. The first swatch will replace the others wherever they were used in your document.

How Do I… Add Typed Content to CC Libraries?
If you have some typed content that you plan to use over and over again in other projects—such as contact info or social media links, for example—you can type out your text, style it accordingly, and drag the entire text frame onto your CC Libraries panel. Or you can select the text frame in your document, click on the + sign in the bottom-left corner of the CC Libraries panel, select Text from the menu, and click Add. The typed content is now available for use across all Adobe CC applications.

How Do I… Edit Typed Content Once It’s in a Library?
Double-click on the type asset in your CC Libraries panel and it will open in a new InDesign window. Make your changes, and then close that file. This automatically updates the type and you’ll see the change in the asset thumbnail. If you want to make a separate instance of the type so that you have two versions, Right-click on the type asset and select Duplicate, before you make any changes to the original type asset. Then edit the duplicate version.

How Do I… Move Columns and Rows Around?
It’s quite easy to move columns and rows around in a table without having to cut, copy, paste, or generally make a mess of your data. In this example we’ll move a column, but you can use the same method to move a row up or down. Start by highlighting the column you want to move, and then hold the cursor over any part of the highlighted area. When the cursor changes to a black arrow with what looks like two tiny cells on top of each other, just click-and-drag the column into a new position. When it reaches the border of another column, you’ll see a blue line appear, which means you can release the mouse and the column will be moved to that location within the table. Try it with a row too!

How Do I… Color Code My Menu Items or Make Them Invisible (Cool Easter Egg #4)?
I have learned some new things while writing this book, and I’ve been reminded of some long-forgotten tips. Here’s another one that involves organizing the menus to suit your preferences: you can color code menu items and make them visible or invisible in the menus. Just go to Edit > Menus, and you’ll be presented with a dialog that lists all of the menus (including application menus, context menus, and panel menus) and menu items in InDesign. Open the Category pop-up menu to select either Application Menus or Context & Panel Menus. To see the items within each menu listed, click on the arrow to the left of the menu name. Now you can click on the little eye icon to the right of a menu item to turn its visibility off, and click on that same space to turn it back on. You can color code an item by clicking on None (or the name of a color, if one has already been chosen) to enable a pop-up menu, and then selecting whichever color you choose. In the example above, I made “Open” green, and “Close” red. You can save your choices within a new workspace for future use. Don’t you just love customization? And rhetorical questions?

How Do I… Protect a PDF with a Password?
There may be times when you want to send a PDF to someone, but you don’t want just anyone to be able to open or edit the document. To ensure that only the intended recipients are able to open or edit your PDF, you can assign a password to your exported document. When using the File > Export option (see pages 249 and 250 for more on exporting to PDF), make sure you click on the Security tab in the Export Adobe PDF dialog. Place a check mark next to Require a password to open the document, and enter a password in the field below (make sure you remember it!). This prevents anyone other than a password holder from opening the document. In the Permissions field of that same dialog, you can also add a password to restrict printing, editing, and other tasks. Again, check the box for that option, and then decide on the level of control a password holder can have in terms of editing and/or printing. When you are happy with the security of your document, click Export.

Commenting is easier and faster when you're logged in!

Recommended for you

InDesign Magazine Issue 74: Flipbooks
We’re happy to announce that InDesign Magazine Issue 74 (June, 2015) is now avai...
InDesign Magazine Issue 116: Excel Tips
Issue 116 of InDesign Magazine with articles on Excel tips, list spacing, tiny t...
InDesign Magazine Issue 65: Long Documents
We’re happy to announce that InDesign Magazine Issue 65 (September, 2014) i...