


After the enthusiastic response to my homemade teleprompter story, I’ll share with you another gadget I recently constructed.
I needed to convert a reel of 16mm film to digital video for a historical documentary I am working on.
There are commercial services that will convert film to video for a fee, usually priced per minute plus a set-up minimum. Local photo store will often convert 8mm home movies for a reasonable fee, but for this 16mm project I found a professional lab in the Los Angeles area.
The lab charges $300 per hour plus the set-up fee. Altogether, the project would have cost $1,000 or more. Though not an outrageous sum, the hobbyist in me said, “Just do it yourself!”
So I built a rear-screen projection system for converting my 16mm motion picture film to video. The system I describe here will work with any projected film. It is surprisingly easy.
How Film is Transferred
When you send your film to a lab for conversion, the operators use a system called a telecine, which is essentially a projector and a video camera built together (see Figure 1). I operated one of these machines back in 1970 when I worked at the local TV station. A telecine has internal optics and uses aerial projection of the image, where there is no actual screen in the optical chain, but the light is focused there anyway, so the video camera photographs it in mid-air. The optics for this are too sophisticated for the average tinkerer.
 Figure 1: The Rank Telecine machine. Available used for only $100,000!
There are four parts to my system: a motion picture projector, a front-surface mirror, a rear-screen translucent projection screen, and a video camera. Let’s look at these in turn.
The Projector
The projector can be of any type. In my case I use a Kodak Ektagraphic 16mm synchronized projector (see Figure 2). It was made in the 1970s, but it still works perfectly, and it can play either magnetic or optical sound-on-film, which in this case was handy because the film I needed to transfer was news film with a magnetic sound track.
 Figure 2: The Kodak projector with my front-surface lens mounted in place.
The Mirror
The front-surface mirror is an important part of the system. Not only does it reverse the image, which is necessary because you will be photographing through the projection screen, but it also makes it possible for the video camera not to be focused directly at the projector’s lamp, which causes exposure troubles, and a visibly brighter center area.
Not any old mirror will work, either. I tried a piece of high quality mirror, but that caused tremendous trouble due to internal reflections. Conventional mirrors are silvered on the back, so that the glass in front can be cleaned. The 1/8-inch thickness of clear glass in front allows reflected light to bounce-around inside the glass, which made multiple images. The result was a video Mondrian.
So, I bought a “first-surface” optically flat mirror from Edmund Optics, at a price of about $30 for a 3-inch mirror disc. I then glued this mirror to a wood stand I built to fit the 16mm projector (see Figure 3). It’s important not to touch or clean first-surface mirrors, because (as its name implies) as the silvering is on the top surface, so it will scratch easily. This mirror solved the internal reflections problem, and makes a perfect reflector for my projector.
 Figure 3: The Edmund “first-surface” mirror mounted to a wooden bracket.
When I made the film-to-video transfers, I clamped the projector, the front-surface mirror, and the screen to the same bench, and then set up my digital video camera on its tripod a few feet away. Clamping everything ensures that there will be no movement or little or no vibration.
The Screen
The screen is nothing more than a wood frame with a piece of translucent plastic stretched tightly across its face. I tried a variety of media for this, and found that vellum was too fibrous (you could see the paper fibers in the video) and tracing paper was too opaque. I finally found a piece of white plastic at the art store that has no discernable grain or pattern, and which allows adequate light to get through.
I found that stapling creates ripples in the screen, so I eventually settled on stretched plastic held in place with Gorilla Glue — permanent and extraordinarily strong. I cut the corners off to remove the differences in tension between warp and woof (see Figure 5). This is a trick I learned from the screen-printing industry, whose tightly stretched screens are not tensioned at the corners to prevent tears and blow-outs. Then I hung weights on the plastic while the glue hardened
 Figure 4: Cutting off the corners helps prevent tears in the plastic.
Positioning the screen is simple. Make sure that the image is straight and square on the screen by measuring its edges with a tape measure. Once it’s square and straight, clamp the screen in place and set up the video camera (see Figures 5 and 6).
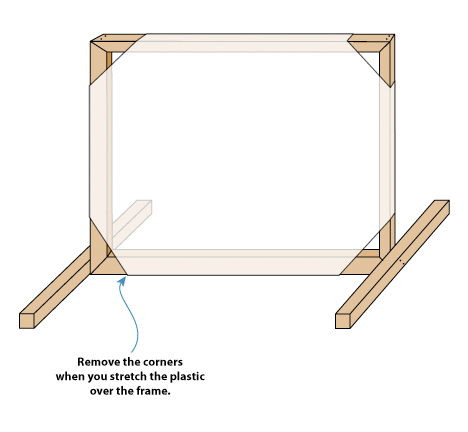 Figure 5: My rear-projection screen assembled.
 Figure 6: Overhead Schematic of system.
The Video Camera
Most any prosumer digital video camera will work; it’s important to have one with a variable shutter speed. Position the camera on its tripod so that the image on the rear-projection screen is straight and square in the viewfinder. I found that I needed to crop my film just a bit to get rid of visible frame edges in the motion picture film. Turn off auto focus! Set exposure to manual (you don’t want the exposure to wander), and make a sample tape.
Sound, if it’s present on the film, can be transferred to video by plugging a cable into the projector’s sound output and then feed that into the camera’s line or microphone input. A mixer may be necessary here, depending on the level of the output of the projector (mine has a line-level output in addition to an amplified signal).
Cleaning the Film
Dust accumulates on motion picture film, and you’ll photograph that dust unless you clean the source film before making your video transfer. This is part of what the professional labs charge $300 per hour to do.
Film cleaning solutions and special cloths for film are available at many photo supply houses. I found a good source at Climax Photo Supplies, which has a great selection of film handling products. They sell lint-free cleaning pads and film cleaning fluid. Remove the dust by soaking a pad in the fluid and running the film slowly through the pad.
Synchronizing Film to Tape
This is the trickiest part of the process. 16mm and 35mm motion picture film runs at 24 frames per second (fps) in the U.S. while European film runs at 25 fps. Various 8mm film formats traditionally run at 18 fps.
When the film is running at 24 fps, and the video camera is recording at 30 fps, you will inevitably get a “roll” pattern. The video camera will be photographing the closed shutter, and various partially open positions, too — think of it as a moiré pattern in video! The simplest solution is to speed up the projector slightly, or slow the shutter on the video camera until the roll pattern goes away.
Though my projector will not run at any speed other than 24 fps (its synchronous motor keeps it on-speed), many 8mm and Super-8 projectors have a variable-speed controller. If there is sound on the film, this won’t work (the pitch will change), but with no sound, a small adjustment of the projector’s speed will solve the synch problem. Watch the video camera viewfinder while you speed the projector slightly (18 up to about 20 fps), and the roll will soon go away.
Since I cannot speed or slow my projector, I look to the video camera to solve the roll problem. With one prosumer camera, a Sony PD-170, I was able to get a successful video with the shutter speed slowed to 1/15 sec. Though there is an appearance of jerkiness as a result of the slower shutter speed, it’s not an overwhelming problem, and the video looks OK. Shutter speeds slower than 1/15 second make unattractive video.
With a professional digital video camera the process is much easier. The Sony DSR-570WSL and similar cameras have a feature called Clearscan that is designed to eliminate roll interference when taping video and computer monitors. When I tested this camera, I was able to remove the roll with a small adjustment of shutter speed using Clearscan. The resulting video did not exhibit the jerkiness of a 15 frames-per-second video because it is very close to the normal 30-frames-per-second.
Once you have the system set up, project the film you want to record to digital video, capture the film on tape, then use an application like Apple’s Final Cut Pro to capture the footage (usually done over a FireWire cable), and do some color correction (always necessary in my experience). The results are worth the trouble, and the equipment can be set up whenever you need to make a film-to-video transfer.
Heck, you could even go into competition with the photo labs that provide this service!
This article was last modified on December 13, 2022
This article was first published on February 15, 2005
Commenting is easier and faster when you're logged in!

Recommended for you

8 Tips for DSLR Video Beginners to Shoot Great Video
Video is more accessible today than it has ever been. DSLR cameras with intercha...
Make a Pinhole Panoramic Camera
Tutorial compliments of “Make:” magazine. Pinhole cameras have been...

Turn your iPhone into a pro-quality light meter with Luxi
If you ever struggle to choose the right exposure settings on your camera, but y...