Becoming a Master in Your Digital Darkroom

If you’ve ever been smitten by the photography bug, you’ve probably yearned at least once or twice to try your hand at processing your own prints in the darkroom. However, many people are hesitant to try it, fearing they’ll irreparably damage their negatives. To confound the issue, much of the needed equipment is costly, especially when you’re not sure it’s really your bag in the first place.
Of course, all this is quickly changing, now that people are flocking to digital cameras, and their natural extension, the digital darkroom. And chances are, the most powerful component for that new darkroom is already sitting on your hard drive–Adobe Photoshop. Like its chemical and light predecessor, Photoshop allows you great control over an image, even after it’s captured. But do you know which tool is best for the job? In this article, we’ll show you various examples of digital images that could stand a little improvement, and then show you how to use Photoshop to make them great.
Starting with a Clean Slate
Before you do anything to an image, you want to first create a new layer to work with. That way, you can quickly compare your handiwork with the original picture. It also allows you to quickly revert to the original.
Dusting Off the Photo
The first thing you’ll want to do is remove any obvious noise from the image, and here we’ll use the same technique we’d use when cleaning up a scan–the Dust & Scratches filter. Granted, you probably don’t have any dust on your digital images, but you undoubtedly have a bit of noise, especially in the Blue channel. To get rid of the normal noise, press c-3 to display only the Blue channel. Then, choose Filter > Noise > Dust & Scratches. In the dialog box that appears, set a Radius of 2 and a Threshold of 1 and then click the OK button. (As with most of the techniques outlined in this article, you’ll need to experiment around with the settings a bit, depending on the resolution of your image.) You’ll now notice in Figure A that while the image is much blurrier than before, much of the noise is gone. Now when you press [z][~], you’ll notice that since you didn’t change the first two channels, there’s very little, if any, noticeable degradation of the image.

Figure A
The Dust & Scratches filter blurs the Blue channel, but doesn’t noticeably degrade the image.
Sharpening the Image
When you capture an image digitally, some of the detail gets lost by the CCD (Charge Coupled Devices), most notably along the edges of an item. With traditional film cameras, the same phenomenon occurs to a lesser degree and is normally corrected by the film developing process. With digital imaging, you should concern yourself with sharpening and while its name is a bit misleading, you’ll find the Unsharp Mask filter the best in the lot of sharpening filters to achieve this task. It sharpens an image by increasing the contrast of adjacent pixels in an image. The Unsharp Mask filter takes its name from the traditional darkroom technique of sharpening an image by masking a blurred negative to a positive. The technique allows you to sharpen an image without over-sharpening high-contrast areas. In a sharp image, you’ll find transitions between colors happening relatively quickly and over a small area. Soft images, on the other hand, tend to blur the transition over a larger area. And while you may be tempted to refer to this as sharp or soft focus, it isn’t technically correct–it’s the amount of transition between colors.
When you work with the sharpening features in Photoshop, you should realize that it actually goes a little further than just delineating between tonal changes. It goes a smidgen over on each side, increasing both tone and color a little bit beyond where they actually should be. This tricks the eye into seeing more detail than there actually is.
Photoshop provides three filters you can use to sharpen an image–Sharpen, Sharpen More and Unsharp Mask. All three sharpening filters can help an image appear in better focus. However, as we mentioned earlier, the Unsharp Mask filter is the only one of the three that allows you to control the amount of sharpening that’s applied to your image. To use the filter with an image, choose Filter > Sharpen > Unsharp Mask to display the dialog box shown in Figure B.
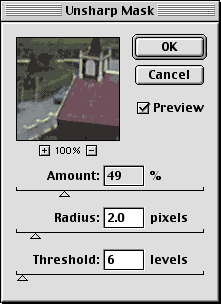
Figure B
The Unsharp Mask filter is the best choice for sharpening your images.
The three dialog box settings–Amount, Radius and Threshold–let you customize the sharpening amount to perfectly fit the needs of your image. The Amount setting determines the level of sharpening the filter applies to an image. Although you can specify a sharpening level from 1 to 500 percent, we suggest leaving this setting at the default 50 %–it’s a good, all-purpose setting. To apply very subtle sharpening to an image, you can set Amount as low as 25. However, in cases where an image requires more sharpening than the default setting applies, reapply the filter rather than raising the Amount setting. (Remember that to reapply the last-used filter using the keyboard, you just have to press [z]F.)
The Radius setting lets you blend the sharpening effect of the Unsharp Mask filter. This setting determines the range of sharpened pixels that Photoshop blends into the surrounding pixels–preventing high-contrast areas, such as edges, from becoming “crystallized.” Although Photoshop will accept a Radius setting of 0.1 to 250 pixels, in most cases you’ll never need to increase the Radius setting above 1 or 2 pixels. Specifying a setting that’s too high blurs all detail in your image.
The Threshold setting defines where in the image Photoshop should apply the Unsharp Mask filter based on the amount of contrast between neighboring pixels. You can set the Threshold setting from 0 to 255 levels. Each value represents the 256 levels of gray or color in a pixel. For example, setting the Threshold to 25 tells the Unsharp Mask filter to look for pixels that are 25 levels brighter or darker than nearby pixels and sharpen those pixels. Setting the Threshold to 255 directs the filter to look for areas with the highest amount of contrast, such as a black-and-white area (255 levels brighter or darker). Similarly, a Threshold setting of 0 tells the Unsharp Mask filter to sharpen the entire image. In general, use a Threshold setting of 0 to sharpen the whole image. Only alter the Threshold setting if you wish to sharpen specific parts of an image, such as the reflections in a window or a particular characteristic of a texture. Even then, before applying the Unsharp Mask filter, create a selection to isolate the area you want to sharpen.
Unfortunately, when working with the Unsharp Mask filter, there’s no hard-and-fast rule for any image–you have to approach each image differently. However, you’ll be best served if you experiment with several images and see how they look after a little alteration. As you can see from our test image in Figure C, the three settings at your disposal can greatly affect how an image ultimately looks.

Figure C
Depending on the settings, sharpening can improve or degrade an image.
But remember that an image that appears okay on the screen may look totally different when printed. As you experiment with the settings, print out a few samples so you get an idea of how the filter relates to the print.
The Dreaded Red-Eye
Nah, we’re not talking about the whiskey made popular by the cowboys, we’re talking about the effect the electronic flash has on your eyes. This phenomenon occurs when the light from your flash reflects off the blood vessels of the retinas of your subject’s eyes. Some cameras use a series of flashes to prevent it from occurring but unfortunately you’ll find a little red-eye pop up even in pictures taken with the most sophisticated cameras. Luckily there are a couple of ways that you can correct the red-eye problem. The first, and probably the simplest, is to use the Curves feature. For example, once you’ve used the Magic Wand tool to select the red portion of the pupil, choose Image > Adjust > Curves to display the dialog box shown in the top portion of Figure D.
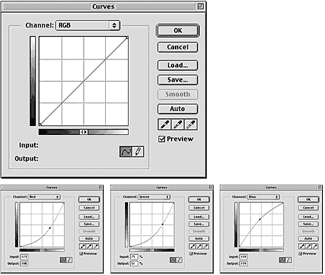
Figure D
Red-eye reduction may take a little trial and error.
Now choose the color you wish to adjust from the Channel pop-up menu and then simply experiment with the curve. As you’ll notice in the bottom portion of Figure D, you may have to alter each of the channels a bit in order to get the eye to look normal. And notice we said experiment. While this technique is very effective in fixing the red-eye problem, it’s still largely a trial-and-error type process. In most cases, you’ll want to add more black and less red, but after that, it really depends on the individual’s eye color.
Another option is to create a new layer and then paint in the red eyes with the Paintbrush tool with the color set to black. Then you can change the opacity of the layer to redraw the flash highlights. Granted this technique is relatively time-consuming, but it often leads to great results.
Correcting Underexposure
While the flashes on most digital cameras do a decent job, they just can’t match some of the external flashes that you can buy for traditional 35mm cameras. And since most of us are used to the luxury of stronger flashes, many of our digital images may be a bit underexposed. Fortunately, you can easily correct this using a bit of digital darkroom magic. To do so, we’ll use a feature in Photoshop called High Pass manipulation. It would take pages to explain how and why this feature works, so just trust us when we say it will lighten your image better than a simple adjustment of the Brightness/Contrast setting. To correct the exposure, you’ll first want to create a new layer and then paste a copy of the previous layer by pressing c[option][shift]E. Now, to brighten the image a bit and improve the contrast, choose Filter > Other > Custom (this lets you enter a custom setting for the High Pass filter). Then, in the Custom dialog box that appears, enter the values shown in Figure E.
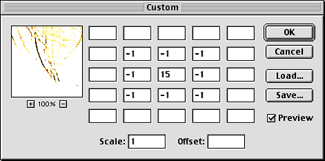
Figure E
Unless you’re into big-time image mathematics, you won’t want to know where these values came from.
Then when you click the OK button, you’ll see a much lighter image–much lighter than it actually needs to be. To come to a happy medium, set the layer’s blending mode to Overlay and then adjust the opacity of the layer until the colors look better.
A Little Background Work
With all the changes to the image, you might notice that the background is getting a little washed out. After all, we’ve been concentrating mainly on the subject in the foreground. For this technique we’ll create an inverted mask of the Blue channel to help us add a little more punch to the background. To begin, switch to the Channels palette and drag the Blue channel onto the Create New Channel button at the bottom of the palette. By default this channel is named Alpha 1 and it’s automatically selected. Now press cI to invert the image. Next, make the image high contrast by choosing Image > Adjust > Brightness/Contrast. In the resulting dialog box, set the Contrast to 100%. We also set the Brightness to -40%, but this setting will vary depending on your image. Click OK and you have the beginnings of a high-contrast mask.
To make a layer mask, return to the Layers palette and select the High Pass layer. Then, click the Add Layer Mask button at the bottom of the Layers palette. This attaches a mask to the High Pass layer, but the mask doesn’t contain any information. We’re going to paste information from the Alpha 1 channel.
To do so, switch to the Channels palette, turn on the visibility of the Layer Mask channel and Alpha 1, and then select Alpha 1. Press cA and then cC to select and copy the information in the Alpha 1 channel. Then, select the Layer Mask channel and press cV to paste the information into the layer mask. Now you can throw away Alpha 1 and deselect the image.
To modify the layer mask, use the Paintbrush tool to paint out all the rest of the image except for the skin areas. Once that’s done, choose Filter > Blur > Gaussian Blur to feather the selection a bit. We used a Radius setting of 2.
Once you’ve finished the mask, turn off its visibility and return to the Layers palette. Your image should look pretty good. However, select the High Pass layer and look at the image carefully to make sure no areas of the mask are noticeable.
Rubber-Stamping Out Your Friends
Once you’ve cleaned up the digital image, you’ll begin to notice other ways to improve on the photo. For instance, in the example shown on the left side of Figure F, the people in the background distract from the overall photo. Luckily you can use the Rubber Stamp tool to totally remove them from the photo (sorry, folks).
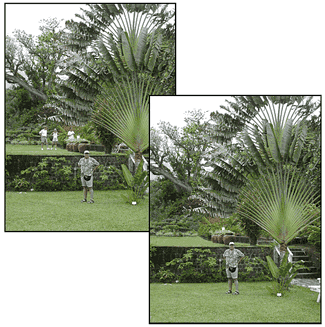
Figure F
Wouldn’t it be nice if you could get rid of houseguests this easily!
To do so, first click the Create New Layer button at the bottom of the Layers palette. Name the layer if you like and then select the Rubber Stamp tool. Since you’re working on a blank layer, select the Use All Layers check box. This allows you to alter the image on one layer while keeping the original intact (just in case you goof up). Now locate a portion of the image that you can sample to cover the “offending” potion of the image. In our example, nearly any part of the background foliage would have worked. Then, hold down the [option] key as you click on the image to define the sample point. Next, simply begin painting over the other section. Almost magically the people, or whatever else you don’t want, disappear, resulting in the image shown on the right side of Figure F. This technique can also be helpful in removing shiny spots and skin blemishes just like they do on the supermodels!
Tips When Using the Rubber Stamp Tool
When altering an image with the Rubber Stamp tool there are a few rules you should follow to get the best results.
- Match the hue, saturation, and tone of the sample area as close as possible to the area you’re covering.
- Take your time. This is one of those times where haste can certainly lead to waste.
- Keep the brush size to a minimum. The larger the brush, the less control you’ll have over the correction.
- Use small strokes even if you’re filling a large area. That way, should you mess up (and you will) you don’t have to redo everything.
- Consider another tool. Often simply copying and pasting a section of an image will work better, and quicker, than using the Rubber Stamp tool to clone a section of the picture.
- Don’t set the sample and the paint area too close together. Otherwise you’ll end up with an echoing of the sample pattern.
Everything is a Blur… Well, Almost
With traditional 35mm SLRs, you can alter the area of focus by using different aperture values. By altering the area of focus, commonly referred to as the depth of field, you can easily add emphasis to the subject of the photo. Unfortunately, since many digital cameras are automatic exposure, it isn’t possible to alter the depth of field when you capture an image–but it is possible in your digital darkroom. To do so, select the Blur tool, select an appropriate brush size for the resolution of your image, and then select the Use All Layers option. Again, this option allows you to quickly compare the original to the altered image.
Now move the brush over the area you wish to blur. For the far background of an image, the Pressure setting of 100% will work fine. But as you get closer to your subject, you should consider altering the setting to around 30 to 50%. That way, the blur appears more gradual, and gradual is the trick here. Once you’ve finished, the subject should stand out much better than before, as illustrated in Figure G. (If you’d like, you could also create a mask for your subject and blur out the rest of the image choosing Filter > Blur > Gaussian Blur. We’ve just found the Blur tool easier with most images.)
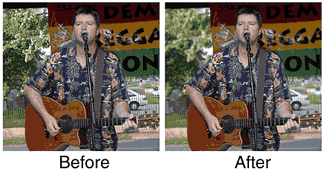
Figure G
Blurring the background simulates a shallow depth of field.
You’ll Never Get it Perfect
As you continue working with your digital images, you’ll quickly realize you’re becoming obsessive in your digital darkroom. There just always seems to be “one more thing” you need to correct. But while you may be tempted to clean up every image to the point of perfection, don’t forget that we live in an imperfect world and it’s often the imperfections that add interest to a subject. However, it’s always good to know that you have Photoshop around, should you need to make a few minor corrections to your digital image.

Copyright © 2000, Element K Content LLC. All rights reserved. Reproduction in whole or in part in any form or medium without express written permission of Element K Content LLC is prohibited. Element K is a service mark of Element K LLC.
This article was last modified on January 3, 2023
This article was first published on December 6, 2000
Commenting is easier and faster when you're logged in!
Recommended for you
How to Turn a Photo into Graffiti with Photoshop
You can turn any photograph into a piece of graffiti artwork in Photoshop, witho...

Know Your Photoshop Distortion Tools
Adobe Photoshop comes with more tools for adding or correcting distortions than...
CreativePro Tip of the Week: Resetting the Bounding Box of Objects in Illustrator
This CreativePro Tip of the Week on resetting the bounding box in Illustrator wa...


