


Once you’ve figured out the basic design of your site, the remainder of your work is largely repetitious. Put a little text here, insert a graphic there. Click, click, click, drag, click. Boring! And in a way, it’s sort of anti-climactic. After all, you’ve already done the challenging stuff. All that’s left is the grunt work. So how can you hurry through these tasks as quickly as possible? By turning the initial design elements into a template. That way, all you have to do is insert the content and you’re set. Plus, should you decide to make last-minute changes, you simply change the template and it updates related pages automatically. So let’s take a few moments to look at how you can speed things up by using Dreamweaver to create templates.
Bare Bones
To create a template, you’ll need to strip a page down to only those things that will appear universally on your site–navigation elements, logo and the like. For our example, shown in Figure A, we’ll use a page that contains rollover navigation, a logo and a simple table. Also notice that we chose to include placeholders for content. This is helpful if someone else is doing the work, as it reminds him to fill the area.
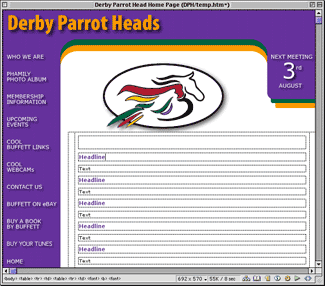
Figure A
We’ll start off with a page that includes all the basics for our site.
Since you would normally use a template across an entire site, Dreamweaver assumes you associate your template with a site defined within the application. To do so, choose Site > Define Sites and then in the dialog box that appears, click the New button. Now you’ll need to complete the information that appears in the Site Definition dialog box shown in Figure B. While it isn’t vital that you complete each section, it will definitely help you out in the long run. Once you’ve finished with the definitions, click the OK button to close the dialog box and then click the Done button in the Define Site dialog box.
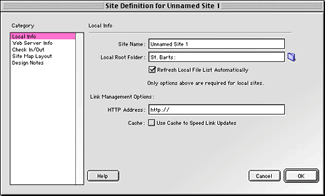
Figure B
Enter the name for your site and the local root directory for the files in the Site Definition dialog box.
Once you’ve defined your site, you’re ready to save the file as a template. To do so, simply choose File > Save As Template to display the dialog box shown in Figure C. Select the site you just set up from the pop-up menu (if you have more than one site defined), and then name the file. Notice that there’s a list area for other existing templates for each of the sites. This makes organizing your templates a breeze.
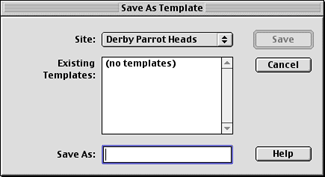
Figure C
You can name templates based on their use to aid their organization.
For our example, we’ll name the template news. That way we’ll be able to easily locate the correct template for our news pages. Now when you click the Save button, Dreamweaver renames the file accordingly while appending the name with <<Template>> in the title bar.
Allowing Changes
Once you’ve created a template, you’ll then have to go in and define what’s editable and what’s not. As it currently stands, the entire file and all of its contents are locked.
To define an area as editable, select it and then choose Modify > Templates > New Editable Region. Then enter a name in the dialog box that appears. Again, be sure to name it something representative of the area. You’ll notice in Figure D that we named the first cell Headline 1. Not too original but it will help us keep things straight. Now, when you click the OK button you’ll notice that the area defined as editable is shaded blue. This just helps you remember what’s defined and what isn’t. Now, we’ll continue throughout the rest of the document and define the other areas.
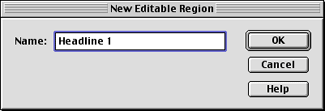
Figure D
Always try to name the editable area something related to its function on the page.
Once you’ve defined each of the editable regions, you can then go back and set the default formatting for each item. To do so, choose Window > Properties to display the Properties Inspector. At this point, any of the characteristics you choose for the item will carry over in the template itself. For our Headline 1 area, we set it up to always use a size 2, Verdana, with a mild purple color.
Changing Dates
You might have noticed the date tab in our example. This graphic is replaced each month to reflect the next meeting date. But here, we don’t want to define it as a New Editable Region. Instead, select it and then choose Modify > Templates > Mark Selection As Editable. That way the graphic isn’t replaced by the placeholders. Then, to replace the graphic, all you have to do is double-click on it and locate the new file. Figure E shows the final template we’ll use for our news items. Now save the file and let’s see how easy it is to work with a template.
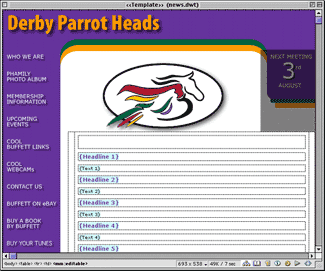
Figure E
The final template shows the editable regions.
Simple Editing
To use a template, choose File > New From Template and then select the file you just created. When it opens you’ll notice that many of the areas are highlighted yellow, as shown in Figure F. These are areas that you can’t change without changing the template. Now, to add your content, just press the [tab] key to advance to the first editable region. Next, when you’ve finished with the first item, press the [tab] key again to move to the next section. Repeat this procedure until you’ve completed the document. Then you simply save the file as you would any other Dreamweaver document.
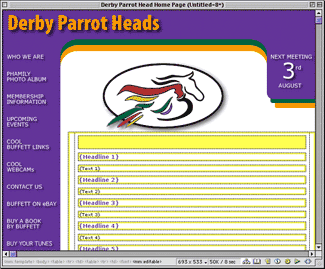
Figure F
The yellow areas designate regions of the page that you can’t alter.
The Beauty of it All
Though it might appear that simple data entry is the only benefit of templates, several other aspects make their use attractive. For one, you don’t have to worry about someone accidentally changing a table attribute or deleting a graphic. You can protect anything you want from accidental slips of the mouse. Another benefit is the ease of which you can update each and every page based upon the template. For example, should you decide to change the text style or even an editable region, all you do is open the template and make the change. Then, when you save the file, the program asks you whether you wish to update the files based upon it. If you click the Update button, Dreamweaver goes through each file and makes the appropriate changes and then displays the results in the Update Pages dialog box, as shown in Figure G. If you choose not to update the pages, the related pages stay the same, while the template is updated.
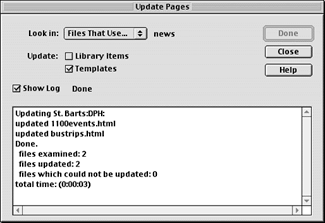
Figure G
You can update every file based on a template in a matter of seconds.
Conclusion
By carefully defining your work before you begin adding content to your site, you can save yourself tremendous amounts of time down the road. Working with large sites can be a daunting task but with the use of templates you can quickly add content to pages and still change entire portions of your site on the fly.

Copyright © 2000, Element K Content LLC. All rights reserved. Reproduction in whole or in part in any form or medium without express written permission of Element K Content LLC is prohibited. Element K is a service mark of Element K LLC.
This article was last modified on January 8, 2023
This article was first published on December 12, 2000
Commenting is easier and faster when you're logged in!

Recommended for you
InQuestion: Matching Photoshop Colors, Combining Documents, Using Smart Guides
Learn how to troubleshoot and solve common problems in InDesign

What's New with CC Libraries
When Adobe MAX arrived in Los Angeles the first week of November, it brought wit...
Is Apple Working on rivals to Photoshop and Illustrator?
You’d think that Apple might have enough on their plate with the debuts of...