is now part of CreativePro.com!

Applying Flexible Paragraph Spacing in InDesign

15

When it comes to creating space between paragraphs in InDesign we generally use the Space Before and Space After options. These settings suffice for continuous text flow. However when I work on single-frame stories, there are times when I wish I had access to what I’d call ‘flexible paragraph spacing’ in InDesign.

I use two workarounds to fake flexible paragraph spacing, and wanted to share these with you in two examples that require slightly different workarounds.


Example 1

  • You have a single text frame.
  • The frame contains only two paragraphs.
  • You want to be able to change the height of the text frame while aligning first paragraph to the top of the text frame and the second to the bottom.

visual example

Workaround: Use Vertical Justification and Paragraph Spacing Limit

The workaround for this is relatively easy, as long as your text frame only contains two paragraphs.

  1. With the Selection tool, select the text frame.
  2. Choose Object > Text Frame Options to display the Text Frame Options dialog box.
  3. Click the General tab. In the Vertical Justification section, set Align to Justify.
  4. Next set Paragraph Spacing Limit to a large number. I use 150mm (5.9in) in this example, which far exceeds the height the frame will ever have.
  5. Click OK.

Vertical Justification Dialog box with Align set to Justify and Paragraph Spacing Limit set to 150mm.

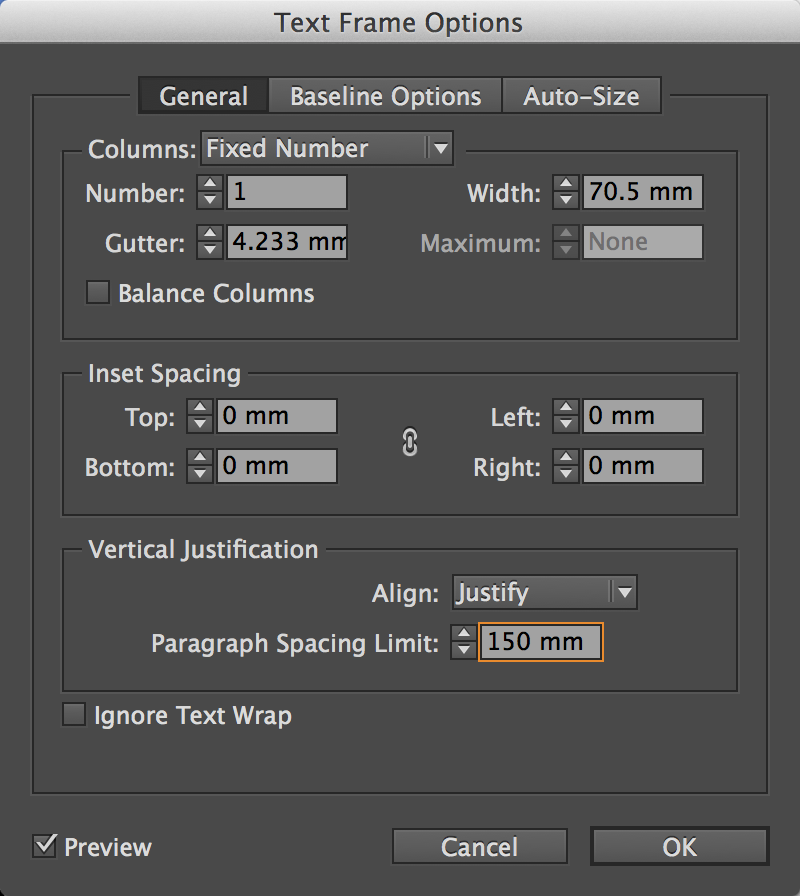
When Align is set to Justified, InDesign will align text to the top and bottom of the text frame, inserting additional spacing between the lines of the paragraphs (increasing the leading) and space between the paragraphs. To make sure that space is only added between the paragraphs, set the Paragraph Spacing Limit to a number that is equal to or greater than the maximum height the frame will have. Once the Paragraph Spacing Limit is set, you can adjust the height of the text frame and the second paragraph will always align to the bottom of the frame.


Example 2

  • You have a single text frame.
  • The text frame always has the same height.
  • The text frame contains two or more paragraphs (I’m using three paragraphs in this example).
  • The length of paragraphs one and two will vary.
  • The last paragraph is a single-line paragraph, that must align to the bottom of the text frame.

Visual example of advertisement with non-threaded text frames.

Workaround: Use a Text Frame Baseline Grid

This workaround is a little more complex. But assuming the text frames in the layout are the same height, as in the ad-example I’m using, the workaround will do the trick.

There are two things we need to do:

  • Ensure that the paragraph at the bottom of the frame is aligned to baseline grid.
  • Set the baseline grid at text frame level.

Align to baseline grid

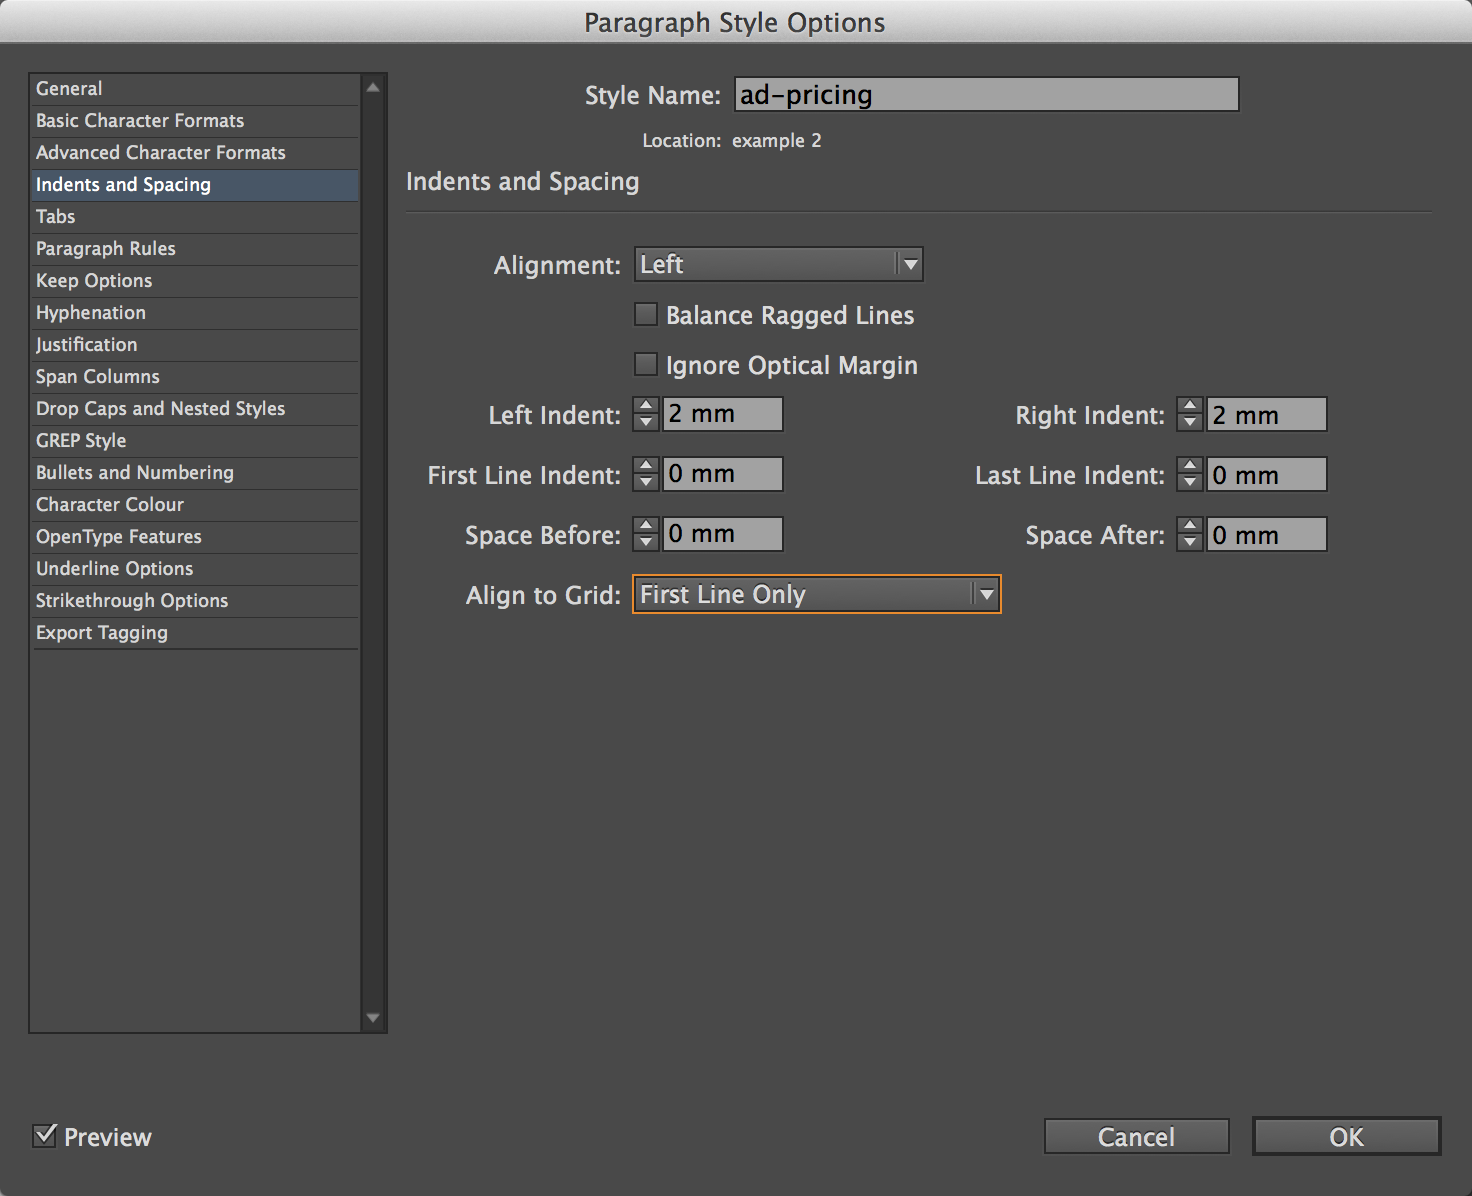
I’ve applied three different paragraph styles in the example: ad-title, ad-text, and ad-pricing.

  1. In the Paragraph Styles panel, click the paragraph style name of the last paragraph in the text frame (ad-pricing in this example).
  2. Choose Style Options from the Paragraph Styles panel menu.
  3. Click Indents and Spacing in the left column.
  4. Set Align to Grid to First Line Only. (Since this example uses a single-line paragraph, selecting All Lines would work as well).
  5. Click OK.

Paragraph Style Options dialog box, Indents and Spacing selected, and Align to Grid set to First Line Only.

Set baseline grid at text frame level

A baseline grid is more commonly used across a document, and generally aligns body text to a grid. When working with column-based layouts, where the text across columns must be aligned, a document-based baseline grid is a big help. Document baseline grid settings are set in Preferences > Grids. Text for which Align to Grid is enabled will snap to the grid.

In this example I set the baseline grid at text frame level, so that each text frame has its own baseline.

  1. With the Selection tool, select the text frame.
  2. Choose Object > Text Frame Options to display the Text Frame Options dialog box.
  3. Click the Baseline Options tab. In the Baseline Grid section, select Use Custom Baseline Grid, and set Relative To to Top of Frame.
  4. Select Preview, and increase the Baseline Start value until the third paragraph is aligned properly.
  5. Click OK to apply the settings.

Text Frame Options dialog box, Baseline Options selected and Start set to 64mm

Automating the workarounds: Next Style and Object Styles

These workarounds might seem to take a lot of effort, but you can apply all the required formatting with a single click via object styles. An object style can apply text frame options like Vertical Justification and Baseline Options, and it can also automatically apply paragraph styles sequentially with the Next Style feature.

Enabling Next Styles

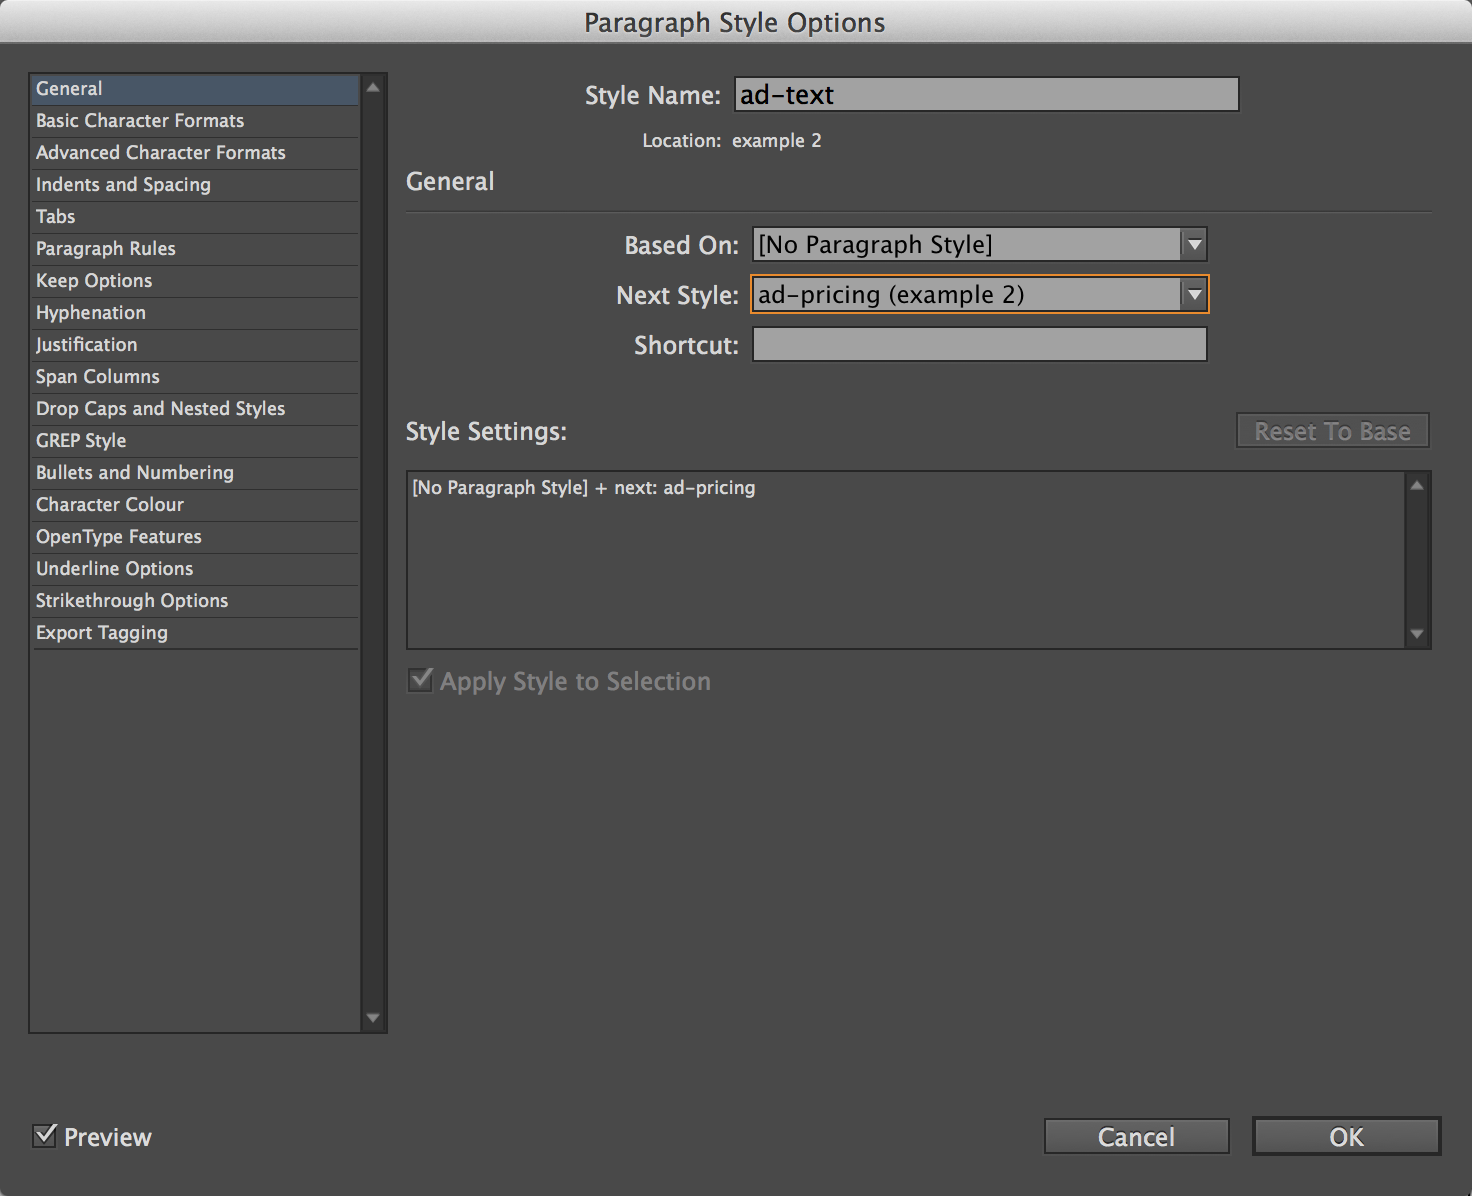
For each of the paragraph styles used to format the text, set the Next Style option in the General section of the Paragraph Style Options dialog box. The Next Style is the paragraph style you want to apply immediately after the style for which you select the options.

  1. Right-click the paragraph style and choose Edit “style-name” to display the Paragraph Style Options dialog box.
  2. Select the General category on the left, and select the style name that you want to apply immediately after the current style from the Next Style menu.
  3. Click OK.

Paragraph Style Options dialog box, with General selected, and Next Style set for the style.

Creating an Object Style

The text frame specific settings (including the first paragraph style that is applied) can be applied with an object style.

To create an object style:

  1. With the Selection tool, select a text frame with all the desired formatting (insets, vertical justifications etc.).
  2. From the Object Styles panel menu (Window > Styles > Object Styles) choose New Object Style to display the New Object Style dialog box.
  3. Name the style, and select Paragraph Styles in the left column.
  4. Select the first Paragraph Style you want to apply, and select the Next Style Option.
  5. Click OK.

Object Style dialog box, with paragraph styles selected, and paragraph style set and apply next style enabled.

You can now apply all the desired formatting with a single click. Ta-daaaah!

process animation, select text frame, click on style name in object style panel

My wish list

These are two relatively simple examples. I’m sure you’ve encountered other examples where you could benefit from flexible paragraph space settings—I know I have. If you have a favorite workaround, please share it in the comments.

On my wish list are the following:

  • The ability to set the Space Before for a paragraph to ‘Auto’. With this setting set to ‘Auto’, there would be no need to increase the Paragraph Spacing Limit. Instead, setting Vertical Justification Align to Justified would only add spacing above or below paragraphs with their spacing setting set to ‘Auto’.
  • The ability to assign the first line of a paragraph to specific baseline number. In the second example, I’ve kept things simple by only aligning the last paragraph to a baseline. But what if you had ads with more than three paragraphs, and some of them included an additional paragraph that had to be positioned in a specific vertical position in the text frame? It would be nice to set Align to Grid to ‘First Line to Baseline One Only’ and for the next paragraph style, ‘First Line to Baseline Two Only’.
  • Currently, baselines repeat themselves based on the Increment Every setting, so the distance between each baseline is identical. I am imagining a future where we can assign single baselines to top, middle and bottom vertical positions. A bit like how we can set paragraph rule above and below. Each would have it’s own settings. In that case, we could take my second wish list item a step further :)
Cari Jansen is based in Perth, Western Australia and works throughout Australia as a technical writer/editor, print, electronic (EPUB, Kindle, Tablets, Adobe DPS) and eLearning publishing consultant, software trainer, course developer, and public speaker. She's an Adobe Certified Instructor (Adobe Acrobat, Digital Publishing Suite, Illustrator, InDesign, Photoshop), Adobe Certified Expert (Adobe Captivate and Muse) and an Adobe Community Professional and Adobe Training Partner based in Australia. In 2008 she founded the Perth inDesign User Group, which she ran until late 2013. You'll meet Cari at industry events, both as an attendee and speaker, speaking on a range of print and digital publishing technologies and trends. To learn more about Cari, visit her web-site: www.carijansen.com. You can also follow her on Twitter, Facebook, Google Plus and YouTube
  • My wish list for paragraph formatting lies in a different area.

    It pains me to say this, but I long for ID to have the same options to tint within or place lines around a paragraph that Microsoft Word has. And if I recall right, Word can even place each paragraph so formatted in a separate box or create single box around a series of paragraphs. Page breaks should be handled intelligently too, perhaps with a dotted line at the bottom rather than a solid one. And all that should be done as a paragraph style, so it’s easy to apply and change.

    That make it easy to attractively set off portions of a text. without using kludges like one-column tables.

  • Cari Jansen says:

    hi Michael,
    That is definitely a feature request close to my heart as well.

    * It would mean we could have set features such as margin, padding, border and background-color, AND see these converted when publishing to EPUB or HTML from InDesign :)
    * It would mean we could add a line to the left of a paragraph that automatically adjusts its length as the number of lines in the paragraph increases or decreases, without the need to use a script.
    * It would mean we no longer need inline text frames or tables as a work around for this.
    * It would mean we can split paragraphs containing a background tints across pages more easily, without the need to manually tweak the layout each time content is edited.

    I added this as a feature request to Adobe Voice (InDesign Secrets) some years ago. A good reminder that David and Anne-Marie started this feature request forum some years ago. https://bit.ly/1nRZbDF Give it a vote and help it move to the number one spot on the list :) (it’s number 5 feature request currently I think).

  • Wow, great tips, Cari! That was worth the wait! :)

  • Mike Rankin says:

    Awesome post, Cari!

    One other option I thought of is to use two linked frames instead of one. Stack them on top of each other. In the second frame, set the Vertical Justification to Bottom. And set the Keep Options on last paragraph style (the one that you always want to stick to the bottom) to Start Paragraph in Next Frame.

    With this method you could have any number of paragraphs using whatever fixed space above/below values you wanted, and the last one will always appear to stay at the bottom.

    One downside is that (as Cari reminded me) you couldn’t apply a single object style to both frames, since that would mess up the Vertical Justification setting. Auto-sizing also wouldn’t work. And two frames is just more complicated than one. Mo’ frames, mo’ problems. But maybe someone somewhere could use something this.

  • Jean-Claude Tremblay says:

    Thanks Cari, I love that stuff… food for the InDesign geek in me! ;-)

  • Jean-Claude Tremblay says:

    Two others ways (not as clever than what Cari share with us) to achieve this:

    1. Use two anchored text frame inside an empty text frame. One custom align to top of text frame, the other to the bottom of the text frame. Set both original text frame to Auto-resize in height.

    2. Use a Table with only two rows and one column. Align the text to top for the first cell, and to the bottom for the second cell. This can be automate by using table/cell styles along with paragraph styles in cell definition.

  • Cari Jansen says:

    @David, @Mike, and @Jean-Claude Thank you for the kind words :)

    Happy to see I got a few more InDesign geeks puzzling on this :)

    There are quite a few other work-arounds, this was the cleanest example I could come-up with (using a single text frame).

    The problem is though (for example 2), that IF the height of the frame were to vary in that case, the solution would fail, and that’s where the ability to have access to more advices grid features and real flexi-spacing in InDesign would help :)

    Jean-Claude’s workarounds do give the option for example 2 to change the height of the parent text frame, however they also have a draw-back in that both will need to have text placed in two steps, as threading isn’t an option.

    Cari

  • Eugene Tyson says:

    I’m getting to a stage of laziness… just draw 2 text frames.

    I know, I know, I know… All these text frames on a page. But you know what I was working on a magazine recently and I came across a page layout, it went through extensive reviews right up to publishing day!

    I had to lay it out so many different ways, in the end, because of deadlines, I have most paragraphs, including headings in separate text frames.

    Why? Because I had to move things around so much. I used some cool tricks along the way, but when the deadline was looming, I resorted to just plonking everything in separate frames. It just made it easier to move things around.

    Will this ever be an ePub? Probably not, but I’ll cross that bridge if I get to it.

    • Mike Rankin says:

      I don’t think you’re lazy Eugene, just smart. There are different kinds of efficiency, and at the end of the day it’s just about getting the job done well (enough) and on time. Sometimes the coolest solution isn’t the smartest one. :)

      • Eugene Tyson says:

        Ha – thanks Mike! Actually, when others look at my files they can’t figure out how I did something. I was actually styling whole pages using Object Styles – using 1 click.

        Guess my point is, if you’re going to do something outside of the “norm”, I highly recommend writing a “How-To” guide and leave it on the pasteboard for the next designer who has to use your file(s) :)

        This is a practice I follow quite often – actually it really helps me too, because I might work on 1 file once a year or something, and I can see my how-to guides when I open files to remind me how I did something the last time!

  • Richard Groff says:

    What’s been on MY wish list for ages is this: Ultimate control over vertical justification, which would include the ability to set the amount of extra space that could be inserted before a paragraph and the ability to set a paragraph so no vertical justification would occur within it.

    Currently, when I’m paging books, I often have to add or remove slight amounts of space above heads or between elements to align pages at the bottom. I’d like to see these options when setting up a paragraph style:

    Vertical Justification Allowed Within: Yes/No
    Vertical Justification Allowed Above: Yes/No

    And the ability to set percentages for vertical justification above so, for instance, A Heads can have more space above than B Heads or Bulleted Lists.

    I know there are plug-ins available, like ProperVJ, but it would cause problems when handing off files to others to work on who don’t have the plug-in.

  • caddingt says:

    Agreed, Richard. I long for a vertical justification feature like the old Quark had. That’s number two on my wish list. Number one is relative expressions — leading = 120% of type size, etc. As nice as the “math in the field” feature is, it’s not enough.

  • lili says:

    this is great thank you!
    how do you apply spacing between two different styles? I have a document that has two different fonts as the writers switches between present and past memories. the length of the paragraphs varies. I dont want space before or after in between paragraphs that have the same font but between paragraphs that have different fonts (basically different paragraph styles)…. regardless of the length of the paragraphs.
    I hope I am clear… and thank you so much for your help!

  • Richard Coda says:

    I have searched and this is the only thing I could find that made any sense. I cannot get it to work. InDesign 17.4.1. Single text frame, everything done as you have set it up and I still can’t get that last paragraph (para style “table inline”) it is a 2×4 table that I need at the bottom of the text frame. I never use grids, for exactly this reason, they are difficult to work with and I spend more time fighting them than it’s worth. Am I missing something here? Does this not work if the last paragraph is a table? Tried it with and without a hard return. With auto leading and 26 pt fixed (table height). I have next style set to the header in the next frame, but can’t get this table to stick to the bottom. Any help is appreciated.

    • Richard Coda says:

      I think I just answered my own question. This works using JUST text (paragraphs). It does NOT work if that last paragraph is a table. Yeah, I don’t know why, but “Come on, Man (Adobe)!”

  • >