

I’m slightly hesitant to write yet another post about CS5’s animation features that possibly nobody cares about, but I’ll risk it. This discovery was just too cool (IMHO) to keep under wraps. And we’ve all agreed not to speak of the purple bike again, right? Cool.
The gist here is that if you’re willing to work in a little IDML code, you can have greater flexibility and create a much wider range of animation effects than you can by working just in InDesign.
To illustrate, let’s look at the Fade Out animation preset. Literally. Apply it to an object and look at it. See how it makes an object completely disappear? Fair enough. It is called Fade Out. But what if you wanted to partially fade an object? Like from 100% opacity to 50% opacity. How do you order a half caf Fade Out? In the Animation panel your only choices for opacity are None, Fade In, and Fade Out. There’s no opacity slider or field in which you can set a specific amount of fade. So what can you do? Well one workaround is to have two copies of the object stacked. Have the one underneath set to 50% opacity in the Effects panel. Then apply the Fade Out animation to the object on top. If you’re totally codaphobic, you can do this and it works. But the IDML solution is more elegant, and allows you to do much more.
First create a Fade Out animation, then export the animated object as an InDesign Snippet. Snippets are made of IDML, and it’s a lot quicker to find the relevant code in a snippet than it is in a full IDML archive.
Open the snippet with your favorite XML (or plain text) editor and locate the AnimationSetting element.
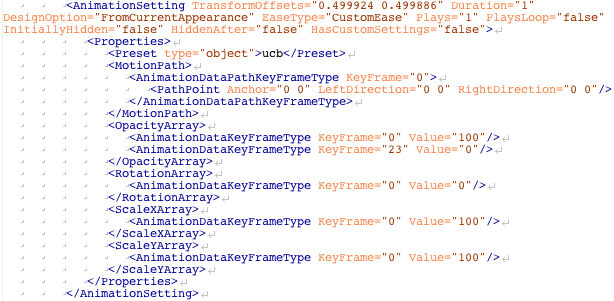
The AnimationSetting element has a number of properties: a Preset, a MotionPath, and a number of arrays that determine how the opacity, rotation, and scale of the object change over time. Each array contains one or more AnimationDataKeyFrameType element. These are your keyframes. They establish the value of a property at a specific point in time. MotionPath keyframes are a little different. They create motion by associating PathPoints with keyframes, basically telling the object where it has to be at a certain point in time.
The ability to insert keyframes isn’t directly exposed in the InDesign UI. But we fearless IDML explorers don’t need no stinkin’ UI! By going directly into the code and inserting additional keyframe elements and/or changing their values, you can customize animations to your heart’s content. It’s not as quick and tidy as clicking a button in a dialog box, and you don’t get the immediate gratification of a preview, but it’s pretty painless, and you earn extra geek points.
If you look at the OpacityArray in this example, you see that at keyframe 0 (the start of the animation) the opacity is 100(%). Then at keyframe 23 (the end of the animation) the opacity is 0(%). Any guesses about how you could fade to 50% opacity? Change the value in the last keyframe to 50.

Simple enough? Yes, but there is another thing you have to check and possibly change in the code. There is an attribute of the AnimationSetting element called HasCustomSettings.
![]()
If you make changes to the default values of a preset in the Animation dialog box, HasCustomSettings will be true. If you do not make any changes, HasCustomSettings will be false. The value of HasCustomSettings must be true in order for your IDML edits to hold when you place the snippet back in InDesign. Otherwise InDesign will ignore your keyframe tweaks and apply the unaltered preset animation. So if the current value of HasCustomSettings is false, change it to true and you’re in business. Save the changes to the XML and you’re done working in the code.
Place the Snippet into your InDesign document. But before you preview the results of your hand-coded awesomeness, there’s one more thing to do. Check the Animation panel to see the value of Event(s). If it was set to On Page Load before you exported the snippet, it will probably say Choose.
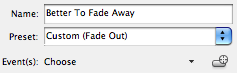
If that’s the case, just choose On Page Load from the pop-up menu.
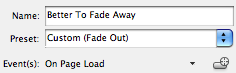
I’m not exactly sure why InDesign develops a case of amnesia about this particular event. The other events, On Page Click, On Click (Self), and On Roll Over all spawn TimingSetting elements in IDML that hold the event.
![]()
In any case, it’s an easy fix.
With this technique in mind, you can experiment by adding keyframes and changing their values to create new animation effects impossible to create solely in InDesign’s UI.
This article was last modified on December 20, 2021
This article was first published on January 13, 2011
Commenting is easier and faster when you're logged in!

Recommended for you

Preflighting eBooks for Overrides
With the help of the Preflight panel, a plug-in, or a cool script, you can spot...

Tip of the Week: Creating Custom Motion Paths for Animation
This tip was sent to Tip of the Week email subscribers on December 10, 2015. Sig...

Making Illustrative Effects in Photoshop
Combine illustration and photography to create an intriguing image. Drawing skil...