

As you drag to create or move objects on an InDesign page, you may have noticed lines, arrows, and other indicators appearing and disappearing. These are Smart Guides and other elements that can help you work more precisely. If you haven’t yet used Smart Guides, the following tips will introduce you to easy alignment and spacing that will result in better-looking pages.
Smart Guides for the Page and Column Centers
The simplest Smart Guides are the two magenta-colored lines that indicate the horizontal and vertical center of the page. As you drag to create an object, these guides appear whenever the cursor passes through the vertical or horizontal centers. This allows you to align the top, bottom, left, or right edges to the centers of the page.
Figure 1: The magenta horizontal and vertical Smart Guides indicate when an object’s edges align with the centers of the page.

These center marks are also displayed when the object passes through the center of the column. Adobe calls them Column Guides. If the top and bottom or left and right margins are equal, the page centers and column centers will be equal. However, if you have unequal margins on the left and right or top and bottom, these centers are not the same as the centers for the page. Watch the guides. If the guide is magenta and touches the edge of the page, it’s displaying the center of the page. But if the guide is violet and stops at the column, it’s displaying the center of that column area.
Figure 2: An example of the vertical center of a page and the horizontal center of the column.

These column guides are also visible between individual columns if you have multiple columns on the page.
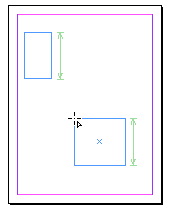
However, as you drag to create an object, the guides don’t indicate when the center of the object passes through the Smart Guides. You need to finish drawing the object and then move it around the page to see the Smart Guides for an intersection with the center of the object.
Figure 3: Once you have created an object, you can move it into position to align the center of that object to the page center.
Watch the video below for another explanation of what Smart Guides are and how to work with them.
Smart Guides for Object Edges and Object Centers
In addition to the page centers, you can also use Smart Guides to align objects with each other.
With an object on the page, start to draw or drag another object. A Smart Guide, in the form of a green line, appears when the object’s edge aligns with the edge of the other object. Release the mouse with the Smart Guide visible and your objects are aligned.
Figure 4: A green alignment guide appears when the edge or center of one object is aligned to another object’s edge or center.

This alignment is very flexible and extensive. One object can align to the top, bottom, left, right, or center of another object. That’s even more flexible than the Alignment panel, which only lets you align similar edges.
Smart Dimensions of Smart Guides
Smart Guides also tell you when the horizontal or vertical size of one object is equal to the horizontal or vertical size of another. This is called the Smart Dimensions feature of Smart Guides. Smart Dimensions work as you create an object as well as when you modify it.
To see the Smart Dimensions indicators, start dragging. When you see a double-headed arrow appear on that object’s edge and another object on the page, you know the dimensions are equal. If you have several objects on the page with the same dimensions, the Smart Dimension arrows will appear on all those objects.
Figure 5: The Smart Dimensions arrows indicate when the size of one edge of an object is equal to the size of another object.
You can only compare the same dimension of one object to another, which means you can’t compare the horizontal size of one object to the vertical size of another.
Smart Guides for Rotation
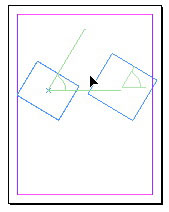
In addition to the Smart Dimensions for objects, you can also see when one object is rotated to the same amount as another. Start with a rotated object on the page and use the transformation handles or the Rotation tool to rotate a second object. When you see rotation indicators on the objects, you know they’re both rotated to the same angle.
Figure 6: The indicators for Smart Guides for rotation show that the two objects are rotated to the same angle.
Smart Spacing of Smart Guides
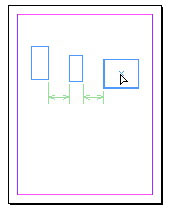
This one will blow you away. If you have two or more objects on the page, you can move a third object so that the space between all three objects is identical. This works only with objects that you move into position, not objects that you are creating by dragging.
Use the center point to move the object into position and you will see double-headed arrows appear between the objects. This indicates that the spacing between those objects is identical. Note: The objects must be in the same area for the Smart Spacing to take effect.
Figure 7: The double-headed arrows between objects indicate that the space between those objects is identical. This is called Smart Spacing.
Setting the Smart Guide Preferences
You don’t have to settle for the default preferences for Smart Guides. You can set your own options for how Smart Guides work.
Choose Preferences > Guides & Pasteboard. This area contains the options for working with Smart Guides.
Figure 8: The Guides & Pasteboard preferences contain the options for working with Smart Guides.
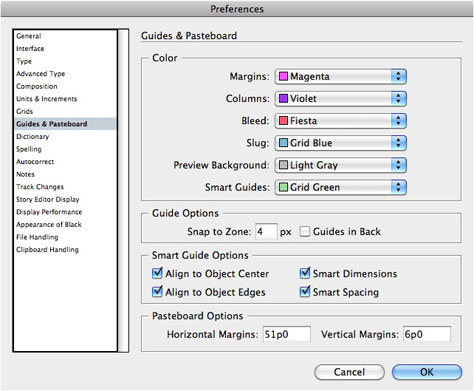
The first option for Smart Guides is under the Color section. This is where you can set the color for the alignment, dimensions, and spacing indicators. The default is green, but you have 36 other colors to choose.
The next settings are under Smart Guide Options. This is where you can turn on and off the alignment to an object’s center or edges. You can also turn on or off the indicators for Smart Dimensions or Smart Spacing.
You can completely turn off the Smart Guides displays by choosing View > Grids & Guides > Smart Guides.
Tips for Working with Smart Guides
Smart Guides apply only to objects that are within the visible area of the page, not on the pasteboard. You can, however, align objects that are on different layers. You can even align objects to others that are locked or on locked layers.
You may have trouble aligning objects if you have many objects in the visible area. The solution is to zoom in so that fewer objects are visible.
You can turn off the alignment to edges, centers, dimensions, and spacing in the Preferences. However, there is no preference setting to turn off the alignment to the horizontal or vertical centers of the page. If you don’t want Smart Guides to snap to column guides, turn off Snap To Guides temporarily by choosing View > Grids & Guides > Snap To Guides.
Unlike working with ruler guides, Smart Guides are accurate regardless of the page zoom percentage. If you see the Smart Guide indicators, you can rely on the alignment being correct.
Smart Cursors Transformation Values
Smart Cursors are another set of visual cues to help you create and modify objects on the page. To turn on the Smart Cursors, choose Preferences > Interface > Show Transformation Values. With the Transformation Values visible, you will see a transparent rectangle that displays information about the object.
Figure 9: The Smart Cursors displays the Transformation Values for creating and modifying objects.

As you drag to create or modify an image, the Transformation Value displays the W (width) and H (height) values of the object.
If you use the center point to move the object, the Transformation Value displays the X (horizontal) and Y (vertical) of the reference point of the object in the Control panel.
If you rotate the object, the Transformation Value displays the degree of rotation.
Watch the Cursors
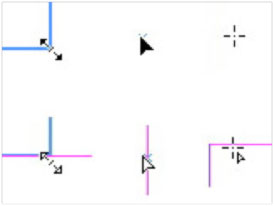
The cursors also signal that you’re aligning objects. Watch carefully as you move objects around the page. When you’re within the snap distance that will align objects, the cursor either changes to white or a white angle icon is added to the cursor.
Figure 10: The top cursors indicate non-alignment. The bottom cursors indicate that the cursor will align to a guide or Smart Guide.
This article was last modified on August 2, 2021
This article was first published on December 28, 2011
Commenting is easier and faster when you're logged in!

Recommended for you

2012 Holiday Gift Guide
Holiday gift giving time is here and the clock is ticking. If you have a creativ...
Poll Results: Where do you use InDesign?
The results of our poll on where you use InDesign and a new poll asking about wh...
Alias Searches for Next Maya Masters
Alias announced today that nominations for its 2005 Maya Masters™ will be...