
Advanced Photo Techniques
How to achieve amazing results with panoramas, HDR images, and stacked images in Photoshop, Lightroom, and Camera Raw

This article appears in Issue 10 of CreativePro Magazine.
This is a great time to be a photographer. Quality camera equipment is more affordable and visual literacy higher than it’s ever been. That also makes it a challenging time to be a photographer: When everyone has a good camera and knows how to use it, how do you make your pictures stand out? Lately I’ve been experimenting with some multi-frame techniques in an attempt to answer this question. What they have in common is that they require the capture of multiple frames: panoramas, high dynamic range (HDR), and focus stacking. In this article, I’ll share what I’ve found.
Panoramas
Some subjects can’t be captured in a single frame. Standing at the rim of the Grand Canyon, you know that a single shot isn’t going to cut it. In such situations, a panorama can be an effective way to capture the grandeur of a scene—and combining multiple frames increases the pixel count of the final image, so that you can print the result at larger sizes (Figure 1).

Figure 1. This panorama of San Francisco from Twin Peaks is made from 24 individual frames. Because of its aspect ratio, it’s difficult to show onscreen. Because it has so many pixels, however, I could print it at a width of more than 10 feet. Zooming in, there’s a tremendous amount of detail captured in each frame.
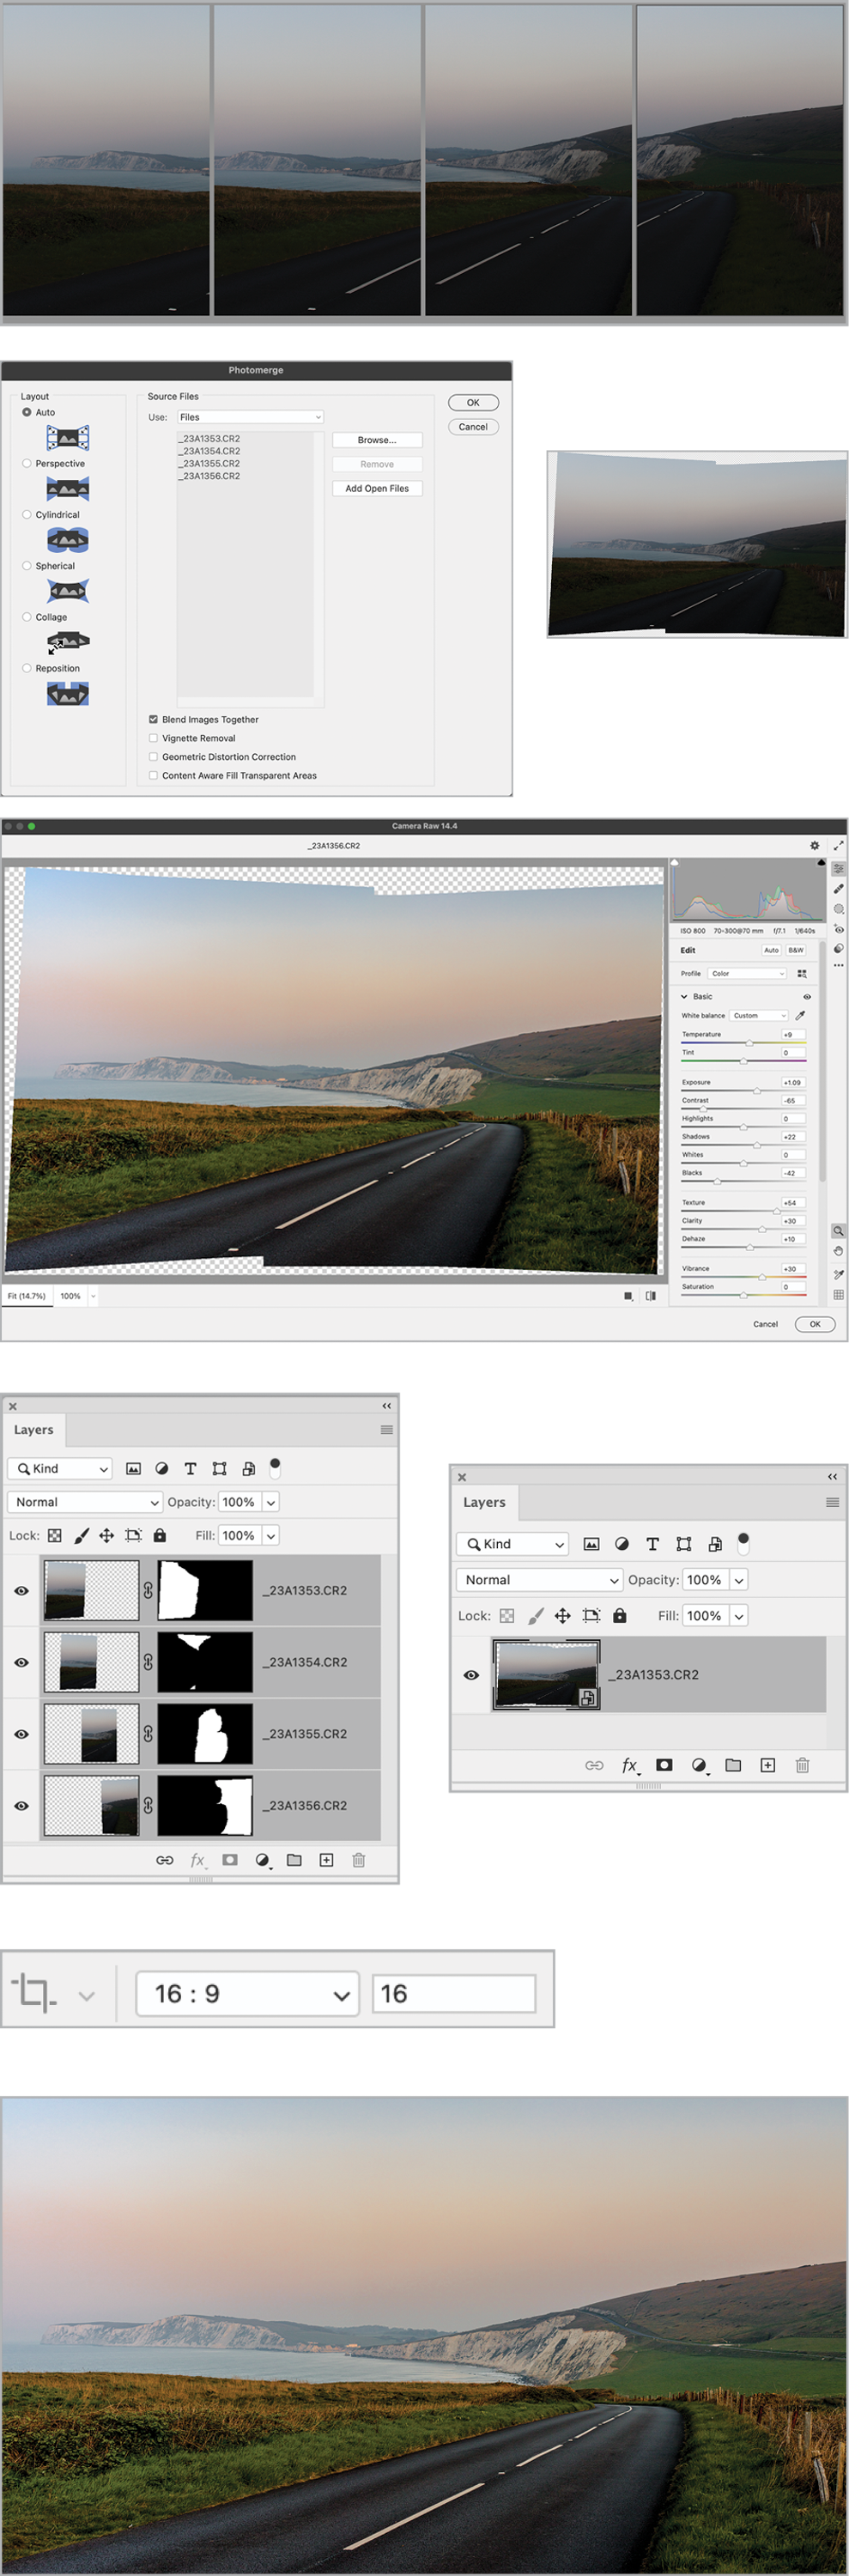
Figure 2. The panorama combined in Photomerge, edited in Adobe Camera Raw, and cropped in Photoshop (click for large, detailed composite image)
Create a panorama in Lightroom Classic
You can also create panoramas in Lightroom Classic with slightly different options.
- Select the frames, then choose Photo > Photo Merge > Panorama.
- Select from three available Projection settings: Perspective, Spherical, or Cylindrical. If Lightroom can’t merge the frames with the currently selected Projection, it will tell you so and suggest you try an alternative option (Figure 3). For the example, I used Perspective to keep the horizon line straight.

Figure 3. You can’t always get what you want
- Adjust the Boundary Warp slider. Not available in the Photoshop Photomerge, this option transforms your result so that you don’t need to crop. Alternatively, you can choose the Fill Edges option to use Content-Aware Fill technology. This can work well if the edges are sky, but if they contain detail, the result may look cloned or stretched. It’s not an either/or proposition: You can combine these features, applying some Boundary Warp, then filling any remaining empty space with Fill Edges. However, if you’ve anticipated losing content (see “Shoot Vertical” in the “Shooting Panoramas” sidebar), you’ll have captured enough information to crop without Boundary Warp or Fill Edges. When it comes to Auto Crop (or Auto Settings), I prefer to make those judgments myself after clicking the Merge button.
- Choose Create Stack to group the individual frames with the merged result in the Filmstrip, if desired.
- Click the Merge button (Figure 4).
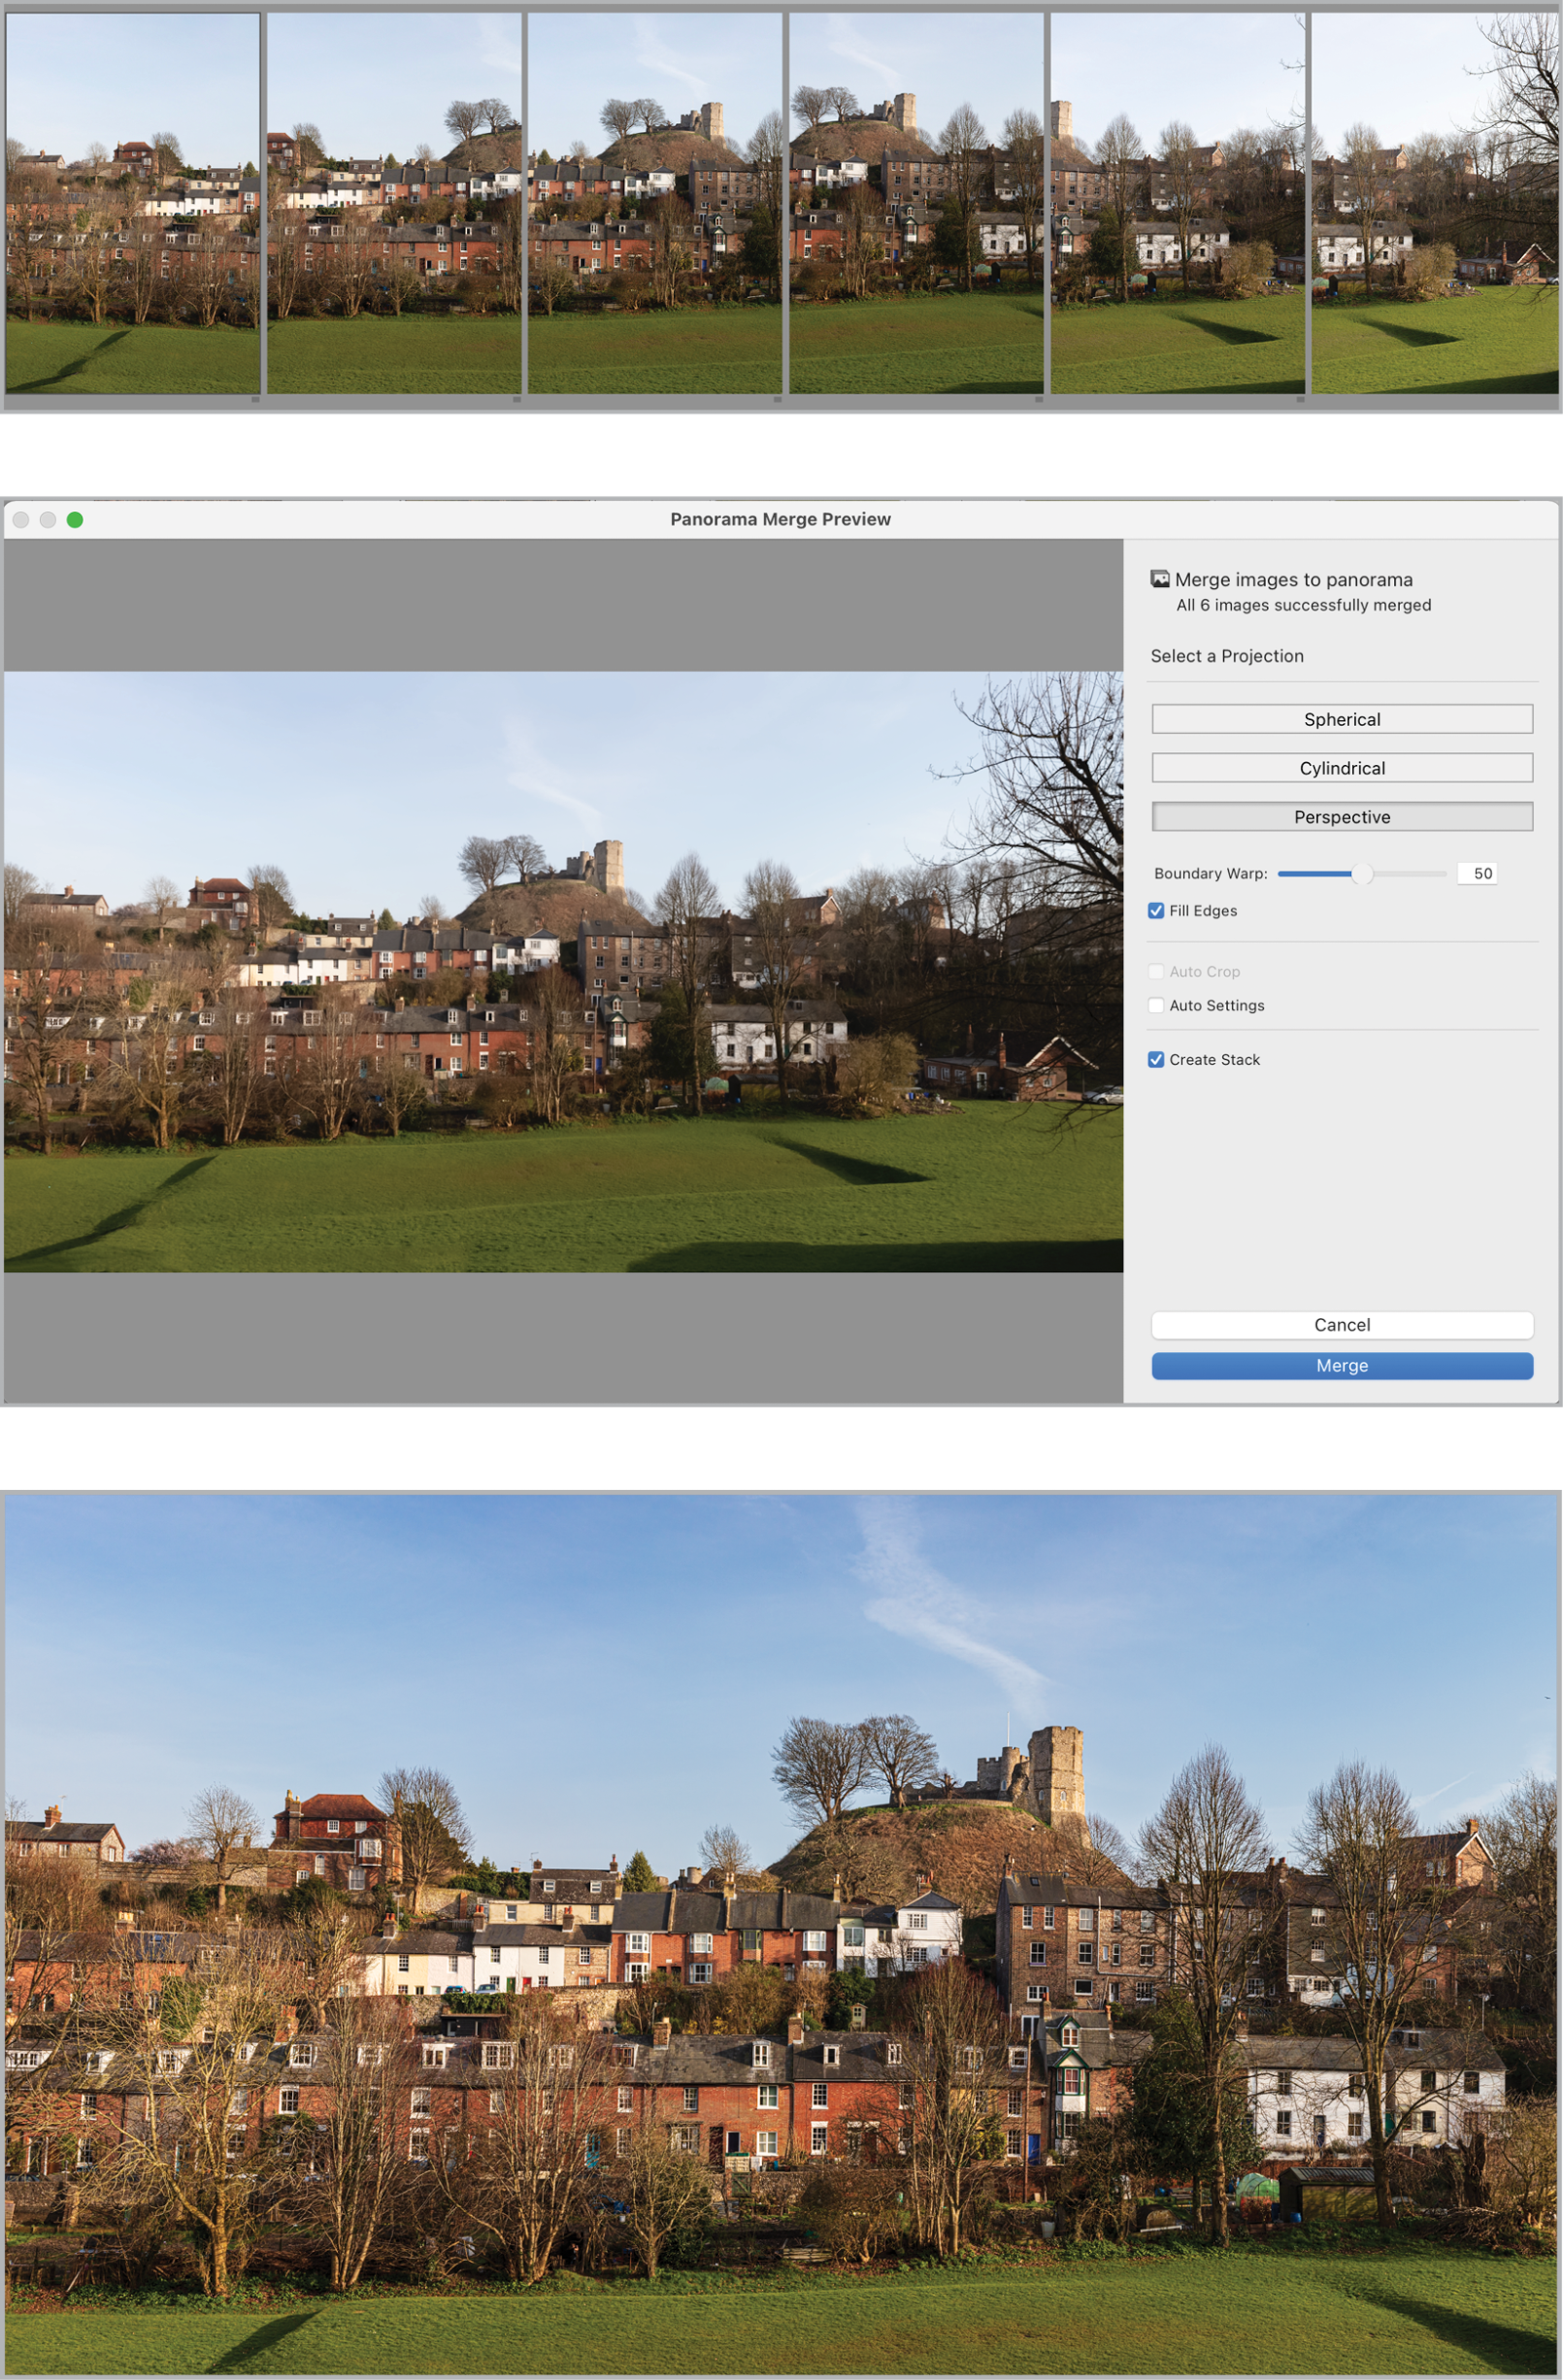
Figure 4. The initial frames, the Photo Merge dialog, and the resulting panorama cropped and developed (click for large, detailed composite image)
Create a panorama in Adobe Camera Raw
Adobe Camera Raw offers the same options as Lightroom Classic. In Bridge select the frames, then click Open in Camera Raw. Select the frames in the Filmstrip, right-click and choose Merge to Panorama (Figure 5).

Figure 5. Creating the panorama in Adobe Camera Raw (click for large, detailed composite image)
Create a vertical panorama
We tend to think of panoramas as horizontal, but if your subject is vertical, there’s nothing to stop you from making a vertical panorama (Figure 6). You don’t have to tell Lightroom, Photoshop, or Adobe Camera Raw that you’re creating a vertical panorama—they’re smart enough to figure it out.
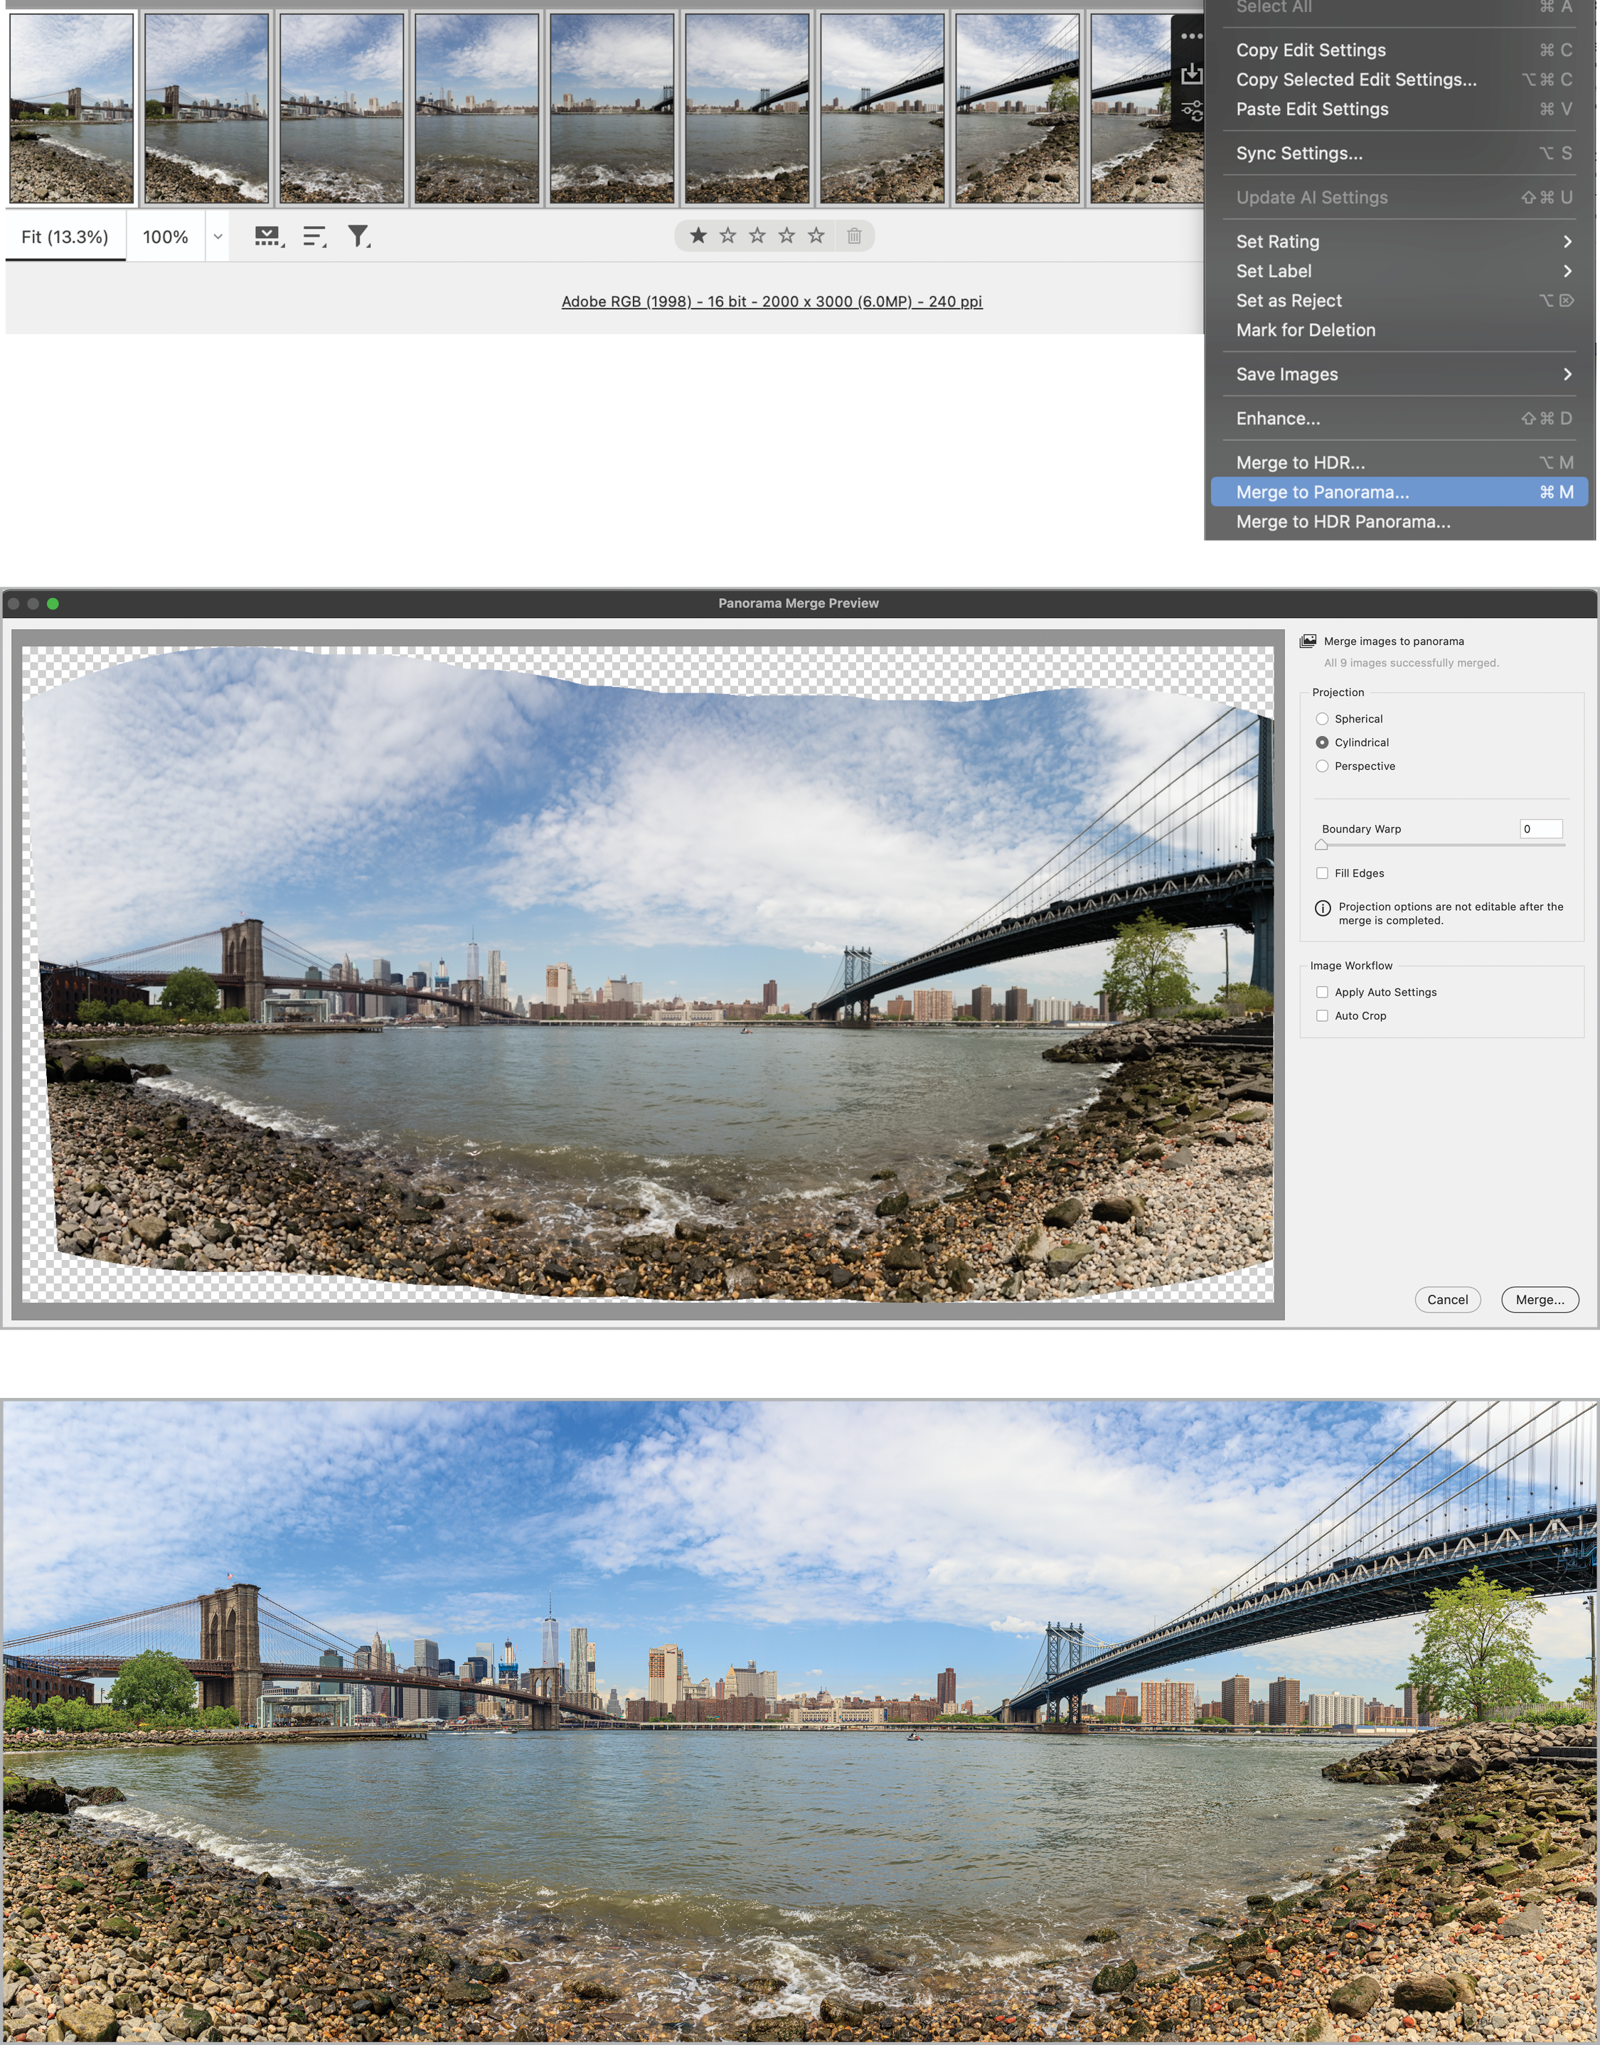
Figure 6. A vertical panorama created from 3 frames (click for large, detailed composite image) .
Fix (or embrace) distortion
If you rotate the camera lens from one frame to the next, distortion is inevitable. For the Figure 7 example, I couldn’t stand further back from the subject, so I inevitably I rotated my body to capture the scene. I can embrace the distortion, loving it for what it is, or try to apply some fixes in Photoshop.

Figure 7. Here it wasn’t possible to get further back from the subject, so there’s inevitably some distortion in the panorama. Applying an Adaptive Wide Angle filter in Photoshop straightened out the foreground. For the finished result, I applied further warping and filled the empty space with Content Aware Fill (click for large, detailed composite image) .
Add additional frames to a panorama
A panorama can be a stepping stone to the finished result. You can combine a “finished” panorama with additional frames to create a better composition—which only occurred to me when I checked my camera roll. Figure 8 started out as a three-frame panorama. I then added two more frames as a separate step in Photoshop: one for the seagulls, the other to bring the lone figure closer to the camera.
- With the panorama made, I selected it in Lightroom along with the additional frames, then chose Photo > Edit In > Open as Layers in Photoshop.
- To align the layers, I chose Edit > Auto-Align Layers. This transformed the additional layers to align with the panorama.
- For the seagulls, I changed the blending mode to Darken, masked the layer with an inverted layer mask, then reintroduced the seagulls by painting in white on the layer mask.
- For the figure, I first removed him from the panorama frame using Content Aware Fill, turned on the visibility of the additional layer, then used Image > Adjustments > Match Color to fix the different exposure.
- As with the seagull layer, I added an inverted layer mask, switched the foreground color to white and painted the figure back in. To fix the haloing around him, I changed the blending mode to Darken.
- I used Content Aware Fill to fill some empty sections of sky.
- Next, I applied a crop.
- Finally, I combined all layers into a Smart Object and applied the Camera Raw Filter to adjust the exposure, contrast, and brightness.
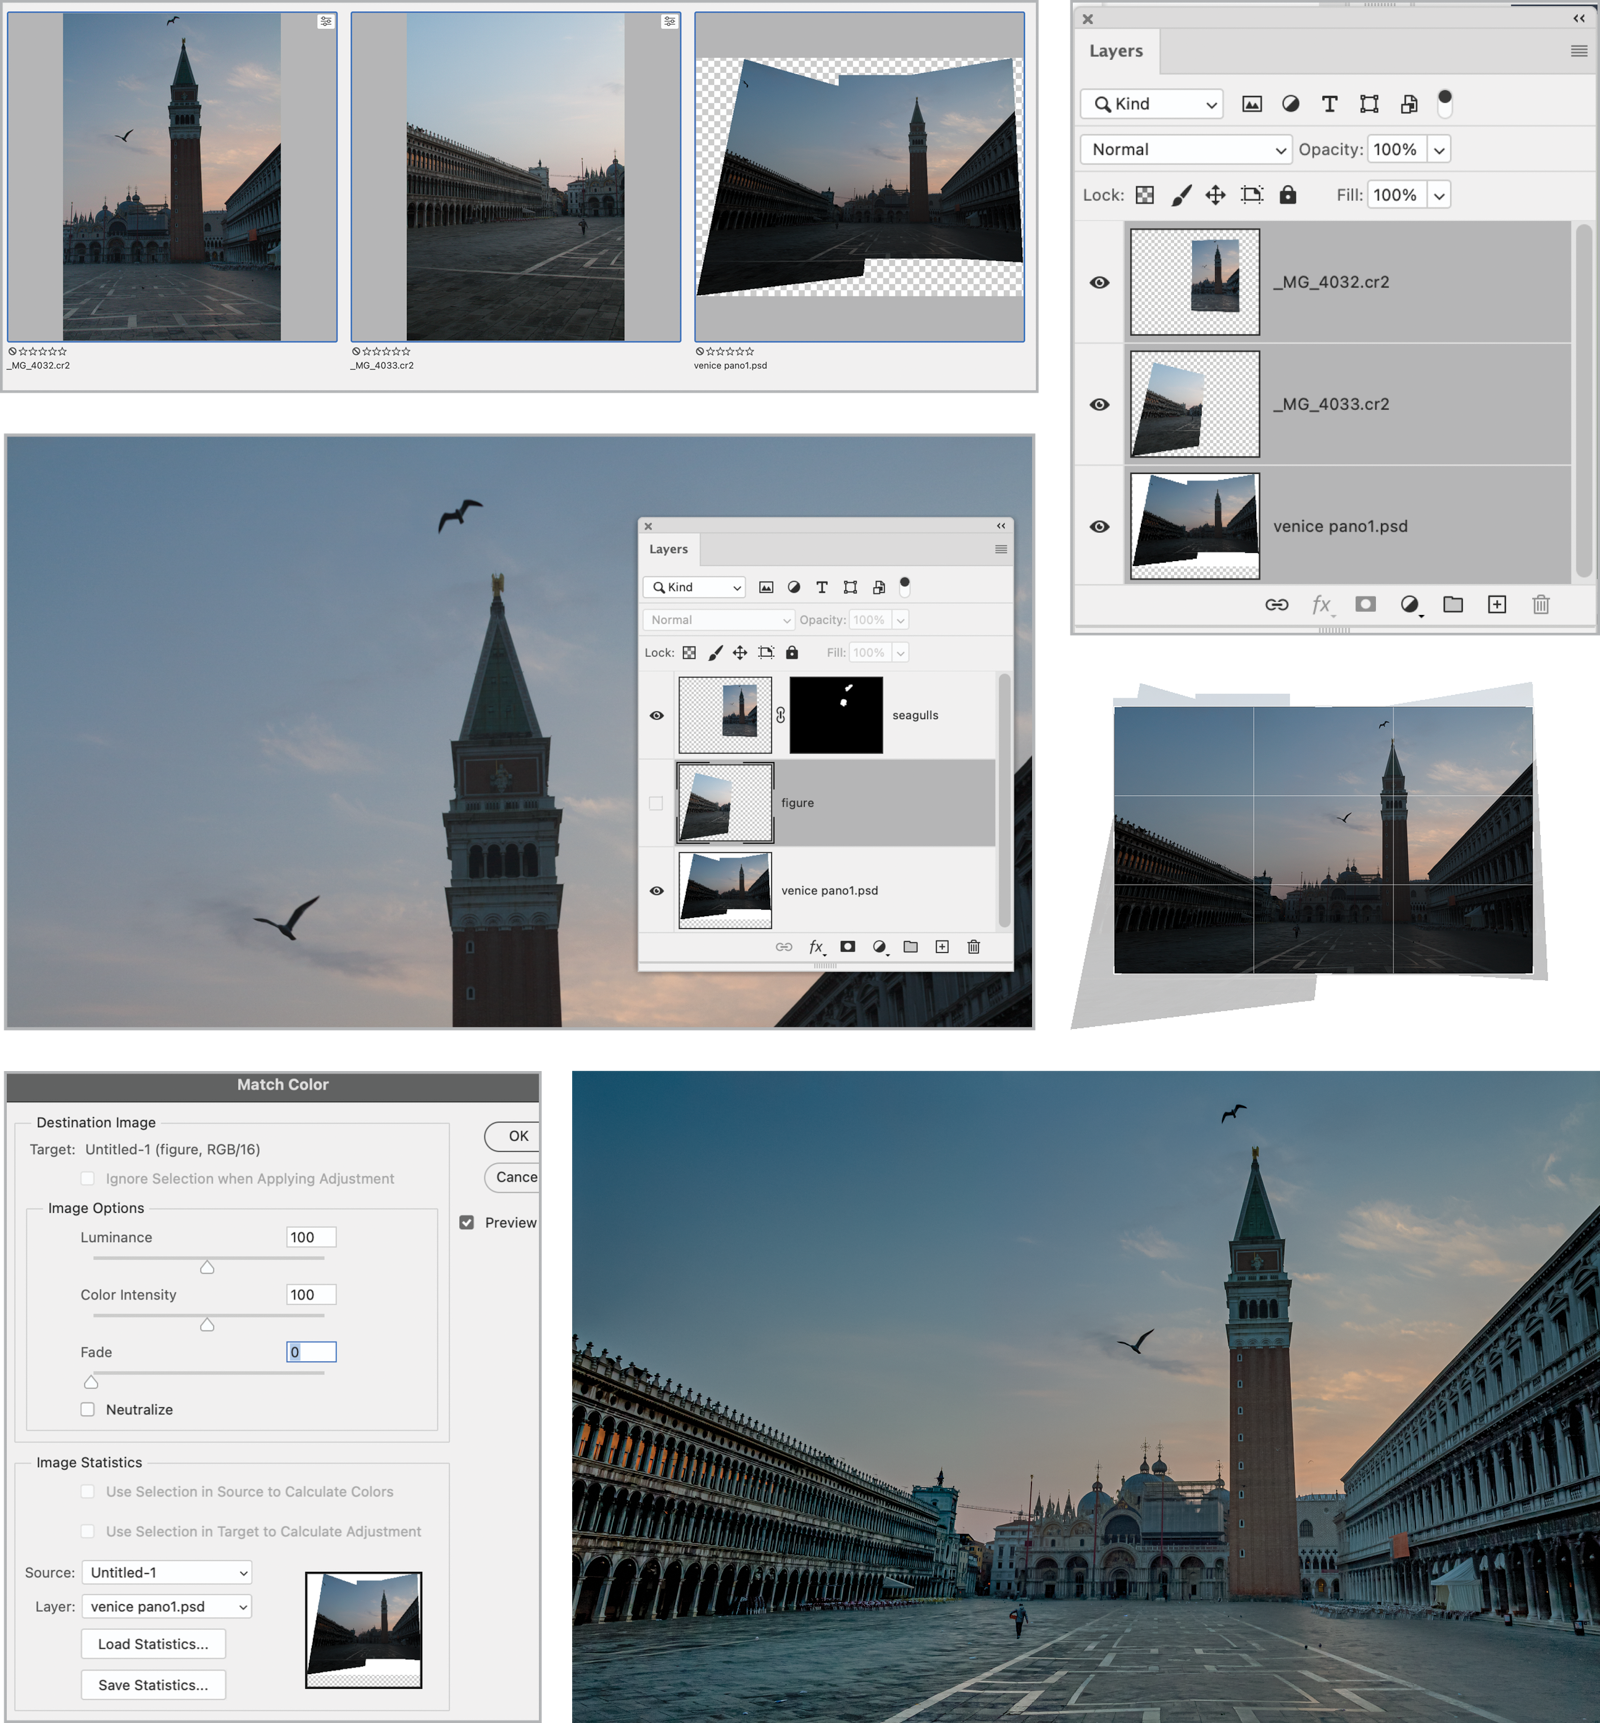
Figure 8. Combining additional frames with a panorama—in this case to add the seagulls and bring the figure closer to the camera (click for large, detailed composite image)
Use Photomerge as a wide-angle lens
Beyond creating high pixel density images to print at large sizes, Photomerge has some more workaday uses. For Figure 9, my lens wasn’t wide enough to capture the whole tree. Rather than step back, which would have introduced unwanted foreground objects, I shot three vertical frames, then merged them together.

Figure 9. When the subject won’t fit, use Photomerge (click for large, detailed composite image) .
Use Photomerge to fix composition
Sometimes Photomerge can get you out of a tight spot—like when I inadvertently excluded a weather vane at the top of a derelict church. Thankfully, I had a frame that included that information. Even though one frame was horizontal and the other vertical, I was able to blend them together using Photomerge (Figure 10). Content Aware Fill wouldn’t fill the transparent areas either side at the top because they were too large. Instead, I filled these areas by copying the edge content to a new layer and transforming it.
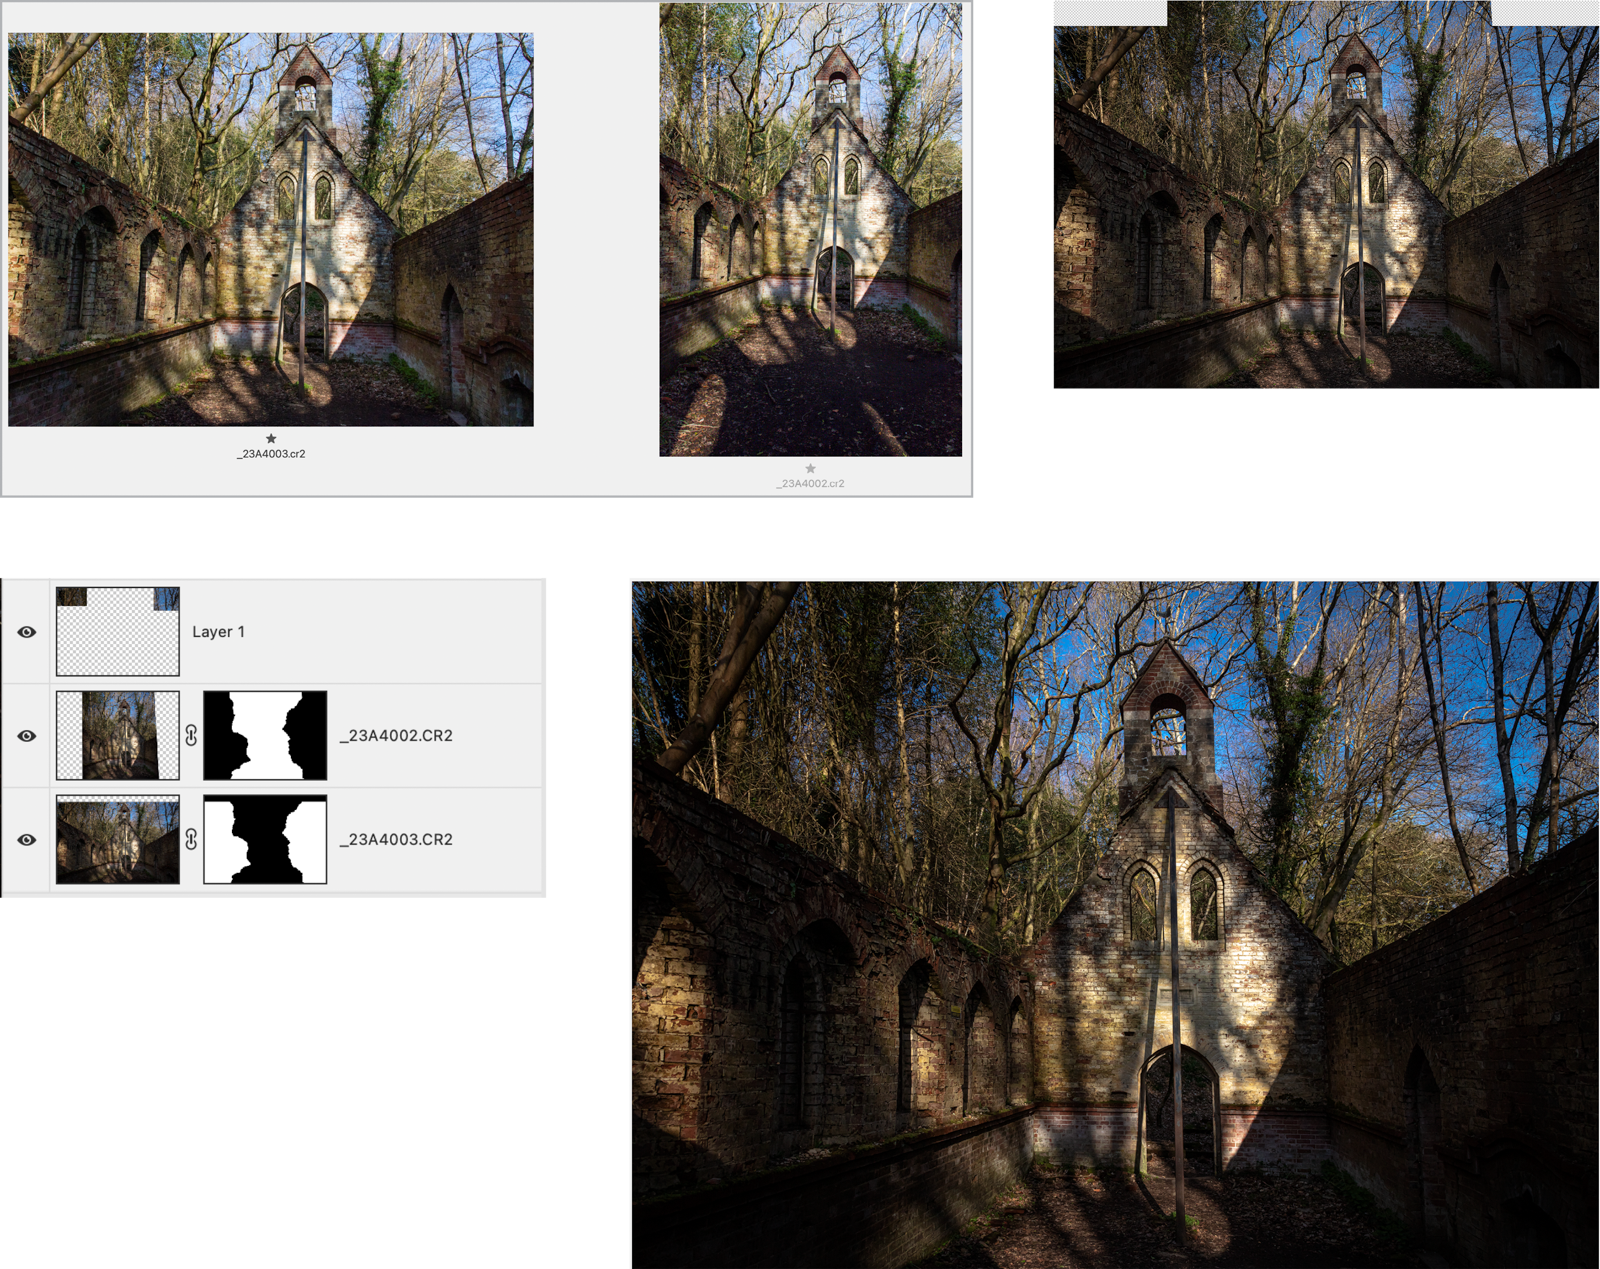
Figure 10. When you forget to get everything in the frame, maybe there’s another frame from which you can borrow the content (click for large, detailed composite image).
Create an Instagram panorama
If you use Instagram, Photomerge can help you create panoramas that you can chop into segments for a carousel Instagram post (Figure 11). Here’s how:
- Create the panorama, then size its height to 1350 pixels as per Instagram’s requirements.
- Choose Image > Canvas Size and set the width 4320 pixels (4 × 1080 pixels). If Photoshop warns you that clipping will occur, adjust the cropping by moving the image left or right within the new canvas size.
- To divide the image into segments, choose View > New Guide Layout and specify four columns with zero gutter.
- Choose the Slice tool, and then choose Slices from Guides on the Options bar.
- From the File menu, choose Export, Save For Web Legacy. Choose your optimization options (JPG, High Quality, for example) and then choose Save to export the four slices as separate files.
- In Meta Business Suite, or wherever you make your Instagram posts, create a post. Load the images into Instagram to create a seamless panorama from the four frames.
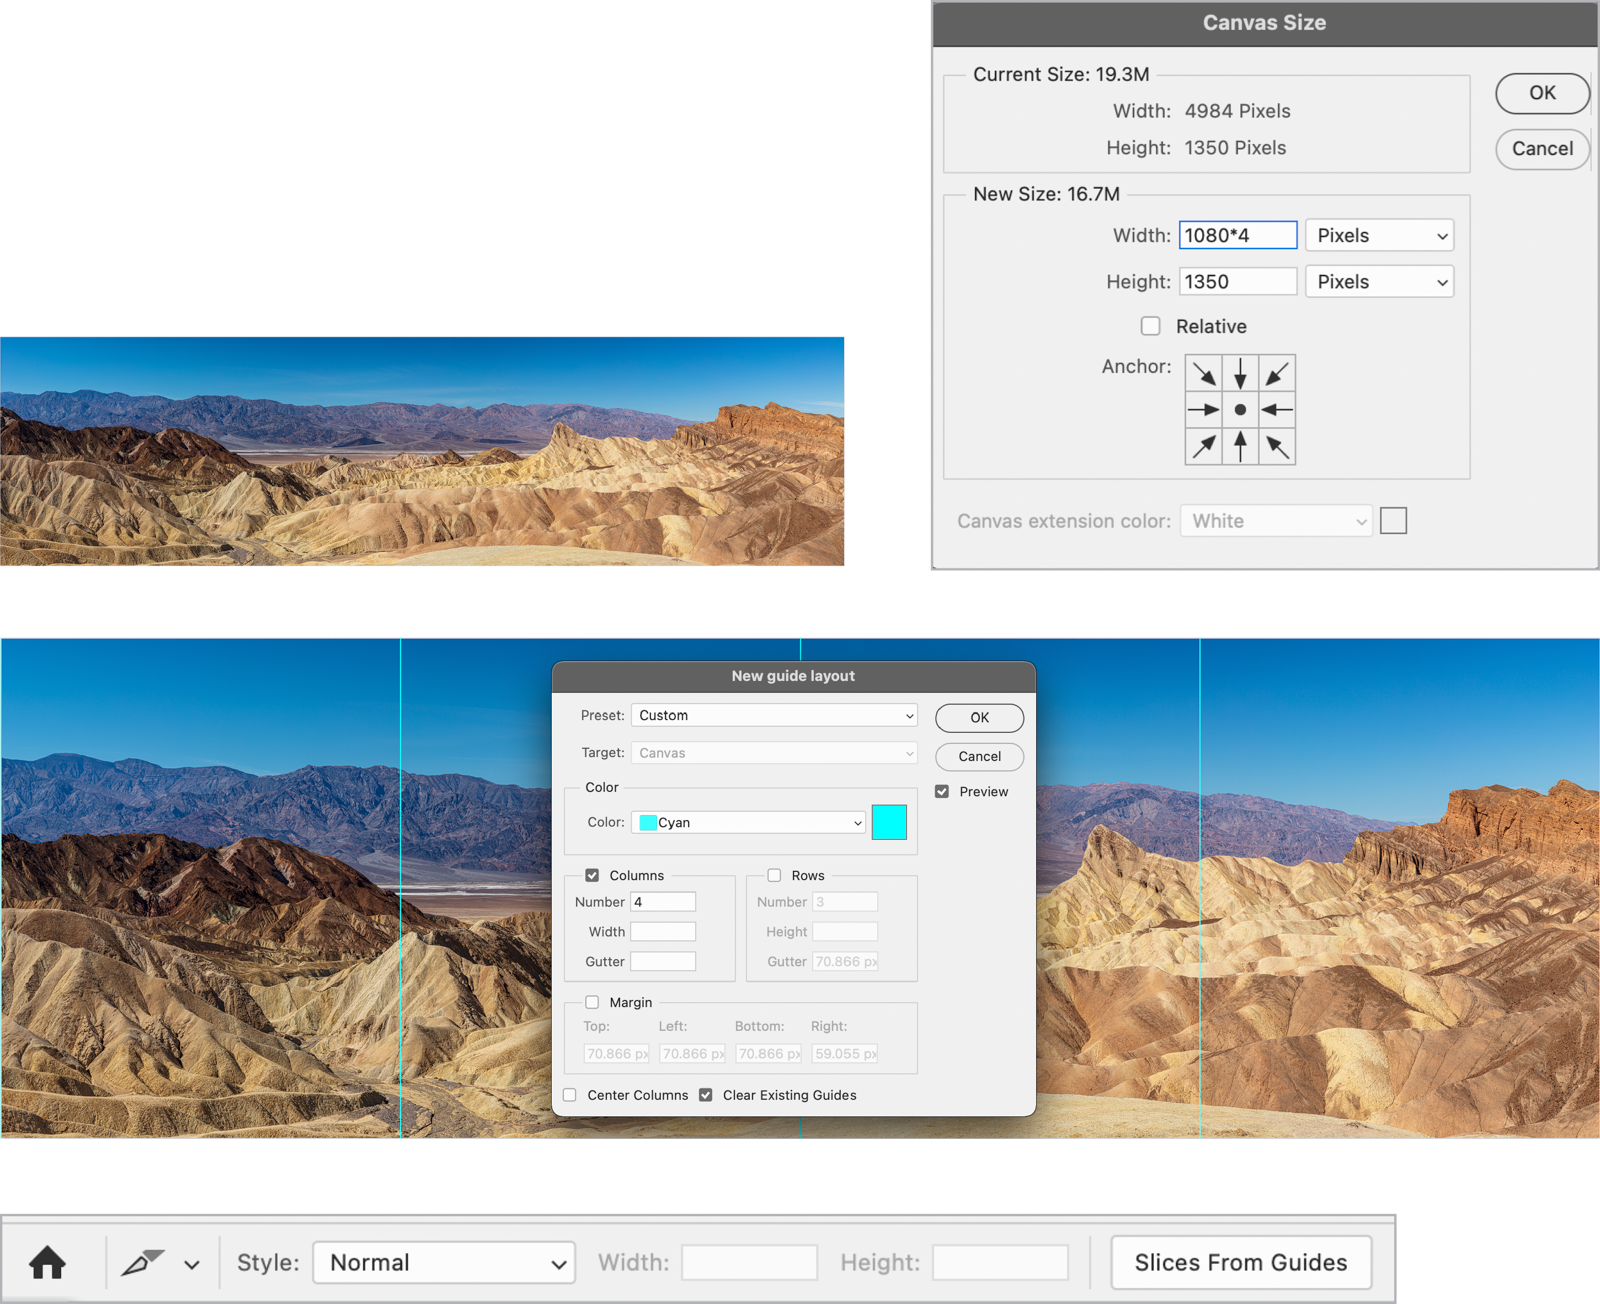
Figure 11. Creating an Instagram carousel (click for large, detailed composite image)
Create a collage
You can also use Photomerge to create an intentionally random panorama. The Collage option overlaps and repositions frames, but unlike the other options, it does not transform their perspective. If you choose not to blend the images, no layer masks are created, and you can deliberately incorporate some slightly different exposures so that the result looks like an old-time collage made up of overlapping pictures (Figure 12).
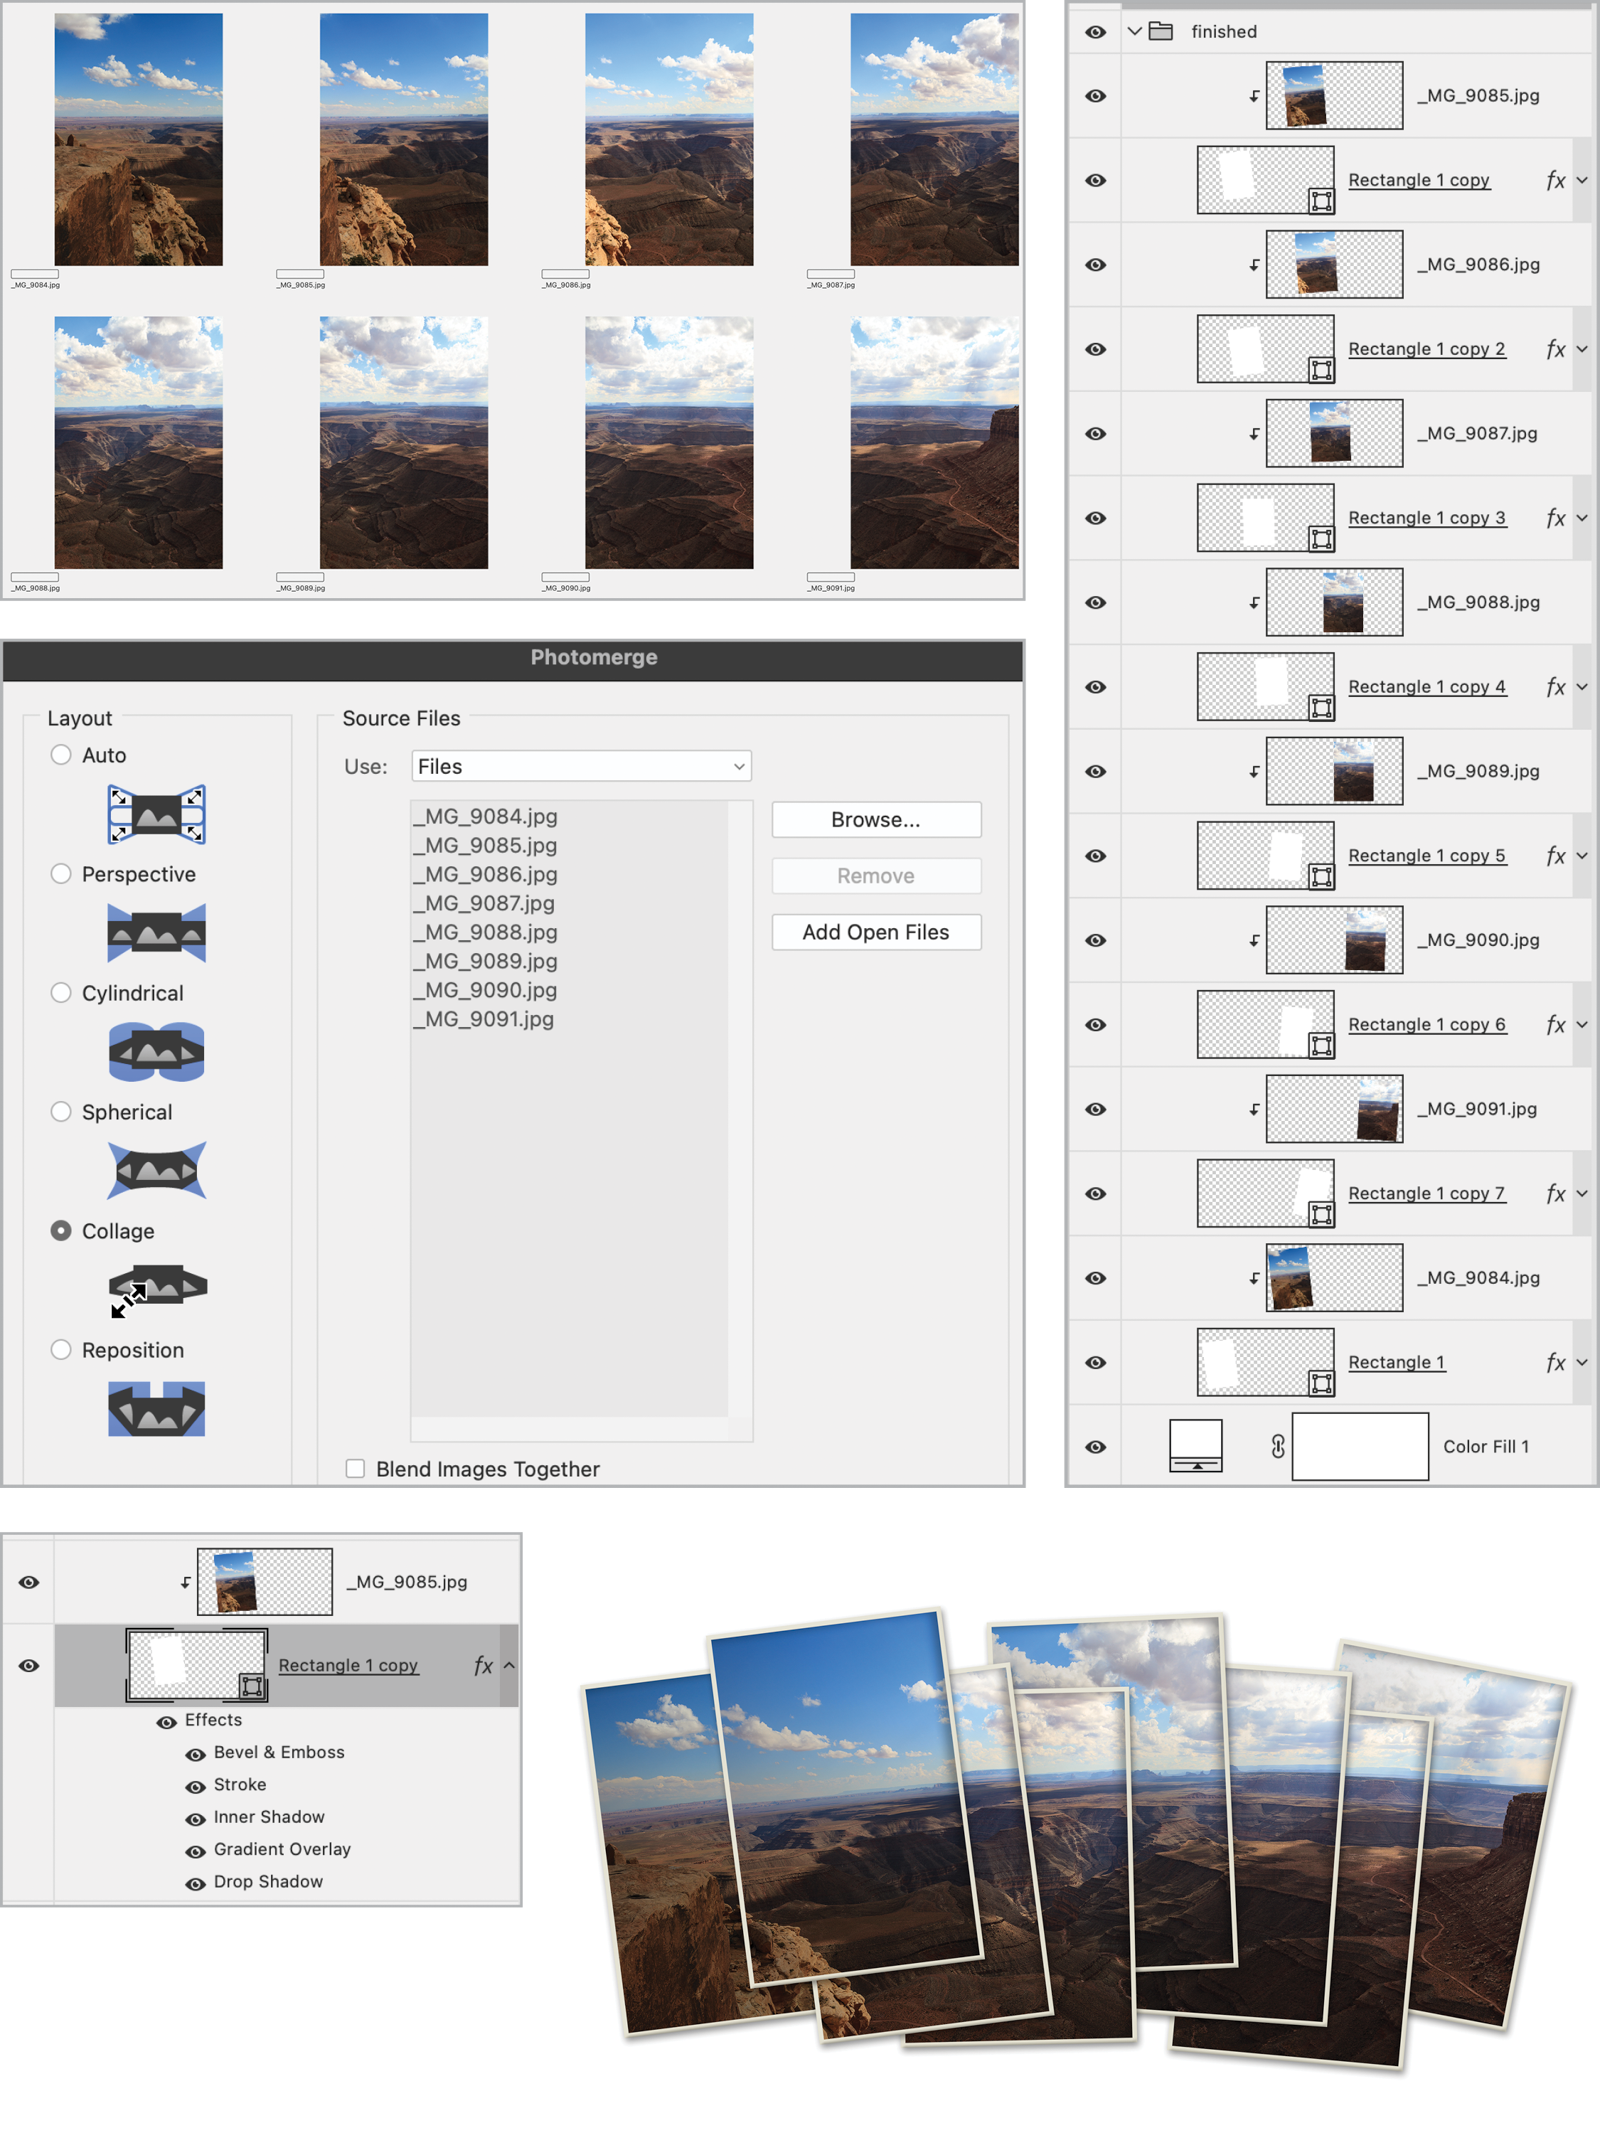
Figure 12. Because there was too much overlap for the effect I wanted, I used a clipping mask to clip each frame to a shape layer below. To give the impression that each of these frames is a vintage photo with a border, I added a layer style to each of the shape layers (click for large, detailed composite image).
HDR
Another technique that involves the use of multiple frames is HDR: high dynamic range images. The purpose of an HDR image is to capture both the brightest highlights and the deepest shadows in challenging lighting conditions, where a single exposure would favor one or the other. An HDR image is comprised of your base exposure combined with one or two frames that are overexposed and one or two frames that are underexposed—a three-exposure or a five-exposure bracket.
Here’s a typical HDR scenario: The subject is indoors, and you’re shooting through a window. With a single frame, everything outside the window will be blown out to provide enough light for the subject. But, shooting a three-frame exposure bracket—the correct exposure, underexposed, and overexposed—captures the scene (Figure 13).
- In Lightroom Classic, select the frames, right-click, and choose Photo Merge > HDR.
- Choose your settings in the dialog that opens. For the example, I chose to auto-align the frames but not to apply auto settings, because I planned to apply my own Develop settings to the DNG file that Lightroom will create. I kept Deghost set to None, because the shots were fairly static (Deghost attempts to remove any motion from one frame to the next).
- To group the HDR image and the brackets that make it up, select Create Stack.
The HDR result for the example didn’t look promising, but it gave me more scope for opening up shadows and recovering blown out highlights because of the additional information in the DNG file.

Figure 13. Shooting the subject as HDR lets you expose correctly for the subject and the exterior (click for large, detailed composite image)
Create an HDR image in ACR
The same HDR options are available in ACR. In Bridge, choose the three exposure brackets, then click Open in Camera Raw. Select the brackets in the Filmstrip, right-click and choose Merge to HDR (Figure 14).
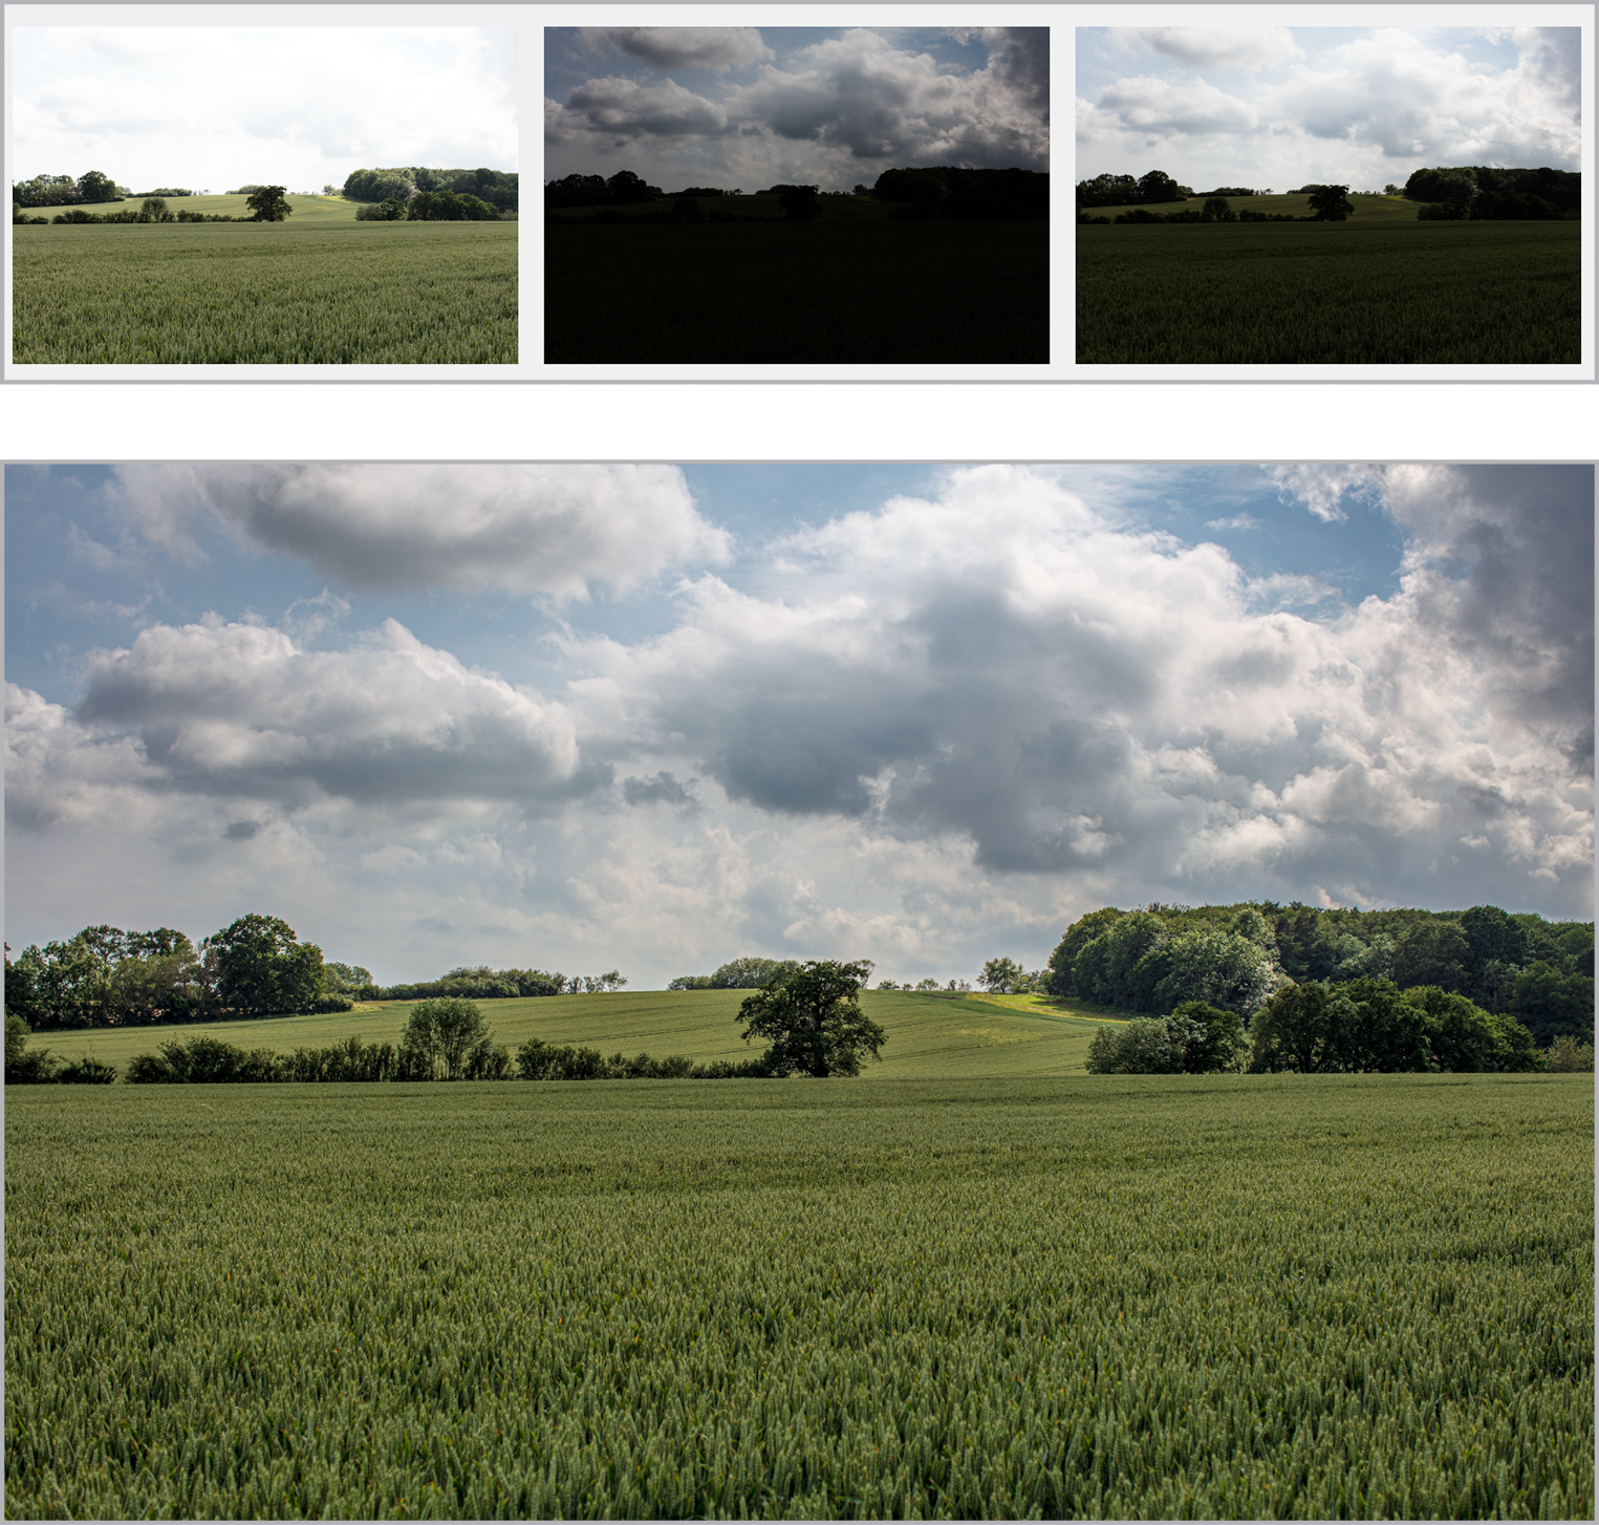
Figure 14. A typical scenario for HDR: Retain the drama of the sky without making the foreground too dark (click for large, detailed composite image) .
HDR is a very pleasing technique—when it works. But ask yourself: Do I really need an HDR image? All those extra frames are going to eat up your camera card and your hard drive space, as well as take longer to process. There definitely are times when HDR will deliver the best result, but it’s possible to get carried away with the technique: When all you have is a hammer, everything starts to look like a nail, and you apply the HDR approach to everything. Figure 15 is a case in point: Here’s an HDR image created from a three-exposure bracket. I shot the scene as HDR to retain the drama of the sky. But the result I get using just the underexposed frame is, in this case, as good. Camera raw files are full of data, and if you have a good camera, you can open up shadow detail without introducing too much noise and degrading the image quality.
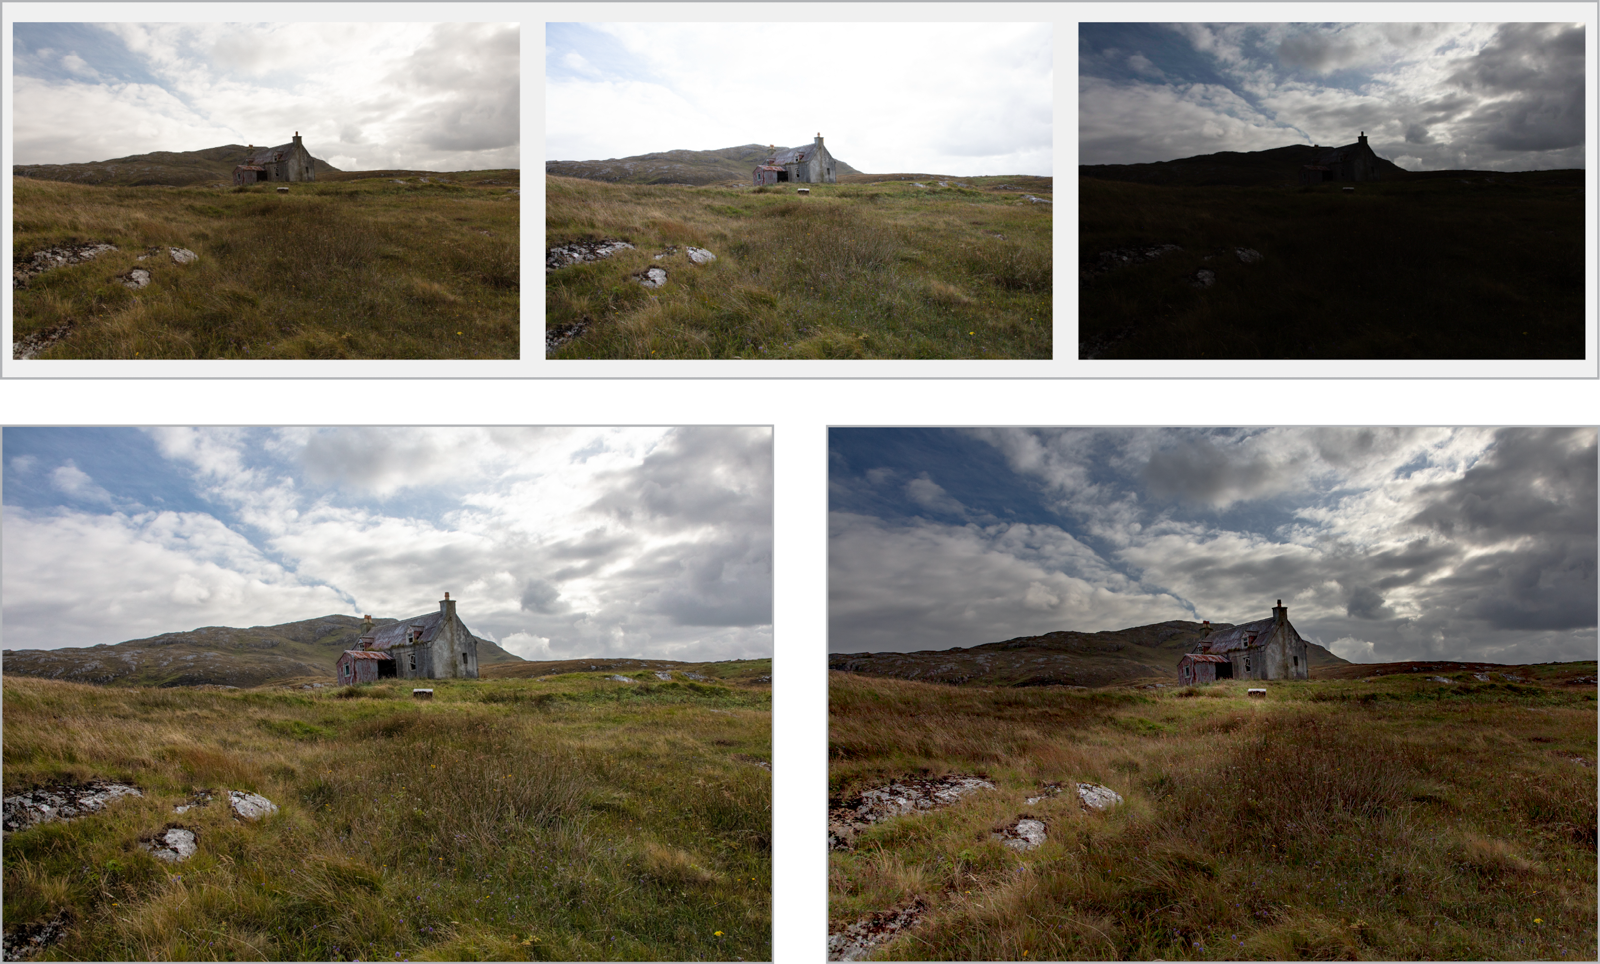
Figure 15. I was able to open up the shadows enough so that an HDR image wasn’t necessary (click for large, detailed composite image) .
Create an HDR image in Photoshop (HDR Pro)
An alternative approach is to use HDR Pro in Photoshop (Figure 16). Starting in Lightroom, choose Photo > Edit In > Merge to HDR Pro in Photoshop. Change the mode to 32-bit. If there’s been movement from one frame to the next, turn on the Remove Ghosts option and select one of the frames to take the detail from. The initial result will be flat-looking, but when you choose Tone in ACR, you’ll have a data-rich file from which you can tease out shadow and highlight detail.
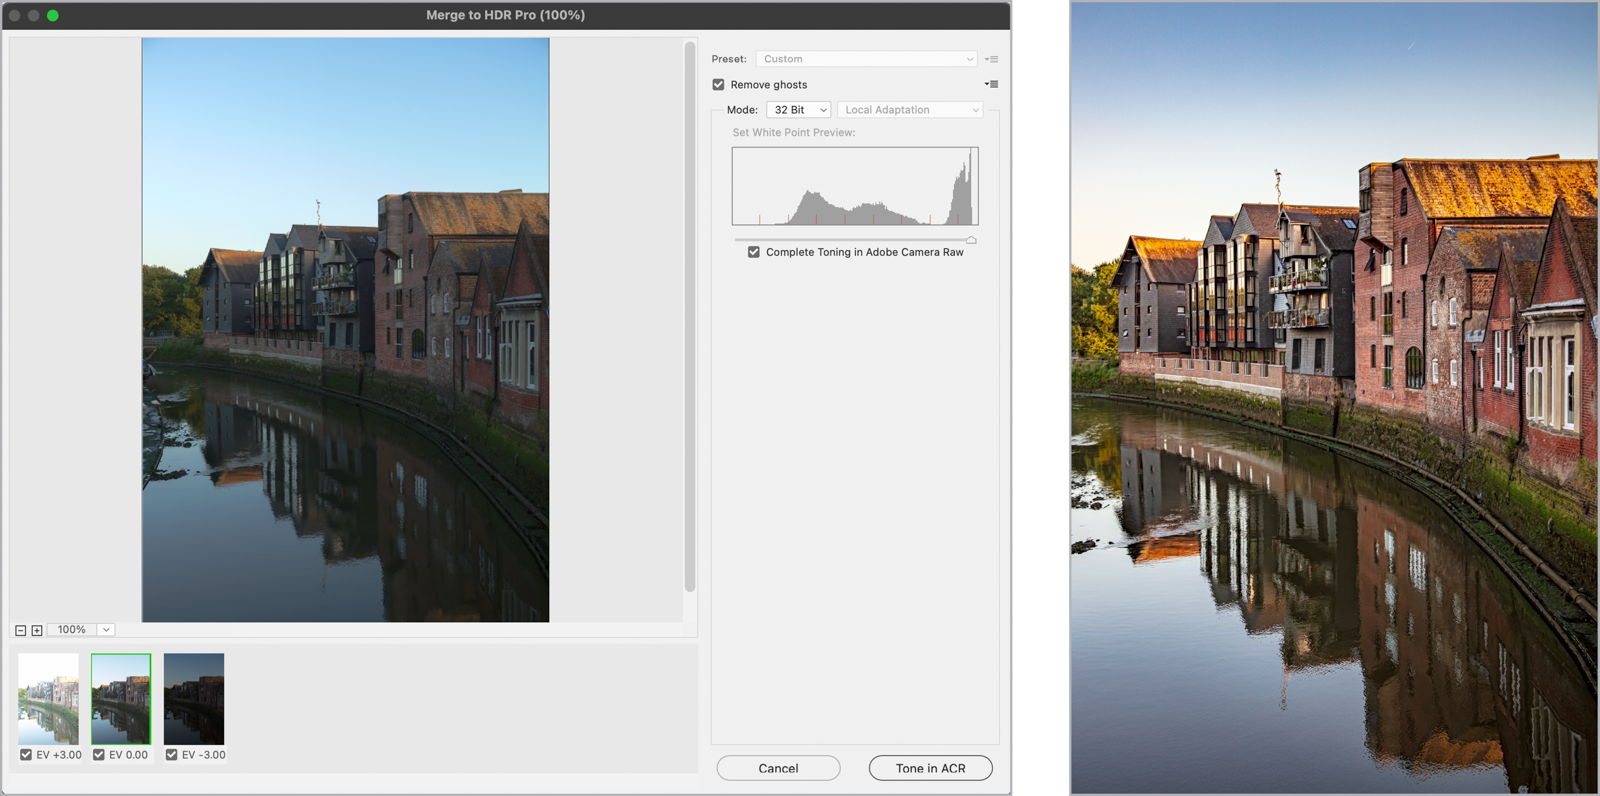
Figure 16. Creating an HDR Pro image in Photoshop (click for large, detailed composite image)
Create an HDR panorama
It’s possible to combine Photomerge and HDR to create an HDR Panorama. For each of the frames of the panorama, you’ll have an exposure bracket. For Figure 17, for example, I had a three-frame panorama with a three-frame exposure bracket for a total of nine images. In Lightroom Classic, choose Photo > Photo Merge > HDR Panorama (the same option is available in ACR). You might see a warning message: HDR brackets merged with Align Images on and Deghost off. If there’s been movement between frames and deghosting is necessary, first merge all the HDR brackets and then combine those HDR images into a panorama.

Figure 17. The HDR panorama using a Spherical Projection and cropped to a 2:1 aspect ratio (click for large, detailed composite image)
Stacking, Blending, and Combining Layers
A third approach to working with multiple frames is stacking images for the purpose of increasing depth of field. Focus stacking allows you to have your image in focus from front to back, something that might not be achievable with a single frame.
- As with panoramas and HDR, use a tripod where possible and include a marker frame so you can easily spot the frames on your camera roll.
- Use manual settings, to ensure that exposure doesn’t change from one frame to the next.
- Aim for the sweet spot of the lens in terms of its aperture. This will vary from lens to lens, so do research the properties of the lens you’re working with.
- Avoid moving subjects where possible. It’s easier to get a good result if the elements in the scene are still.
- Use the Live View mode on your camera for more focus points to work with, so you can pinpoint the area of focus more accurately.
- Capture more frames than you need. A focus stack might be ultimately made up of three images, but may start out with more.
- Apply only minimal edits before you create the stack, then merge the layers together into a Smart Object and apply your Develop settings to that.
Focus stack
To create the still life in Figure 18, I shot a frame for each item, making it the focal point. Combining them in a focus stack is simple:
- In Bridge, select the layers that make up the stack and choose Tools > Photoshop > Load Files into Photoshop Layers.
- In Photoshop, select the layers and choose Edit > Auto-Align Layers. Use the Auto option for Layout without Vignette Removal or Geometric Distortion Correction turned on.
- Choose Edit > Auto-Blend Layers. Select Seamless Tones and Colors. If Photoshop agrees with you about the focus points, when you look at each of the layers, you should see just its subject with the other content masked. That’s more or less what I got for the example, although much of the lemon is on the grapes layer.
- Select all of the frames, convert them to a Smart Object, and choose Filter > Camera Raw Filter to develop the image in ACR.
- Finally, back in Photoshop, perform the final crop.

Figure 18. Creating a focus-stacked still life, combining multiple frames with different focal points
Create a simple focus stack and exposure blend
Sometimes just two frames may be all you need for your focus stack. For Figure 19’s pseudo-HDR example, I exposed one frame for the rocks in the foreground, the other for the cliffs in the background. I aligned them automatically, but blended them manually. Auto-Blend didn’t work well because I had adjusted the exposure from frame to frame. This goes against the advice that I gave elsewhere, but in this case, I deliberately underexposed the cliffs to better capture their texture.
- With both frames selected in Bridge, I chose Tools > Photoshop > Load Files into Photoshop Layers.
- I selected both layers, chose Edit, Auto-Align Layers, and used the Auto option for Layout.
- Using Auto-Blend created weird effects over the sea where there was movement from one frame to the next, and Photoshop didn’t understand my intent of underexposing the cliffs. So, instead, I blended the two frames manually by adding a gradient layer mask to the top layer. This concealed the blown-out cliffs on the top layer, revealing the cliffs on the layer below.

Figure 19. Sometimes you get better results blending exposures manually with the help of a gradient layer mask.
Adjust the layer masks
Here’s another time when Photoshop’s Auto-Blend doesn’t get it right. Figure 20’s two-frame focus stack was hand held, and there was (despite my best efforts) movement from one frame to the next.
One frame has the foreground flower in focus, the other has the background in focus. If you find yourself in a similar situation:
- Auto-align the layers using Auto option for Layout.
- Choose Edit > Auto-Blend to create the stack, but without creating seamless tones and colors (which permanently changes the color and tone of the layers). For the example, Photoshop made an incorrect call about which layer to use for the sky, so with the Brush tool, working on the layer mask of the rock layer, I painted in white to restore the sky.
- Combine the layers into a Smart Object and apply Develop settings via the Camera Raw Filter.
- Crop in Photoshop.

Figure 20. Photoshop isn’t always as smart as it likes to think it is, and you have to do some manual cleanup.
Other Ways to Combine Multiple Frames
Here are a couple more suggestions for ways to combine multiple frames.
Statistics
The Statistics feature in Photoshop is a great way to remove unwanted elements from a scene—so long as those elements are moving, like sightseers at a popular tourist destination or, as in Figure 21, traffic on a busy road.
- In Photoshop, choose File > Scripts > Statistics and browse to the folder containing the source images.
- To remove moving elements, set Stack Mode to Median. Check the option to automatically align the source images.

Multiple exposure effect
Here’s a technique that I’ve become fond of. I’ve seen it referred to as the Pep Ventosa technique because it’s associated with a San Francisco photographer of that name. I’m not sure, exactly how he does it, but this is what I have found to work.
- Take multiple frames of the same subject from slightly different angles, then load them into a layer stack. For example, walk around the subject, taking a frame at each number of the clock—although you may not need as many frames as this.
- Combine the frames into a layer stack as above.
- Align the frames manually. You’re not after precision here, just a rough alignment. One way to do this is to change the blending mode of the top layer to Difference, then one by one select the layers beneath and reposition them to bring the subject into “register.”
- Select all layers and change their blending mode to Soft Light (depending on the subject, other modes may be preferable). Experiment with the opacity; I find about 50% works well.
- Add a solid color fill layer of white at the bottom of the layer stack.
- Put all the layers (except the fill layer) into a group and then change the blending mode of the group to (Figure 22).

Figure 22. Create ethereal looking images by combining multiple frames shot from different angles.
Advanced Advice
If you’ve made it this far, I’m sure you have a sense that there’s tremendous scope for mixing, matching, and further developing these techniques. One final suggestion: Combining multiple frames can be processor intensive and there will be a lot of trial and error and a few blind alleys on the way to getting results that you’re happy with. While you’re experimenting, consider working with lower resolution copies of your files to save time.
Commenting is easier and faster when you're logged in!

Recommended for you
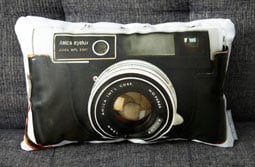
Comfy Camera Pillows
Etsy seller “intheseam” has created a fun line of pillows printed wi...

Quark Launches Next Generation of Quark Publishing System
Quark Inc. announced today the release of Quark Publishing System® 7, the next g...

Tackling Tables through Scripting
Tackle tables through Javascript, for instant formatting. And a bonus: download...