
Adobe Bridge Gets a Major Upgrade
Changes large and small take the program from useful and powerful to indispensable.

This article appears in Issue 32 of CreativePro Magazine.
Regular users of Adobe Bridge already know it as the hub of creative workflows centered around Adobe tools. I covered many of its capabilities for wrangling creative assets in the article “Taming Wild Assets” in InDesign Magazine Issue 139, which introduces Bridge for design workflows. Read it first if you are completely new to Bridge.
Bridge 2023 introduced the most important upgrades to the user interface since the original Bridge CS edition of 20 years ago, but the implementation was buggy and incomplete. In Bridge 2024 (version 14), most of the initial shortcomings have been addressed. It’s time to tell you about these new features and how they can enhance creative workflows.
This is the biggest upgrade to Bridge in a decade. If you’re into clichés, “It’s a game changer.” (Even if you aren’t, it’s still a game changer.)
True Custom Workspaces
Bridge now allows you to completely redesign its panel layout how you want, save it as a new named workspace, and switch to and from that layout just as you’re used to doing in the rest of the Creative Cloud apps. What may catch you by surprise is that the visual language of the Bridge interface owes more to the audiovisual apps—Premiere Pro, After Effects, Audition—than Illustrator or InDesign.
Remix your panels
You’ve always been able to customize workspaces in Bridge, but for the most part you were stuck with what came in the box. Now you can reposition and resize panels just by dragging them to their new location. You can even move them out of the Bridge window onto another monitor.
If you work with After Effects or Premiere Pro, this new capability in Bridge will be familiar. Instead
of a thin blue outline like Photoshop or InDesign, Bridge now provides a large and obvious geometric shape to show exactly where a panel will go when you drop it (Figure 1). This makes configuring your Bridge workspace easier and far more flexible than it has been.

Figure 1. The Keywords panel will dock with the Metadata panel, shown by the darker square inside the edge indicators.
Save your workspaces
You can now save custom workspaces just as you do in any of the other CC apps (Figure 2), although there are a couple of enhancements to custom workspaces that are missing elsewhere.

Figure 2. The expanded Workspaces menu lets you update a saved workspace directly.
The first is so simple and obvious that it’s amazing it isn’t used throughout all the Adobe applications. When you modify a workspace in, say, InDesign and you want to save the changes without changing the name, you must choose New Workspace, give it the same name, then convince InDesign to overwrite the existing one. Bridge makes it easy: Save Changes to this Workspace (Figure 2). One click, and you’re done.
Another difference in the workspace options, a subtle one, is under Window > Workspaces. Where other apps offer Reset [workspace name], Bridge has Reset to Saved Layout. At first glance, it does exactly what it says on the tin: revert the workspace to its original configuration, but the difference is more than a matter of semantics. Bridge has another powerful trick up its sleeve, which we’ll explore in the next section.
Multiple Content Panels
How many times have you wanted to keep several folder locations open in Bridge at the same time? Or you’re working in one folder but want to be able to quickly look in another without losing your place?
Well, now you can, because Bridge can have multiple Content panels—as many as you wish.
The main Content panel now has a tabbed interface (Figure 3), like a web browser or Windows File Explorer, so you can open multiple tabs by clicking the + sign or pressing Ctrl/Command+Shift+T.
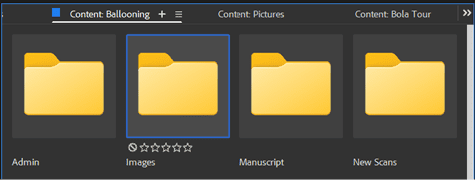
Figure 3. Three tabs in the enhanced Content panel point to different folders, like tabs in a web browser or documents in InDesign.
In the Content section of the Bridge Preferences/Settings panel, you can select which folder has focus when a new tab opens. The defaults (Computer, Home, Desktop, or Pictures) probably aren’t very useful, but you can specify a folder that is more aligned with your workflow. I customized mine to open with my active Projects folder (Figure 4).
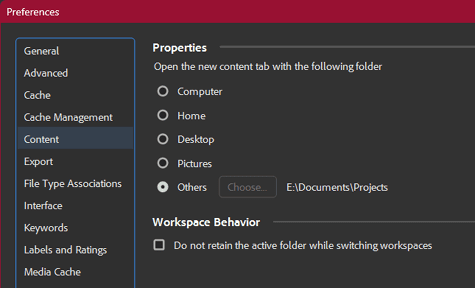
Figure 4. Choose Preferences > Content, then you can specify which folder will have focus when you open a new Content tab.
Inexplicably, Bridge offers no shortcut to close a Content tab: You must select Close Panel from the panel menu, and you cannot set a custom shortcut for it, which is a shame.
You can also move any Content tab outside of the UI to become a floating Content panel, and you can open additional tabs within them. You can even tile them (Figure 5).

Figure 5. This floating Content panel can have tabbed or tiled Content tabs, as well as reside on a separate monitor.
Multiple monitors
Many designers, photographers, and videographers use multiple monitors for workflow efficiency. One of the important workspace upgrades allows any panel to be moved to a different monitor, to complement the advantages of multiple Content tabs.
If you’re working on a travel article and the photo assets from each photographer are in individual folders, you can now open each one in its own Content panel tab and arrange them however is most useful to you. Do you want to see three folders side by side on your secondary monitor? No problem! You can also drag items from one Content panel to another.
Bridge’s other panels automatically sync with whichever Content panel has focus, so, for example, you can even park a nearly full-screen Preview panel on one monitor as you browse a Content panel on another! (Yes, this is as awesome as it sounds.)
It gets better.
The ultimate custom workspace
When you save your current working set of panels as a custom workspace (Window > Workspaces > Save as New Workspace–see Figure 2), Bridge remembers which folders are open in which Content tabs and where all your panels are, even if they are on different monitors. When you switch to that workspace, everything opens exactly where it was when you left it, including the folders that were open in your Content panel(s).
This means you can set up a custom workspace for a project, giving you instant access to your assets and working files for as long as you are working on it. It’s hard to overstate what a time-saver that can be if your work requires you to switch among different projects in your workday or work week.
Collections and Smart Collections
Many workflows can take advantage of one of Bridge’s traditional superpowers: virtual folders known as Collections. A Collection is a set of assets collected (by you) from separate locations in your system that behave as if they are all in the same folder. A Smart Collection is the result of an Advanced Search (see “Taming Wild Assets” in InDesign Magazine Issue 139) that runs automatically. It also behaves as if all the assets are in a single folder.
Because a Collection, smart or otherwise, is a virtual folder, it opens in a Content panel like any other folder. The open Content tab of a Collection will also be saved in a Custom workspace. How powerful is that?
I could write an entire article just on this, but, for now, I’ll just leave exploring Collections and Content panels as a potentially life-changing exercise for you.
Switching workspaces
One question that the new Content UI addresses is, “What happens when I change workspaces? Do I still see the same folder in the Content tab, or does it switch to whatever was saved with that workspace?” That was a surprisingly hard question to answer, so the Bridge team made it a user choice.
In the Content area of the Preferences dialog box, you’ll see a checkbox called Do Not Retain the Active Folder While Switching Workspaces. It is off (unchecked) by default, so leave it unchecked if you want focus to stay on the current folder when you switch to a different workspace, and check the box if you want to land on whatever folder had focus in that workspace the last time you used it. Both options are useful in different situations, but only one can be active at a time.
Open the window
The new multi-tab interface introduced a practical problem: what to call the various levels of the window/panel/tab hierarchy. Here it gets a bit confusing.
Content panels can be standalone or tabbed, but each tab is also a Content panel. Bridge runs in a window, but you can also run multiple instances of Bridge at the same time, each with its own set of panels. File > New Window or the keyboard shortcut Ctrl/Command+N opens a secondary window with a small tag to let you know it’s not the main instance (Figure 6).

Figure 6. A secondary instance (“window”) shows a badge in the top left.
There can be as many secondary windows as you want, all tagged Secondary. You can detach panels from the primary window only, however, and secondary windows are not saved as part of a workspace. If you try to switch a secondary window to a workspace that uses detached panels, it won’t work. At the present writing, Bridge will crash, so I don’t recommend it.
Close an individual Content panel using the panel menu. Close any other panel, such as Preview or Metadata, by deselecting it in the Window menu. Close a secondary instance (window) with Ctrl/Command+W. Close Bridge with Ctrl/Command+Q.
The best way to learn
That’s a lot to get to grips with, and hard to explain in a short article. This is a case where getting hands-on and experimenting will be your best teacher.
Visual Keyboard Shortcuts
One of the shortcomings of Bridge from its early days was that you couldn’t change or add to the default keyboard shortcuts. That one is fixed in Bridge 2024, but the team went way beyond editable keyboard shortcuts. They gave us a full visual keyboard and then some.
You get to this new panel via Edit > Keyboard Shortcuts (Windows) or Bridge > Keyboard Shortcuts (macOS). Before you do, brace yourself, because this is unlike anything in anyother Adobe app. At first glance, it’s intimidating, but there is a lot to like.
Figure 7 is an overview of the entire panel. We’ll look at parts of it in more detail as we go.

Figure 7. The amazing visual keyboard shortcuts interface
Keys used in shortcuts are color-coded according to whether their commands are application-wide (purple), are active only in the context of a panel (teal), or both (diagonal split). Figure 8 shows a close-up. Hold down modifier key(s), which turn on a blue highlight to see which keys use it/them.
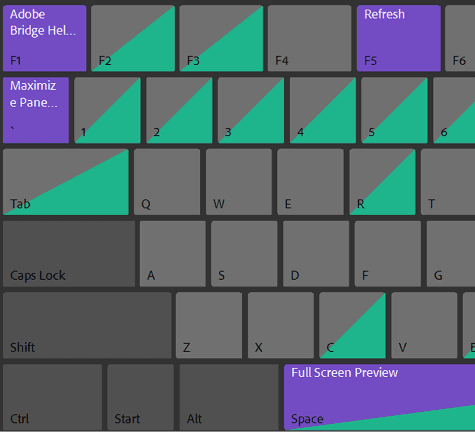
Figure 8. Color-coded keys
Hovering over any colored key pops up a tooltip listing what that key does in which contexts. This list changes if you hold down modifier key(s). Figure 9 shows an example. The frustrations of trying to find an unused key for a shortcut are over.
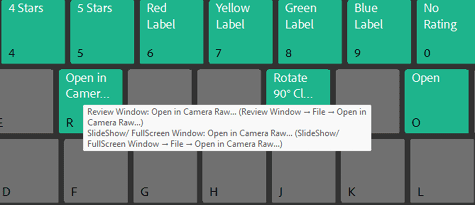
Figure 9. Hovering over any key with a color code (in this case, R with no modifier key) pops up a tooltip listing what it does in which contexts.
Navigating the interface
Available shortcuts are broken down by section and accessed through a hierarchal list of menu commands (Figure 10). Application applies to the top-level menu selections and universal shortcuts such as the spacebar, while the Content, Filter, Folders, and other panels have their own pages. Two special viewing modes, the Review carousel and Full Screen/Slideshow, have their own pages.

Figure 10. Drop-down menu showing the Shortcut column.
Context is everything
Bridge, like InDesign, has context-sensitive shortcuts, whereby a given key combination can have a different effect depending on which panel is active. When you select a context from the Commands menu, only the shortcut keys that are active in that context are highlighted.
Drag shortcuts!
For the first time ever in an Adobe app, you can assign a keyboard shortcut by dragging. Drag the key from the virtual keyboard to the shortcut column while holding down any modifier keys you want to use with it.
It’s not a completely smooth process, so you may prefer to assign shortcuts in the usual way, using the menu.
Zip archive
Bridge now has a File menu and context (right-click) menu command in the Content panel to compress selected items or extract the content of a zip archive.
It’s a little simplistic, for now. Unlike Windows Explorer, Bridge doesn’t ask you to choose a location or filename when creating an archive. The result is always archive.zip in the current folder. It’s up to you to change the name to something meaningful and move the file to where you want it.
Unzipping isn’t quite so cavalier. It asks you to choose where to place the extracted content, although, unlike Windows Explorer, it doesn’t offer a default.
A Bridge to the Future
This has been a quick overview of the last big round of updates, but more are in the works. If you have some particular thing you would really like Bridge to do, or do better, sign up for the prerelease program and get involved!
Commenting is easier and faster when you're logged in!

Recommended for you

How to Add an InDesign File to a CC Library
Learn how to place an InDesign document into a Creative Cloud library. A side tr...

How to Search Using Adobe Bridge
Khara Plicanic uses Bridge to search across multiple documents in a smarter way,...

Colorizing Variable Grayscale Images During Data Merge
With the help of Adobe Bridge and the Effects panel, you can overcome a signific...