Accelerate Graphics Production Using Metadata Filters in Adobe Bridge and Lightroom

You’ve got a folder full of images and you need to run some production chores on them, like converting formats or applying noise reduction. How can you quickly tell which images need work? The filtering features in Adobe Bridge and Adobe Photoshop Lightroom can save you lots of production time by helping you quickly target files you need to work on, and tracking your progress.
Example: Applying noise reduction by ISO speed rating
If you’ve taken a set of photos at different ISO speed ratings, those photos will have varying levels of noise. You could work on photo after photo and keep changing the noise reduction settings as you go, but wouldn’t it be easier to gather together all of the photos taken at a single ISO setting and apply the same noise reduction settings to them all at once? A metadata filter makes that easy:
1. In Adobe Bridge, first select a folder or collection to display the files in it.
2. Open the Filter panel and scroll until you find the ISO Speed Ratings list, which lists all ISO speeds used by the displayed photos.
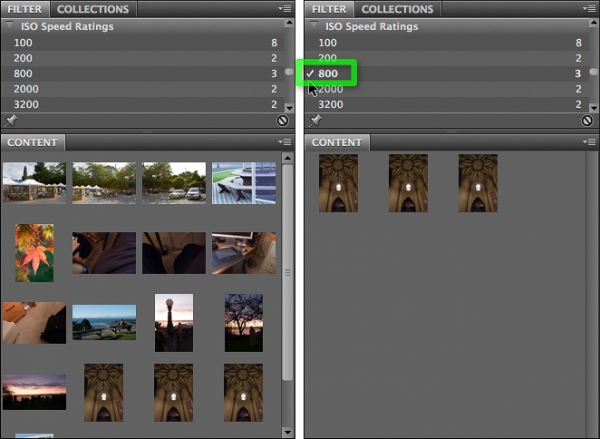
3. Click the first ISO speed rating listed. A check mark appears next to that item and the Content panel changes to display only the images at that ISO Speed Rating.
Figure 1: To filter the files in the Content panel, click to add a check mark next to the criterion you want in the Filter panel.
4. Choose File > Select All and choose File > Open in Camera Raw. Select all the images in Camera Raw and apply noise reduction settings appropriate to that ISO speed in one step.
5. Click done to return to Bridge.
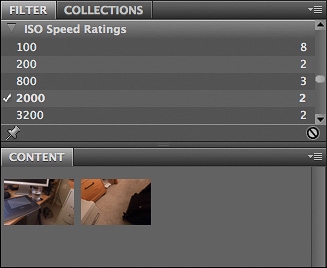
Click to remove the check mark from that ISO Speed Rating and click another ISO Speed Rating to select that bunch of images and open them in Adobe Camera Raw to apply an appropriate noise reduction setting to them. Of course, it will be a different setting than what you applied to the images shot at the other ISO Speed Rating. By repeating this process for each ISO Speed Rating, you can quickly make initial noise reduction edits in just a few passes.
Figure 2: Edit the filter by changing which criteria are checked.
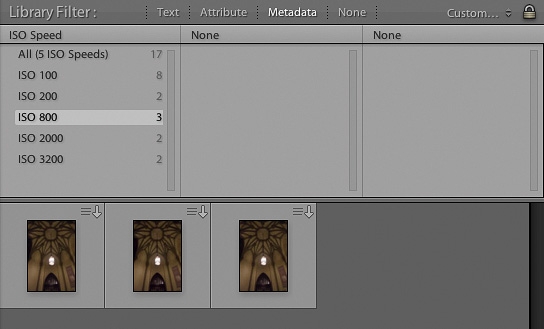
You can also do this in Lightroom using the Grid view in the Library module. In the Library Filter section at the top, click Metadata, then click a column heading to set it to ISO Speed.
Figure 3: Filtering by ISO Speed in Lightroom
Example: Converting to the correct format
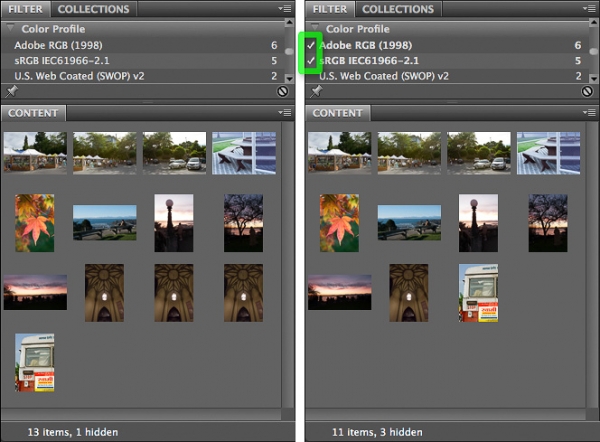
The Filter panel in Bridge can list color profiles; this can be quite useful for production. Let’s say you’re given a folder of images and you need to make sure they’re all converted to a specific CMYK color profile, but you aren’t sure which ones have already been converted. Expand the Color Profile filter panel and you can see how many of the images use the CMYK profile required by your project. Of course, the real value is in seeing which images aren’t yet converted to the required profile. Click to add a check mark to the left of each profile that is not the one you want, and Bridge displays all images that still need to be converted. You can then select them all and open them in Photoshop so that you can apply the Convert to Profile command to them. (If you’ve already recorded the conversion step as a Photoshop Action, you can run it as a batch from Bridge by choosing Tools > Photoshop > Batch).
Figure 4: This project requires files be converted to U.S. Web Coated (SWOP) v2, but the Filters panel shows that only 2 of the files are ready to hand off. Filtering on Adobe RGB and sRGB displays only the images that still need to be converted.
The file counts in Bridge update in real time, so as you convert files you’ll be able to watch the file counts change. This is another useful feature of filters: You can easily track your progress by seeing how many files are left to convert. After you convert the final file, the only profile left in the list will be the one you want, and its count should equal the number of files in the folder. That’s when you know you’re done.
Figure 5: As the files are converted, the file counts update to let you know how many are left to convert.
Bridge and Lightroom metadata filters can help with other similar tasks. If you need all images to be in JPEG format for a web site, use the File Format criterion to quickly see which files are in other formats and need to be converted.
Example: Verifying copyright status
Many content creators want to ensure that their ownership of their work is indicated on the images they publish online. Photoshop, Lightroom, and other Adobe Creative Cloud applications make it easy to embed copyright notice metadata within an image. But how do you know which images are missing copyright status information? Once again, it’s metadata filters to the rescue. In the Copyright Notice filter panel, look for the line No Copyright Notice. (In Lightroom, it’s the Copyright Status metadata filter.) Click a check mark to the left of that line to display all of the files missing a copyright notice so you can then select them and then, in the Metadata panel, enter a Copyright Notice for all of them at once.
Figure 6: Filtering on No Copyright Notice so that a copyright notice can be added to all of those images in the Metadata panel.
Use Smart Collections as a filter alternative
To display files using criteria that isn’t in the metadata filter lists in Bridge and Lightroom, create a Smart Collection (in the Collections panel in Bridge or Lightroom). A Smart Collection is like a saved search based on criteria, and I mention it because the list of criteria you can use for a Smart Collection is much longer than for filters. For example, with a Smart Collection you can filter files by their height or width.
Figure 7: Smart Collections have more filtering options.
Explore the possibilities
Filters save you time because you can instantly check many files without even opening them. Look through the filter and Smart Collection menus in Bridge and Lightroom to think up more ways that metadata filtering can speed up your production work. Need a wide-angle view from a particular shoot? Filter by focal length. Want to exclude photos taken with a smartphone? Filter by camera model. By using information already embedded in your graphics files, metadata filters are there to help when you need to evaluate lots of files quickly and easily.
This article was last modified on July 20, 2021
This article was first published on January 15, 2014


