
A Closer Look at Obscure Features
Blink and you might miss these 20 obscure InDesign features worth knowing


This article appears in Issue 131 of InDesign Magazine.
Psychologists have shown that we humans are often blind to things we’re not looking for, especially when we’re in hot pursuit of a goal! This is so true in InDesign, where we are often so focused on getting our work done that we completely overlook the myriad features that may not seem immediately useful.
However, the more features you know about, the more productive (and happy!) you can become in InDesign. Many workflow inefficiencies are due to people simply not knowing that there’s a better way to accomplish a goal.
A favorite example is users who try all kinds of workarounds to create a hanging indent (where the first line of a paragraph “hangs out” farther to the left than the rest of the paragraph). The problem is they never learned the proper use of the First Line Left Indent feature—or perhaps didn’t even realize InDesign offered this feature.
So, in the spirit of “the more you know, the more fun it gets,” we’d like to share 20 of our favorite obscure features with you. We culled these examples from the over 200 obscure features that Anne-Marie Concepcion and David have talked about in their InDesignSecrets podcast over the past 14 years.
We freely admit that some of these features are really useful, and some are mere curiosities. But we believe it’s always better to at least know what you have to work with, rather than remain blind to something you might want to use.
Masters Fixed
Some features must have been born from two engineers fighting over how something should work, and compromising by simply adding a preference checkbox. That describes the Masters Fixed feature! Normally, if you expand the Pages panel (by dragging the lower edge or corner
of the panel), the area at the bottom, which holds the icons of the document pages, gets bigger. However, if you choose Panel Options from the Pages panel menu, you’ll find a Resize menu that gives you a choice (Figure 1).

Figure 1. Whether your document has many document pages or master pages, the Resize menu in the Pages Panel Options has you covered.
The default choice is Masters Fixed, which keeps the area inside the panel for the master pages at a fixed size until you change it by dragging the line below it. You can choose Pages Fixed (so the size of the master page area changes and the page area does not) or Proportional (both areas change). If you have many master pages in your document, then Proportional might be better for you.
Autogrow
You may already know about the Auto-Size feature in the Text Frame Options dialog box, which lets InDesign adjust the size of a text frame as you add or remove text. But Autogrow is different! Autogrow lets you switch a table row between an exact height and the At Least setting, which allows it to grow as you add text inside a table cell. Normally, you would have to make this change manually in the Control or Table panel. However, InDesign also offers a feature called Toggle Autogrow that you can find only inside the Edit > Keyboard Shortcuts dialog box. It’s in the Product Area called Text and Tables. If you assign a shortcut to this feature, you can use it to switch between the table row settings (Figure 2).

Figure 2. The only way to use the Autogrow feature is to assign it a keyboard shortcut.
Largest Area
Getting text to flow around an object, such as a picture, can be a study in frustration because InDesign provides so many features inside the Text Wrap panel. One of the most baffling challenges is that text sometimes “wraps” around the left and right side of an object, often in really frustrating ways. The problem is that Adobe (in their infinite wisdom) set the panel’s Wrap To menu to Both Right & Left Sides as the default. There are all kinds of painful workarounds for this, but the easiest is simply to change the Wrap To menu to something else, such as Left Side. Another option in this menu is something called Largest Area. This obscure option forces InDesign to look at the amount of space to the left and the right of the text wrap object—and it does so for each line of text. Whichever side of the object is larger, InDesign will put the text there, eschewing the other side (Figure 3).

Figure 3. Text wrap using Both Right & Left Sides (top) versus Largest Area (bottom).
Show Linked Files
Okay, we’re fudging a little here, because this feature—Show Linked Files—still exists and is related to InDesign, but it’s no longer actually inside InDesign itself. Instead, you’ll find it in Adobe Bridge. The feature works like this: You select an InDesign file in Bridge, and then choose View > Show Linked Files (or right-click the file and choose this feature from the context menu). Bridge looks inside the InDesign file, finds all the files that are linked—that is, files that appear in the Links panel—and displays them. This is an awesome way to see which images are used inside an InDesign file without actually opening the file itself.
Protractor
Let’s say you place an image on your page and then want to rotate a text frame to match the angle of an object in the picture. But what angle is it? You could rotate the frame until it appears to match, or you could use InDesign’s protractor feature. Wait, what? Perhaps you didn’t know that InDesign has a tool that lets you measure an angle, but it does. It’s the Measurement tool and it lives under the Eyedropper tool in the Tools panel. To measure a simple angle, you can drag with the Measurement tool. The Info panel will immediately appear, displaying the angle of the line you’re dragging.
But wait, there’s more: If you want to measure any arbitrary angle, drag once with the Measurement tool, and then hold down the Option/Alt key and drag again, starting near the end points of the first line you drew (Figure 4).

Figure 4. Drag once with the Measurement tool, and then Option/Alt-drag a second line to measure any angle.
Relink File Extension
What if someone placed a folder-full of images into a document, and many of them were PNG files? There is nothing inherently wrong with using PNG images, but let’s say they were low-res files and you want to relink them with high-resolution TIFF images instead. If you look inside the Links panel menu, you’ll see several relink features, including Relink to Folder and Relink File Extension. The first one lets you relink your images to a different folder, and optionally choose a different file extension for them. (For example, choose TIFF instead of PNG.) The second one lets you relink to images in the same folder, with a new file extension.
Does it sound like these options are redundant, and Adobe should just get rid of Relink File Extension? If you answered yes, you’d be correct! This feature is so obscure that it’s a contender in the “most useless feature” category. But aren’t you happy to know that it exists?
Convert to Motion Path
If you have ever used a motion preset in the Animation panel, such as Fly in from Left, you’ve seen a motion path—it’s a bright green line stippled with a series of dots and an arrowhead. You can use the Direct Selection tool to adjust the motion path to create a custom animation effect, such as flying in at an angle. But sometimes you want something with even more pizazz, such as flying in along a curve. Fortunately, InDesign lets you make any path (even a frame!) a motion path. To do so, select an object and a path, then click the Convert to Motion Path button at the bottom of the Animation panel (or choose that option from the panel menu). Of the two objects, the one on top (in the stacking order) becomes a motion path (Figure 5).

Figure 5. When you select two objects and click the Convert to Motion Path button, the one on top changes into a path.
Delete End Punctuation
Text variables—especially Running Head variables—are able to capture text from elsewhere on the page (or even a previous page). For example, you might create a variable that looks for the most recent instance of some paragraph style named CompanyName, so that you can use it in a header on the page. But what if the text it finds includes punctuation? You probably don’t want to include that punctuation in the header. Fortunately, there’s an easy solution: Turn on the Delete End Punctuation checkbox when defining the text variable (Figure 6).

Figure 6. When you define a text variable, turn on the Delete End Punctuation checkbox to ensure you don’t get any additional characters.
Change Time
We love the name of this feature because it sounds like it has to do with time zones or perhaps some time-travel episode of Doctor Who. But the reality is more mundane. The Change Time feature lives inside the Track Changes panel. If you have enabled Track Changes for a story, then each change someone makes is captured, and you can see it in the Story Editor window. When you click inside of a change, the Track Changes panel displays who did it (remember to use File > User to set your user name!) and, importantly, when they did it. That’s the change time (Figure 7).

Figure 7. When Track Changes is on, each edit is time-stamped.
Auto-Size Link Information
When you see the name of this feature—Auto-Size Link Information—you know where it must live, right? In the Links panel! In this case, it’s buried deep inside the Links panel menu. To find it, you have to look inside the Utilities submenu. And this feature does one very obscure thing: It resizes the Links panel based on how much appears in the Link Info area. For example, when you select an image, the Link Info area at the bottom of the Links panel is often too small to fit all the lines of data. You could drag the panel, or you could take the extra trouble to choose this feature from the submenu, which resizes it to fit all the lines for you.
To be fair, if you spent a lot of time looking at the Link Info area of the Links panel, this could be useful. But in that case, you wouldn’t want to take the slow path of choosing it from the menu. Instead, you would want to apply a keyboard shortcut to it (using Edit > Keyboard Shortcuts; it’s in the Product Area called Panel Menus).
Redefine Scaling as 100%
This is one that used to be more important, but you still should know about it in case you encounter old files displaying strange measurements in the Control panel. In the early days of InDesign, if you scaled a frame containing text, and then selected some text in the frame, you would see the Font Size displayed in two measurements, like “12 pt(15)” (Figure 8).
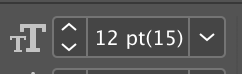
Figure 8. This is an example of the point size of scaled text you might see in legacy documents, until you use Redefine Scaling as 100%.
This happened because the default preference for scaling text and objects was something called Adjust Scaling Percentage. While the intent was to be helpful, by showing you both the original size and the new size (and giving you the option to clear the transformation), it was simply confusing and annoying to almost everyone. Thankfully, Adobe changed the default preference to Apply to Content, which applies the same scaling to both the content and the frame, and the result is that you see only one point size (the correct one!) in the Control panel now. If you ever do come across an old file with those goofy point sizes, select the text frame, go to the Control panel menu, and choose Redefine Scaling as 100%.
Hide New Layers When Updating or Relinking
This one can be a total sanity saver when you’re using the Object Layer Options feature to make different versions of a piece of artwork from a single placed Illustrator file. For example, say your Illustrator file contains one base layer and several layers that you need to show or hide. You set up everything correctly in InDesign with Object > Object Layer Options (Figure 9). So far, so good. But if a new layer is added to the Illustrator file, by default it will show up in all the placed copies of that artwork (Figure 10).

Figure 9. You can create several versions of this jersey, all from one Illustrator file, with Object Layer Options.

Figure 10. Things go awry when a new layer is added in Illustrator.
If you don’t want that layer to be visible, you’ll have to open Object Layer Options for each instance of the image and turn off the new layer. The Latin name for this situation is Tedious Maximus. Fortunately, there is an easy way to avoid it. Before you update the image links, go to the File Handling area of the Preferences dialog box and turn on Hide New Layers When Updating or Relinking. Now, you only need to visit Object Layer Options for the instances of the placed art where you do want to turn on the new layer (Figure 11).
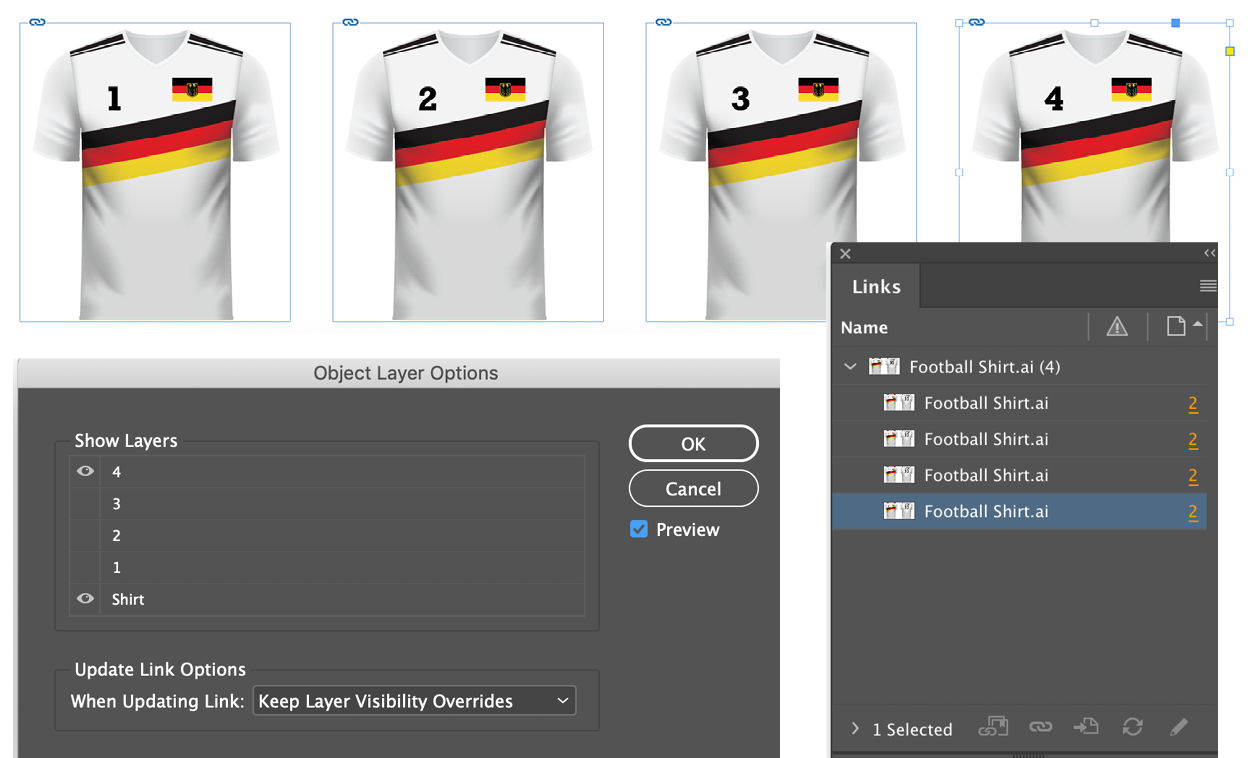
Figure 11. Hide New Layers When Updating or Relinking leaves the appearance of artwork unchanged, saving a lot of work.
Shadow Honors Other Effects
InDesign’s Effects panel gives you the ability to create all kinds of special effects without the need for placed Photoshop or Illustrator files. But you do need to take care, especially when applying multiple effects to the same object. For example, if you want to create a cast shadow effect like the one shown in Figure 12, you can apply a directional feather and a drop shadow to the same object, as described in this post at InDesignSecrets. One of the keys to this technique is for the cast shadow to fade out in the same manner as the directional feather. To achieve that, you need to turn on Shadow Honors Other Effects.

Figure 12. You can create a cast shadow like this by combining effects.
Reset Hyperlink
Managing hyperlinks in InDesign can be a bit of a chore, but there are a few helpful features that can take some of the pain away. One such feature is Reset Hyperlink, which you can use to change a hyperlink’s source. That’s the text or object someone can click or tap on to go to the hyperlink’s destination. To reset a hyperlink, start by selecting it in Hyperlinks panel. In your document, select the text or object that you want to be the new source. Then, from the Hyperlinks panel menu, choose Reset Hyperlink. Voila! The selected text or object is now the source (Figure 13).

Figure 13. The original source of this hyperlink was the image on the left (top). But it can easily be switched to the image on the right with Reset Hyperlink (bottom).
There are a couple of limitations with Reset Hyperlink that you should be aware of. First, the name of the hyperlink in the panel won’t change automatically. So to avoid confusion, you might want to rename it yourself. Second, if you have a character style applied to the original text of the hyperlink source, that character style won’t be removed when you reset the hyperlink. Again, you’ll have to manually clean it up.
Flip Pages
If you don’t already know what this feature does, we guarantee it’s not what you think. This one doesn’t actually do anything inside InDesign. It’s a setting in the PDF Export dialog box that you can use to make a self-running, full-screen presentation, where the pages flip, or advance, at a specific interval you can set (Figure 14). It’s great for demo files that you want to display in a sales context, such as a trade show booth or kiosk.

Figure 14. Turn on Flip Pages to create a full-screen automatic slide show from an exported interactive PDF.
Entire Pasteboard
The Pasteboard is extremely handy as a place to stash stuff that you don’t need at the moment but don’t want to delete either, such as text and images that don’t belong on the current spread. In the same way couch cushions can swallow up everything from cellphones to spare change, the Pasteboard can hide important objects just out of sight and reach—but only until you choose View > Entire Pasteboard. Then there’s nowhere for anything to hide. Heck, it might even help you find your missing keys (Figure 15).

Figure 15. Nothing can hide from your sight when you view the entire Pasteboard.
Satin
Satin is probably the most obscure of all InDesign effects. Most folks, if they’ve ever even heard of Satin, probably try it once, can’t make heads or tails of it, and move on. But Satin is actually very powerful and easy to use once you understand how it works.
Satin creates two inner shadows that match the shape and size of the object they’re applied to. Where the shadows overlap, they cancel each other out and disappear. Distance and Angle set the position of the inner shadows (as measured from the position of the object). Size is the amount of blur applied to the shadows. Opacity and Mode control how visible the shadows are and how they blend with the colors of the object.
A good way to get a handle on Satin is to set the Size to 0. With no blur applied to the shadows you can move them around with Distance and Angle, and when you see an interesting pattern emerge, increase the Size value until you get a cool satiny look (Figure 16). By experimenting with different shapes, colors, and blend modes, you can create textures like fire, water, glass, and so on.

Figure 16. When you apply Satin with 0 Size (left), it’s easier to understand how to control the effect. Then, you can increase the Size value to taste (right).

Check Links Before Opening Document
As everyone who’s ever used InDesign knows, by default the program alerts you when you open a file that contains missing or modified links. Most of the time, that’s a good thing. After all, you don’t want to find out your file has missing links when it’s time to output a printed copy or PDF. But, what if you already know the files you’ll be working on contain missing links? What if you need to open a lot of those files? Clicking through that same dialog box over and over can turn the sweetest disposition sour in short order. To prevent all those unhappy clicks, go to the File Handling area of the Preferences dialog box and turn off Check Links Before Opening Documents.
Skip First
Say you have a long table that spans multiple text frames, and your design calls for a “Continued” version of the table header row in all frames after the first one. One way of achieving this is to duplicate the row that will serve as the header, add “Continued” to the top copy of the row, and designate it as the header (Table > Convert Rows > To Header). Then to hide the “Continued” header in the first frame, choose Table > Table Options > Headers and Footers and turn on the Skip First checkbox (Figure 17).


Figure 17. One way to configure a table that continues over multiple frames is to create a “Continued” table header (top) and turn on Skip First (middle) to make it disappear from the first frame (bottom).
Prevent Selection of Locked Objects
InDesign’s features for locking page objects are rather rudimentary. By default, when you lock an object, it’s completely untouchable until you choose Object > Unlock All On Spread, or click the button on the object (or in the Layers panel) to unlock it. But what if you want to lock only the size and position of an object, while still allowing someone to manipulate the stroke, fill, and content within? You can do that by going to the General area of the Preferences dialog box and turning off Prevent Selection of Locked Objects.
Upon Further Examination
Even after using InDesign for over 20 years, we still get joy from discovering (or rediscovering) uses for features like the ones in this article. They may seem insignificant or obscure until the day comes when you really need them. And then they loom large indeed!
Commenting is easier and faster when you're logged in!

Recommended for you

Find and Remove Repeated Words Using GREP
This GREP query will do a much better job of tracking down repeated words than I...
Changing InDesign’s Default Ruler Measurements
Answering one of the most commonly-asked questions: How to change the ruler valu...

Tips for Selecting Objects Using the Layers Panel
When it comes to selecting objects on complex pages, the Layers panel is invalua...