
Top 5 InDesign Template Tips
Anne-Marie Concepción shares her favorite tips for making awesome InDesign templates

This article appears in Issue 80 of InDesign Magazine.
I’ve been producing layout files for my company and my clients for a couple decades now, and I can attest that starting with a workable template (as opposed to a blank page, or a copy of the previous issue or version) makes production go incredibly fast. However, I’ve found that, oh, about 98% of my clients don’t have templates to give me, and even if I create one for them, it’s a struggle to get them to use it. Believe me, I understand. People feel comfortable doing what they’ve always done. If you’re not a template user, I think you’ll find these five tips (there’s probably about 80 jammed in there) will help convince you it’s worth a try; and if you do use templates, I’m positive you’ll learn something new that will make them even easier and more useful for production.

If you like what you read here, (or want to see me demo these on video), please
take a look at my recently published title on Lynda.com, Designing Templates
with InDesign CC.
1. Make a Starter File Instead of a Template
I know the name alone—TEMPLATE—is an obstacle for many busy designers. Who has time to create a template for a complicated publication from scratch? New editorial is filling up your inbox, the photographer has a folder of images for the feature story, the client wants to see a first proof yesterday, you need to start producing right now. So you just open a previous issue,
Save As, and wade through old content as you bring in the new, like always. Let’s split the difference: make a “Starter File.” See how friendly that sounds? A Starter File is a copy of your existing publication file, cleaned up to receive new content and optimized to make production fast and accurate. Creating a Starter File for a repeated publication is just a little more work than what you’re doing now, but it will pay off tremendously in the future. Start like this: Grab one of the recent issues you’ve already published, and choose File > Save As. In the Save As dialog box, rename it to something like “White-Paper_Starter-File” or “Acme Textbook Series – Starter,” choose InDesign Template from the Format menu, and save it in a location outside of that issue’s production folder. TIP: The template format gives the file an INDT extension instead of INDD. You can still edit it while it’s open, but when you close and reopen it, InDesign creates a duplicate of the file called Untitled.indd. This is to prevent you from accidentally overwriting the original template—which is the point of a template, after all. If you want to edit a template or starter file after you’ve closed it, you can either choose the Open Original option from the bottom of the File > Open dialog box, or just Save As your Untitled document with the same name, choosing the InDesign Template format again in the Save As dialog box to give it the INDT extension.
Make Your Starter File Pristine
Practice safe setup and ensure that the document you’re using as a source for your Starter File is free of internal problems (often resulting from multiple Save As’s, version updates, and recovery from crashes in its past) before basing actual publications on it. Doing an IDML Roundtrip step early in the game will clear out any file corruption. Just save any changes you’ve made so far, export the file (File > Export), and choose InDesign Markup (IDML) from the Format menu. Now close the document, and open the IDML file you just exported from the File > Open menu. It opens as Untitled.indd. Save this file as an INDT, and continue prepping it for duty as a Starter File. Now, start pruning away the deadwood (Figure 1).
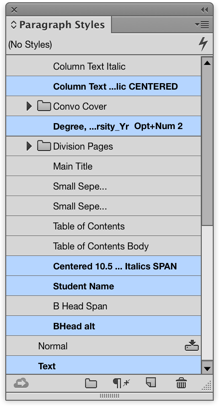
Figure 1: Clear out unused styles that will just get in your way. From the Paragraph Styles menu, choose Select All Unused, and then click the trash can button at the bottom of the panel. Do the same for your Character Styles, Object Styles, and Swatches.
- Paragraph Styles
- Character Styles
- Object Styles
- Swatches
Do that first, before you start deleting pages (with content); otherwise InDesign won’t find the styles you need being used anywhere, and so will include them in the “All Unused” selection. If you’re worried that you’ll be deleting something that you may want to use in the future, remember you can always retrieve it from that older file. Now go through the document and look for elements that take a while to format but that you use fairly regularly. These are things that don’t belong on a master page, since they don’t show up on every document page, but which every issue uses at least a few times. Sidebars, image and caption groups, styled tables, and standalone pull-quotes are good examples. Check to make sure the styles they use are “clean” (see the second tip, below), and then save out each element as a snippet (File > Export > InDesign Snippet) or drag it to a Library (File > New > Library or CC Library) to reuse in future issues (Figure 2).
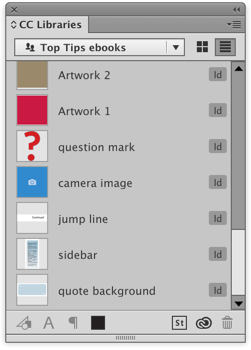
Figure 2: Dragging single or multiple objects into the CC Libraries panel lets you quickly create a “swipe file” of items to reuse and customize in future publications. To reuse them, just drag and drop any of these items onto the page of your new file. One of the unique features of using a CC Library for this (only available in InDesign CC, of course) is that you can create named libraries, like this one for Top Tips ebooks, and you can share libraries with other InDesign CC users in your production department.
TIP: Guides Be Gone
Ruler guides tend to clutter up existing documents, so it’s nice to clear those out from your Starter Files too. A quick way is to press Command+Shift+G or Ctrl+Shift+G, which selects all the ruler guides on the active spread, and then press the Delete key to get rid of them. You have to do this spread by spread, but if you’ve already deleted most of the document pages, it only takes a moment or two.
2. Clean Up Those Styles
“Format creep” happens to all of us. We start with the best of intentions, creating paragraph and character styles for all our text, applying them consistently. But in the throes of production, someone adds manual formatting, perhaps bumping up the text size of a caption, or changing the color of a drop cap. And from then on, you find yourself fiddling with the text size of every caption so it matches. Ack! Take some time to go through your starter file or template to see if it’s a Format Creep victim. With the Type tool, click inside a paragraph, and look at the Paragraph Styles panel. If you see a plus symbol following any of the style names (indicating manual formatting has been applied), and the same is true in most instances where that style has been applied, you’ve got a problem. This style is almost useless, since the purpose and benefit of the style—one-click formatting—is no longer doing its job. We’ll assume you like the look of the manual formatting. While your text cursor is still in the paragraph, choose Redefine Style from the Paragraph Styles panel menu. This adds the local formatting in the active paragraph to the style definition. Voilà! No more plusses, no more need to tediously apply manual formatting to text that already has a paragraph style applied. Do that for each of your paragraph styles. Banish the plusses! Note: If you encounter a plus because your cursor is inside a particular word that’s been formatted differently than the paragraph—say it’s bold or italic—then open the Character Styles panel and create a new character style from it. Once you apply the character style to the text, the paragraph style’s plus symbol will disappear. There is so much more you can do with your styles to streamline your templates—create based-on styles, set up Next styles, organize them in style groups, and create nested styles, for example. But simply deleting unused styles (as we did above) and updating your style definitions to use your actual formatting will save you a huge amount of time the next time you produce the publication.
TIP: A Script to Show Local Formatting
What’s faster than clicking inside text and looking for plusses in the style names? Using a script. I like IndiScript.com’s free cross-platform script, Show Local Formatting, which still works in CC 2015. It puts a red line over characters that have local formatting (meaning they need a character style) and a vertical line to the left of paragraphs with local formatting. As soon as you apply that character style or redefine that paragraph style, the markup disappears. The markup is non-printing, and you can toggle it on and off altogether by double-clicking the script. [Edit from Anne-Marie: InDesign CC 2015.3 and later have a Style Override Highlighter button at the top of the Paragraph/Character Styles panels. No need for the script!]
3. Make Master Pages Do More Work
Useful templates have at least one master page holding essential page elements common to all (or most) pages, including margin and column guides, headers and footers, and automatic page numbers using the Current Page Number placeholder (Type > Insert Special Character > Marker). To make your template’s master pages even more useful, consider adding (or in some cases, removing) these elements:
Add Primary Text Frames (Figure 3) (or change your master page text frames to primary ones)
The beauty of primary text frames (introduced in CS6) is that they don’t have to be overridden on the document pages when you want to type in them, and if you need to apply a different master page to a document page that already has text in it, the text will seamlessly flow into the new master’s primary text frames. Also, if you have Smart Text Reflow enabled for primary text frames (this is the default setting in Preferences > Type), there’s no need to hold down modifier keys to autoflow your text—InDesign will flow it all in, adding pages as necessary.
Figure 3: When you’re on a master page, you can tell if a text frame is a primary text frame or not by looking at the page icon under the In Port box, upper left on the frame. If the page icon has an arrow coming out of it (above left), that’s a primary text frame. Otherwise, a master text frame just looks like a page icon (above middle). When you create a new document, you can choose to have InDesign add primary text frames by turning on the checkbox (above right). To convert a regular text frame on a master page into a primary text frame (or vice versa), click its page icon with the Selection tool.
Remove Elements
If your master page is full of placeholders that you always have to override on the document pages, like text frames with sample content or FPO images, you’re doing it wrong. The best practice is to only create objects on the master page that will seldom, if ever, need to be overridden and modified on the document page. Instead, whenever possible, use library items or snippets, discussed above, as your placeholders, bringing them onto the document pages as needed for those types of elements. They can remember their position on the page, too, if you use the Place command in the Library panel. Being strict with which objects you allow on master pages means you will be able to easily apply a different master to a page with content, or move a left-facing page to a right-facing page, without ending up with extraneous, overlapping elements.
Put Master Page Items on Layers
You can save a fair amount of fiddling if you just add one layer at the top of your Layers stack called Folios, and move your folio text frames there. This avoids the common problem of page numbers disappearing behind document page elements.
4. Create Three Object Styles
This tip is for those of you who never crack open the Object Styles panel. Why am I saying you should create three of them? Because using a feature (that’s new to you) at least three times will help you get used to it. Also, forcing yourself to add three object styles to your template or starter file will get you looking at your elements to imagine where object styles will become handy. As with paragraph and character styles, the reason to use object styles is threefold: fast one-click application of a combination of formatting commands, consistent and accurate formatting for particular types of objects, and easy format updating by editing the style, instead of all the objects themselves. Here are some great candidates for object styles:
- Image frames (stroke, shadow, text wrap, auto-fit [Object > Fitting > Frame Fitting Options > Auto Fit])
- Caption text frames (Figure 4) (paragraph style, text wrap, auto-resize)
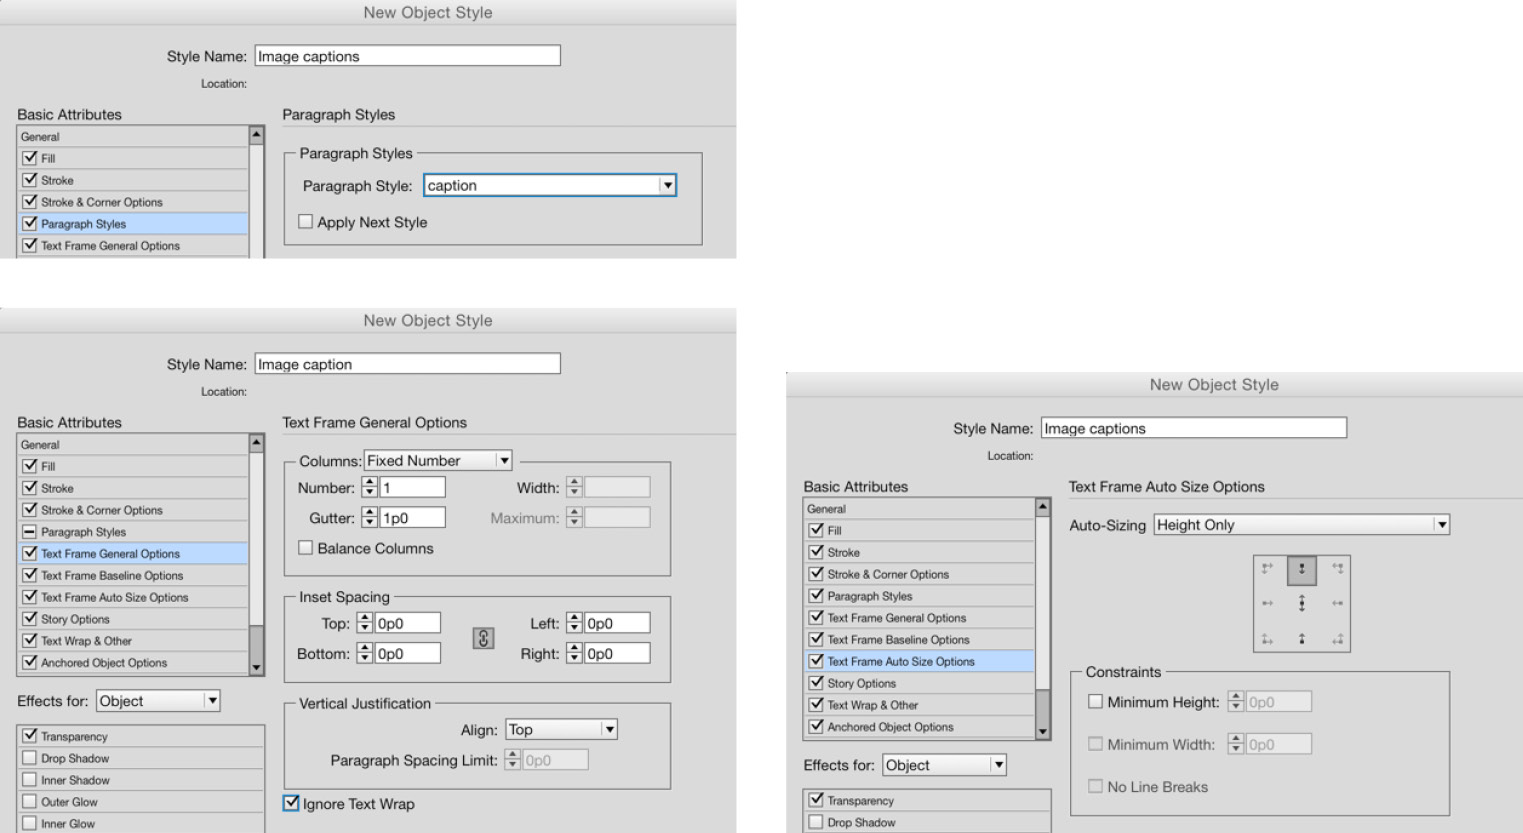
Figure 4: Include an object style for caption text frames in your template if your publication uses more than a few captions. You can save a lot of production time if you include the correct paragraph style for the text in the frame (top left), set it to ignore any text wrap applied to the image it’s next to (bottom left), and set the frame to automatically expand to contain the caption text (right).
- Photographer credit text frames (ditto)
- Callout lines (stroke color, stroke width, arrows)
- Pull-quote text frames (stroke, rule above/below, paragraph style, fill color)
- Jump line text frames (paragraph style, auto-resize)
- Repeated anchored objects (type of anchor, offsets)
Object styles are also easy to create. Just as with text styles, start by manually formatting an object and selecting it with the Selection tool, or just select an object that’s been formatted manually. Then open the Object Styles panel and create a new style by clicking the New Object Style button on the bottom or choosing the New Object Style command from the Object Styles panel menu. Don’t forget to apply the object style to the source object in your template, and to apply object styles to elements before you add them to your Library or export them as snippets.
5. Feed and Water Daily—or Monthly
Do you know why designers abandon the beautiful templates and starter files they created once upon a time? Because they let them die on the vine. You may have created the first issue or three from your template, but soon, that old INDT was out of date. Here’s the reality: when you’re laying out an actual publication, you tend to tweak and iterate and revise. Soon enough, the starter file you created earlier in the year doesn’t have all the goodies the most recent issues carry, like that new sidebar treatment you came up with, the updated style you’re using for pull quotes, the hyphenation tweaks you did for some paragraph styles. To keep your starter file healthy, periodically open it and update its styles, swatches, and master pages to sync with the latest version of your publication. One way to update the text styles is to open the template and import the styles (Paragraph Styles panel menu > Load All Text Styles) from the publication into the template. The default behavior is for the incoming style definition (the publication’s) to replace the destination, which is exactly what you want (Figure 5). For example, if you edited the type size, space above, and hyphenation settings for your Subhead style in the publication, the template’s Subhead style would get updated to match.
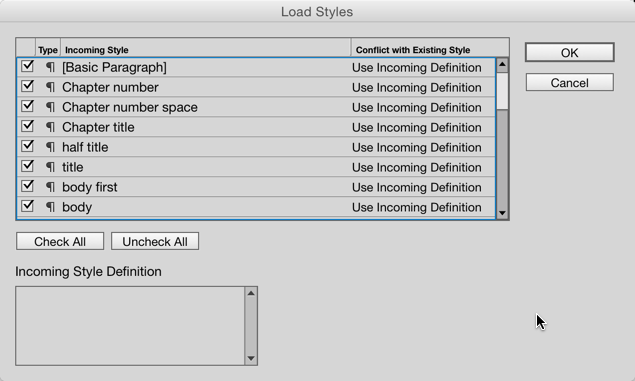
Figure 5: When you load a publication’s text styles into your template, you will of course have many “conflicts,” which is InDesign’s way of saying “matches.” When the incoming style matches the name of an existing style, InDesign defaults to updating the existing style’s settings to also match. That’s exactly what you want, if you’re trying to keep your template up to date with the edits you’ve made to the styles.
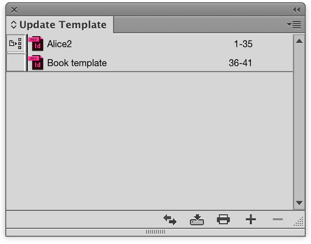
Figure 6: Use InDesign’s Book feature to quickly update a template with all the edits you’ve made to the styles and master pages in a publication that was based on that template. In the image above, I created an InDesign Book file, “Update Template,” and added two files: an actual book publication called “Alice 2,” and the template I based it on, “Book template.” Since I made changes to the Alice2.indd file’s styles that I like better than the template’s, I set it as the Style Source (the icon to the left of Alice2, above). Now when I Synchronize, the Book template file will get updated to match. When I’m done, I can delete the “Update Template” InDesign book file.
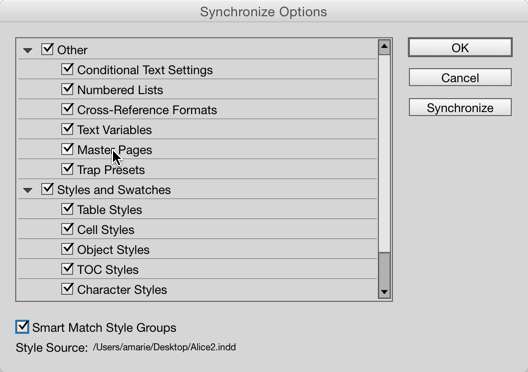
Figure 7: Be sure to turn on the Master Pages attribute in the Synchronize Options dialog box (from the Book panel menu) if you want to update the template’s master pages with any edits or additions you made to the publication’s master pages.
A Blueprint for Success
Still with me? Good—that means you’ve chosen to read this whole article instead of going to the gym or flossing. So I know you’re motivated. And the good news is that it probably took more time to read this than it would to implement one or more of these tips…so get out there and start making life easier on yourself!
Commenting is easier and faster when you're logged in!

Recommended for you

InDesign Template: Catalog
Includes the template in INDD and IDML formats in letter and A4 sizes. The fonts...

Scanning Around With Gene: The Death of Free Calendars and Local Drug Stores
Two developments this week lead me to today’s topic. First, I began my search fo...

This Month in InDesign Articles, October 2018
News, tutorials, tips, and more from around the Web for InDesign users.