How to Think About Pages and Page Sizes in InDesign CS5
Insights into how the new page size feature works in CS5

At the last Print and ePublishing Conference (this May in Seattle), we had a visitor from Adobe — a member of the InDesign engineering team named Shawn who wrote the multiple-page-size feature in CS5. He wanted to chat because he had seen Mike Rankin’s post about applying transformations (rotations and shearing, for example) to pages. He came to offer some insights into what was going on there, and so for about 20 minutes a number of us sat transfixed in InDesign geek awe.
One of the key pieces of information that he spoke about had to do with how to think about page sizes in InDesign — or, more generally, page shape. We tend to think of objects (frames, paths, and so on) as being on pages. But actually each spread is just a huge pasteboard on which objects are sitting. The page boundaries you see are simply? “selection areas” that surround the objects. It’s almost as though the page size — its boundary rectangle — is like the marching ants selection in Photoshop: Whichever page objects are inside that “selection” are printed or exported to PDF.
Then, when the print or exporting happens, the objects inside the page-boundary-selection are mapped to the output “page.” You don’t generally need to think about that, because the page is rectangular and the output is rectangular. But what if you used Mike’s “Transform Again” trick to rotate or shear the page? In that case, InDesign has to “straighten” the rotation.
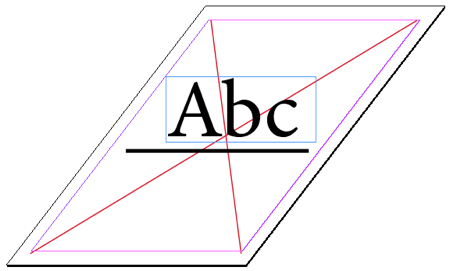
For example, here’s a page rotated and skewed with the transformation trick:

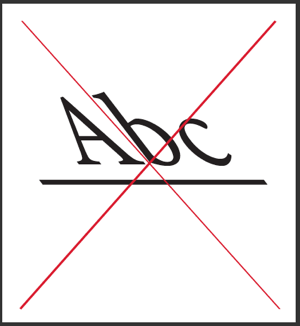
Now here’s the same page exported as a PDF (this would be the same result if I exported to JPG or printed):

Notice how the red lines I drew stretch from corner to corner in both examples. The text, which appeared “straight” on the InDesign page, gets “mapped/transformed” so that it appears skewed in the output. Even the thick black stroked path under the text gets altered — see the angled left and right end caps?
Here’s another example of how the new page size feature is based on an underlying “selection rectangle” metaphor. Open a new 2-page non-facing-pages document, turn off Allow Pages to Shuffle in the Pages panel menu, then drag page 2 up to the same spread as page 1. Use the Page tool to set the page size for page 1 to Letter and page 2 to A4 (or vice versa, it doesn’t matter). Then use the Page tool to drag one on top of the other:

I’ve put two graphics and a text frame on the pasteboard and “surrounded” these objects with the page boundaries. The result? Two pages (each a different size) with the same content.
I’m not saying that this is necessarily practical, but I do believe that understanding how InDesign thinks, how it works under the bonnet, is helpful, especially to people trying to push the program to its limits.
In a later blog post I’ll explore this idea further, and discuss the amazing TransformMaster plug-in that turns an adequate CS5 feature into an awesome one.
This article was last modified on December 20, 2021
This article was first published on July 14, 2010
Commenting is easier and faster when you're logged in!
Recommended for you

Timesaver: Span and Split Columns in CS5
One of the best timesaver features in InDesign CS5 is its ability to span and sp...

Changing sizes… mixing scaling and sizing
This is a story about scaling and sizing objects? InDesign CS5 introduced the ab...

InDesign How-to Video: How to Convert Document Pages to Master Pages
Learn how easy it is to quickly convert InDesign document pages to master pages.


