


I love the new user forums. Not only do I get to see what everyone looks like and learn from their experiences, but I also have a feeling I’ll never run out of stuff to write about. Yesterday, one person threw down the Polaroid challenge: how to make a placed picture look like it was an old Polaroid. Folks made some great suggestions, and now there’s even a Polaroid script we can use. Truly, the collective intelligence InDesignSecrets community is formidable.
The first option I thought of was to use an effect in combination with an object style for “instant” Polaroids. Since a picture’s worth a thousand words (or roughly 7.143 Tweets), I thought I’d illustrate my suggestion.
Start with a placed picture. It can be any dimensions, but it should be in a frame that is square or pretty close to it.

Give it a stroke as thick as you want the bottom of the Polaroid to be. A little less than one quarter the height of the picture seems about right. For now, make the stroke anything but [Black] or [Paper]. In the Stroke panel, align the stroke to the outside.

In the Effects panel, apply a Directional Feather to the stroke with 100% choke to the Top, Left, and Right. This narrows the stroke on those sides.
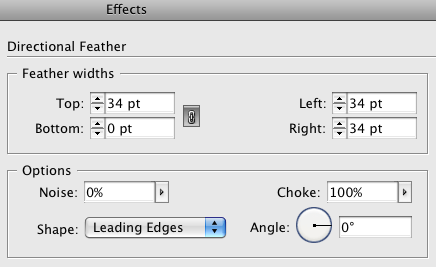

One thing to be aware of: if you plan to use text wrap with this image, the text wrap will be based on the original dimensions of the stroke, not what’s visible with the feather. You’ll have to apply a negative offset to the feathered sides to wrap text close to them.

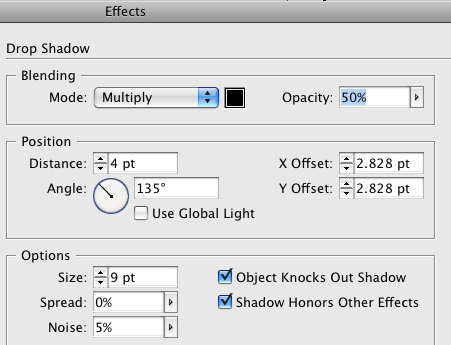
Next, apply a drop shadow. In the Options, check Shadow Honors Other Effects.
This takes the directional feather into account. Adjust the drop shadow settings to taste.
If the picture is to be placed on a white background make sure the drop shadow shows around all sides.
Change the color of the stroke to [Paper] or a small percentage of [Black], say 4%.

Create a new object style based on your creation.
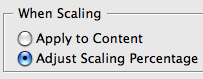
If you want to be able to scale the Polaroid, go to General preferences and check When Scaling: Adjust Scaling Percentage. This way, the directional feather will scale along with everything else.
If you want to apply the object style to photo that has been scaled, you need to select the photo and go to the Control panel menu (waaaaay over on the right side) and choose Redefine Scaling as 100%.
![]()
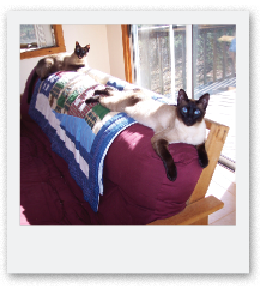
If you leave it scaled…
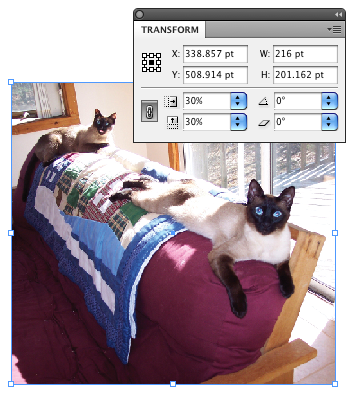
the effect may not behave as expected. These cats are not pleased.

But after you choose Redefine Scaling as 100%, it should work purrrfectly.
There’s only one more thing to do. Say “cheese..”
This article was last modified on December 20, 2021
This article was first published on November 13, 2009
Commenting is easier and faster when you're logged in!

Recommended for you

Making Illustrative Effects in Photoshop
Combine illustration and photography to create an intriguing image. Drawing skil...

Tip of the Week: Making Torn Paper Effects
This InDesign tip on making torn paper effects was sent to Tip of the Week email...
New Contest! Solve the Mystery of the Unwelcome Text Wrap
Hey folks, it’s contest time again! Last month, I received many creative a...