Strip the Crud from Word Files Before You Map Styles
One of my favorite features in CS2 appears at the bottom of the Word Import Options dialog box: Custom Style Mapping. This is the feature to use if you're receiving...

One of my favorite features in CS2 appears at the bottom of the Word Import Options dialog box: Custom Style Mapping.

This is the feature to use if you’re receiving Word files that the author has applied their own style sheets to, either the ones built into Word (like Heading 1, Heading 2) or ones they created all by themselves, the dears; and you want InDesign to automatically to replace those with equivalent styles (differently-named, though) you created in your layout file as you import the document.
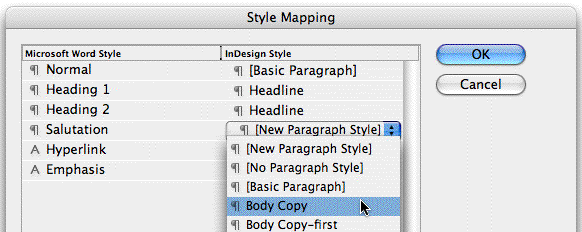
Click the Style Mapping button to open up a dialog box that lists all the Word doc’s styles on the left and all your InDesign layout’s styles (initially all defaulting to New Paragraph Style) on the right. Use the dropdown menus on the InDesign side to choose which Paragraph or Character Style you want each Word style to map to, like this:

With Custom Style Mapping, you can tell InDesign “Hey, as I flow in this file, anything the user applied their Header 1 style to, remove it and apply my InDesign paragraph style called Headline instead; where ever they used their Word style “Salutation,” use the layout’s Body Copy style instead; if the knucklehead set Word to automatically apply its Hyperlink character style to web URLs, apply my “No Character Style” to those please;” and so on.
The goal here is to bring in a Word file almost fully-formatted with InDesign styles, and no tell-tale disc icons in the Styles palettes (indicating an imported style).
When in doubt, map a Word style to InDesign’s default Basic Paragraph Style – including Word’s default Normal style! Leave no Word style unmapped.
When you remap styles in this way you get another huge benefit: InDesign takes care to retain any local formatting the Word user applied. Meaning, if they made a few words Bold or Italic in a Word-styled paragraph, InDesign keeps them Bold or Italic after it applies the InDesign style you mapped it to. This is not the case if you use InDesign’s Find/Change Formatting after the fact to replace paragraph and character styles, which strips out all local formatting as it does its Changing thing.
Fixing cruddy Word files
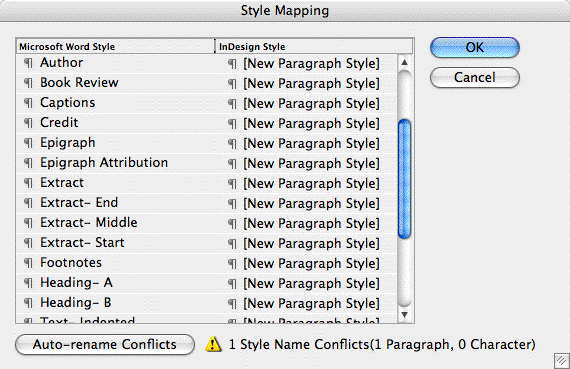
In the best of all possible worlds, as you’re choosing which styles to map to which, the Custom Style Mapping dialog box lists just the styles actually used in the Word document – three or four, maybe ten at the most, usually. But in some cases, you’re confronted with a monster list of Word styles, as in this one:

Now, I opened that Word document that caused what you’re looking at, and 90 percent of those styles aren’t used in it. (And yes, I made sure to uncheck the “User is a Masochist” checkbox in Word Import Options – aka Import Unused Styles – before opening up the Style Mapping dialog.) I’m not quite sure why some Word files come in full of unused styles and others don’t.
But if you’re confronted by such a long list of styles, don’t bother guessing which are really used or not. Just run away screaming. Or, cancel out of the Import Options dialog box for now (don’t place the file), and do a quick bit of Crud Removal prep work to the Word doc before you try again:
- Create a new InDesign document of any size … you’re not going to save this, it’s just temporary.
- In the new document, File > Place the same Word file, this time being sure to choose the Preserve Styles and Formatting radio button in the Import Options dialog box, as well as Import Styles Automatically. Yes, you do want to import all the Word styles into this layout. For now.
- Click the loaded Place cursor anywhere on your new document so it creates one text frame with some of the text in it. Don’t worry if it’s overset. Note all the disc icons infesting your Paragraph Styles and Character Styles palettes. Not to worry.
- Double-click inside the text frame so you get the Type tool cursor blinking in it, and choose File > Export. You’re going to export this entire story to a new file.
- In the Export dialog box, choose Rich Text Formatting from the Format dropdown menu, and save the .rtf file someplace handy, like your desktop. Rich Text Formatting retains virtually all of the Word formatting, including Style names, but only those actually used in the file.
- Close the temporary InDesign document but don’t bother saving changes. You can toss it out.
- Back in your original layout, Edit > Place the exported RTF document you just created. Now look at the Custom Style Mapping dialog box, and you should see a much shorter list of styles, indicating just the ones that were actually used in the original Word file.
Here’s my result from the same Word file with the horrendous list of styles, now being placed an RTF file:

InDesign’s Export to RTF feature: It’s the designer’s best friend.
This article was last modified on December 18, 2021
This article was first published on November 29, 2006


