

Several years ago, Adobe introduced Conditional Text into InDesign CS4. In case you haven’t used it before (and about 95% of InDesign users haven’t) Conditional Text lets you show and hide bits of text to output various versions from the same InDesign document. Here is a link to a great video about how to use conditions for a simple document (a teacher and student version of a study guide).
This simple document has just two conditions: one condition for the Teacher content, and a second condition for the Student content. In InDesign’s default conditional text panel, all the conditions are flat (one level), and they are sorted alphanumerically (which works fine for simple documents with just a few conditions). While Conditional Text is a great tool, it hasn’t been updated since its initial introduction.

Simple Conditional Text
But what if your document has more than just a couple of conditions? What if it has dozens of conditions? The files I work on, operator’s manuals for large equipment, often have fifty or more conditions, relating to the different optional features that might or might not need to be included in the manual. Keeping track of them all, and making sure the correct ones are visible and the others are hidden for the version of the manual I’m working on can take up a ridiculous amount of time.
Instead of boring you with equipment options, though, let’s use a more fun example, like a travel brochure. If I’m a tour operator and I want to create a single InDesign document that I could use to output specific brochures for different destinations, I might have a Conditional Text panel like this:
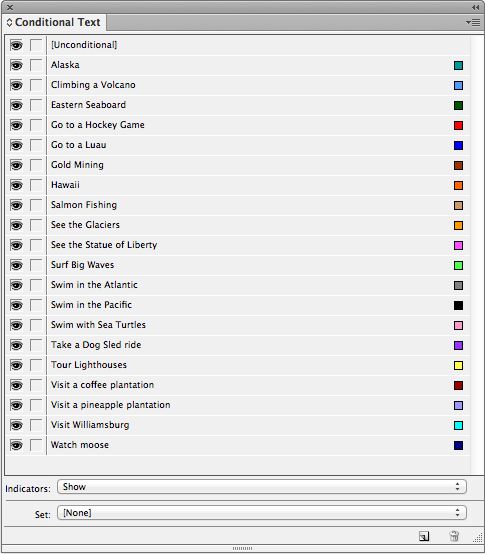
So many choices! How will I keep track of them all?
If I want to create a brochure that describes just the Hawaii trip, I’d have to hide all the conditions I created except for the Hawaii condition, of course, but also remember to keep all the conditions visible that relate to Hawaii activities, like Climbing a Volcano and Go to a Luau. The conditions on this list are related to one another in a hierarchical way that requires a parent-child relationship.
But wait, there’s more. Some “child” conditions (like Hawaii > Swim in the Pacific) also have their own children (Swim in the Pacific > Surf Big Waves or Swim in the Pacific > See Sea Turtles), because I might need to create a brochure just for surfers or just for animal lovers. So, now there are three levels of conditions.
Recently, I have been working with the great folks over at Rorohiko, and they have developed a robust solution to improve Conditional Text. Their plugin is called “Conditional Text Groups,” and offers several improvements over InDesign’s standard conditional text capabilities.
Parent-Child Relationships (Sub-Conditions)
To better manage my long list of conditions, I needed to reorganize them in a way that makes more sense. (Note that from this point on I will be using the Conditional Text Groups panel, which looks quite similar to the built-in Conditional Text Panel. But note the small Rorohiko logo in the lower left.)
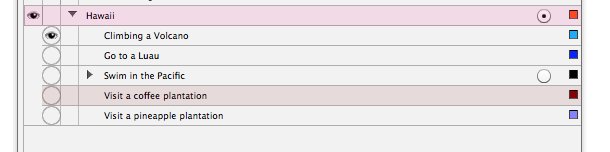
 See how much more sense this organization is! Now, let’s say that I decide to create a travel brochure for Hawaii. To hide the other parent conditions, I just click on their eyeball, as I’ll do to the Eastern Seaboard condition. Because of their parent-child relationship, all its child conditions are turned off as well.

In the Hawaii category, I can move both of the conditions related to swimming in the ocean so they’re under “Swim in the Pacific,” creating a third level of parent-child conditions. (For my work, I need to do this if I’m creating an operator’s manual that includes the condition for “optional doohickey > basic” vs. “optional doohickey > luxury.” )

Radio buttons/checkboxes
The second major improvement is the ability to have mutual exclusivity in our ability to apply certain conditions. In this example of creating a single document that will be the “master” for all the variations I’ll output, some destinations offer activities which are mutually exclusive, others offer activities which are not.
You’ll notice that once a condition becomes a parent condition (and has child conditions) the parent gets a little button on the right hand side of the panel.

That button acts as a combination radio button and checkbox selector button.
- When the circle is empty (which is the default state) the list of child conditions acts as a series of checkboxes. You can select (or have showing) ALL of the child conditions).
- But when that button is filled, the child conditions act like radio buttons (meaning that you have to choose only one). Another great indicator of how the conditions will behave is the addition of circles around the eyeballs (which only happens in radio button mode).

Highlighting of Conditions
The final major improvement is the ability to highlight conditions. Now, this is not to be confused with how the conditional text indicators (which are usually squiggly underlines) will display. This just has to do with how the conditions appear in the list. Let’s say that your conditions list is so long that it will fill up your entire screen to display them all. By adding a highlight color to certain conditions, it’s a little easier to quickly find the really important conditions in your list.
Right click on the condition. Then choose “Highlight.”
 Choose a color. Then close the color choice pop-up window.

Now your condition is highlighted and easier to spot in the list!
If you’re like me (and the rest of the 5% of InDesign users), having more control over Conditional Text makes a great feature even better. This plugin can be purchased at the Rorohiko website.
This article was last modified on December 30, 2021
This article was first published on July 25, 2013
Commenting is easier and faster when you're logged in!

Recommended for you

Using Conditional Text for Web Addresses in Multi-Channel Publishing
Using the same layout for a print and digital version of a project? There are pl...

InDesign Magazine Issue 122: Cross-Media Color
We’re happy to announce that InDesign Magazine Issue #122 (June 2019) is no...

InDesign How-to: Use Conditional Text
In this InDesign how-to video, Erica Gamet demonstrates InDesign's Conditional T...