



Many of us have drawers full of slides and photos of family, trips we’ve taken, and events we’ve attended. You may have thought about digitizing them, but wondered about the time involved or the quality of the results. Wonder no more! I’ve done some experimenting and found that the best way to digitize is to photograph them all, then scan the good ones. Let me show you how I came to that conclusion, as well as some tips I learned along the way.
Digitizing Years of Images
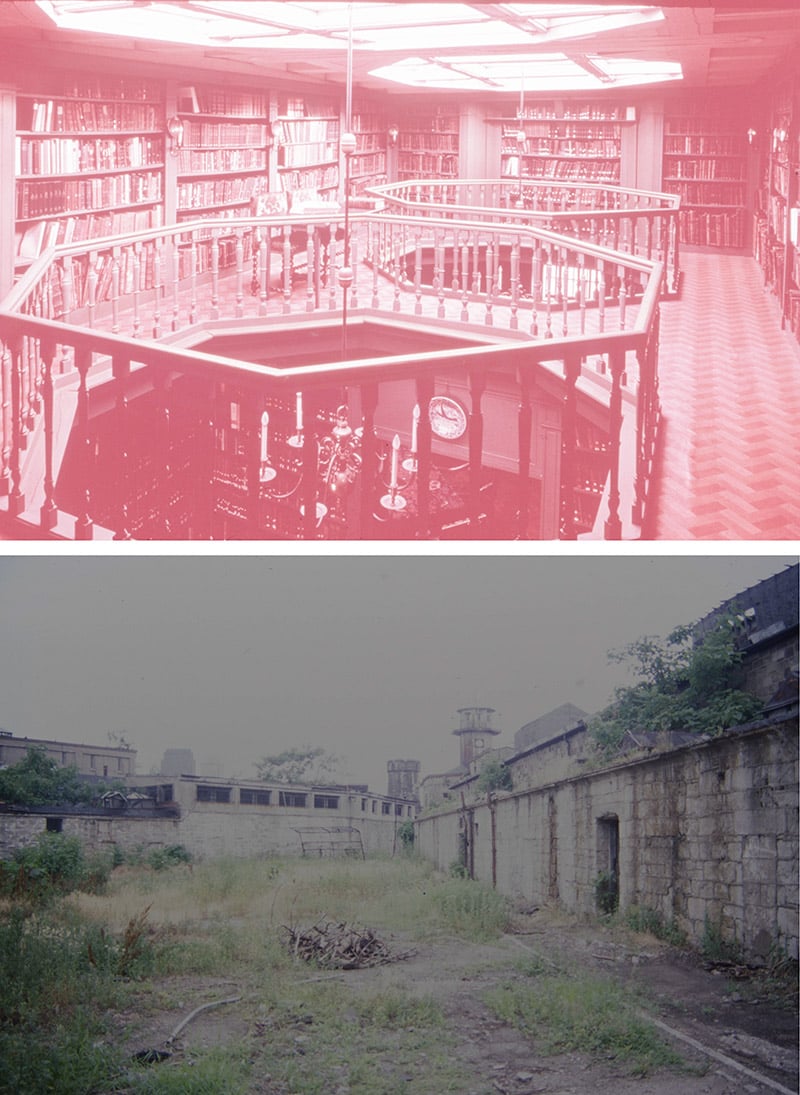
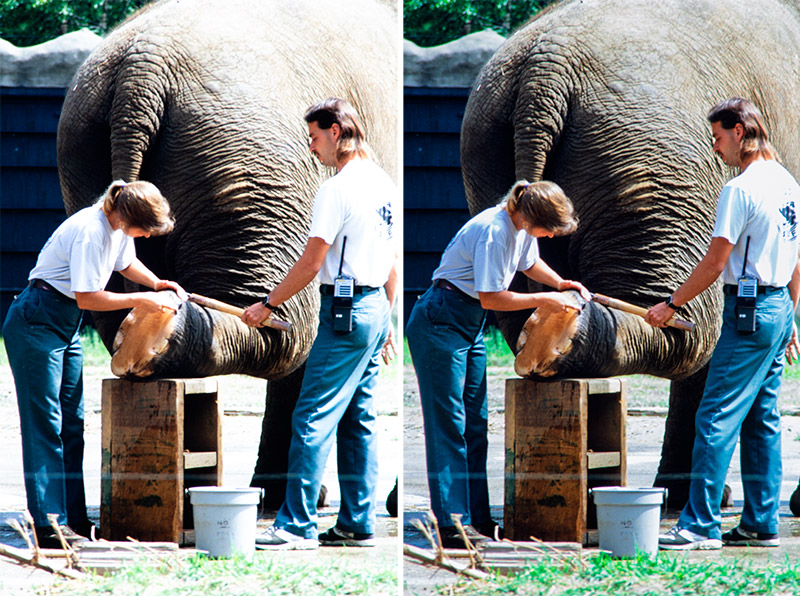
For years, I thought about digitizing my collection of nearly 10,000 slides. But I also knew, from personal experience, that doing a proper custom scan of a slide (and increasing the resolution) could take between three and five minutes. After some quick multiplication, I began to wonder if I could even finish the project in my lifetime. But, I had to try. With some of my slides, the dyes were fading (Figure 1), even though I scrupulously kept them in metal boxes in a cool part of the house.
Time was not on my side, and I started to think that for speed, the best solution would be to photograph all the slides. I never thought all my images were keepers, but I also knew that seeing them on a full screen would help me identify the ones worth keeping. Knowing that good or important slides could be scanned as needed, it would be faster to photograph every slide and then scan the selected ones later for better quality.
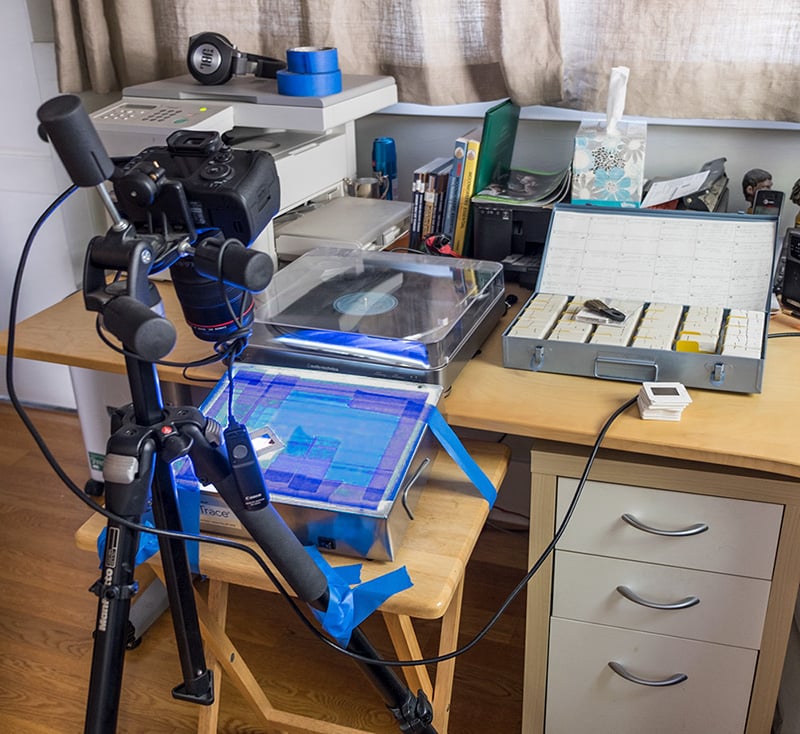
I investigated how to photograph slides, and came up with my own custom solution (Figure 2). I made a thin plastic slide support to hold each slide in the exact same position. I taped the slide support onto my lightbox, and then taped everything (including my tripod) to my worktable to prevent any movement. I tethered my camera to my Mac and imported the images directly into Adobe Lightroom Classic.
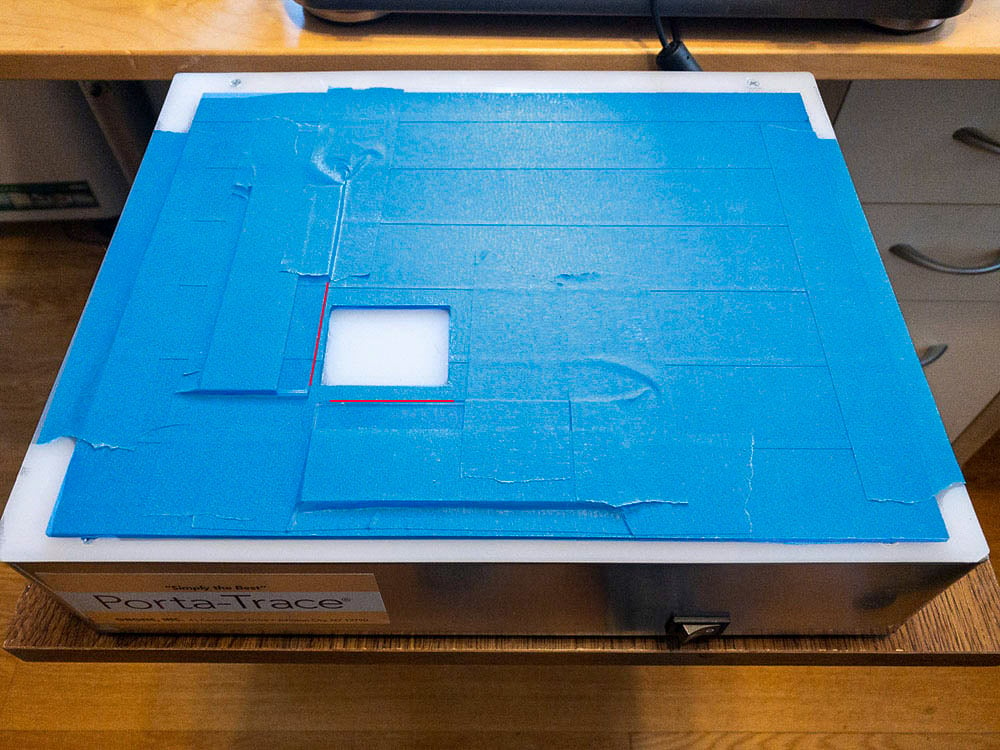
Since I placed each slide down and to the right of an L-shaped frame (Figure 3), I was able to rapidly crop and apply enhancements to all the photos in the set using Auto Sync in Lightroom Classic. Because I always took notes while shooting slides, I was able to enter the what, where, when, and slide box number of each in the Lightroom Keyword section.
Tip: Rotate all portrait-oriented images counter-clockwise to landscape. After photographing them, select them and use Auto Sync to flip them back to portrait view. This makes cropping much faster.
Tip: You can adapt my device set up and approach to photograph negatives or prints. For photographing prints, try using a ring light around your lens to ensure balanced lighting. A tripod is essential, as well as ensuring that your camera is perpendicular to the photo.
• Canon 7D Mark II
•100 mm Prime Lens
• Manfrotto tripod
• Gagne 1012-2 LED Light Box
• Epson V800 Photo Scanner
• Adobe Lightroom
• Classic SilverFast Scanner Software (including SilverFast Color Calibration Cards for photos, slides, and negatives, as well as SilverFast Resolution Targets)
I shot in raw, because it doesn’t bake in any color casts, which makes color adjustments easier.
Tip: If you use raw, you can use the Adaptive Color Profile found in newer versions of Adobe Camera Raw and Lightroom Classic. This can potentially help enhance a photographed slide (Figure 4).
Buying Scanners and Software
If you choose to buy a new scanner, be prepared to pay for quality. For scanning documents, a $100 scanner with a CCD (charged-coupled device) will suffice. For photographs, on the other hand, you really need a scanner with a CMOS (complementary metal oxide semiconductor) sensor. Some of these scanners may call this a CIS (CMOS image sensor)—different name, same function. These scanners will cost quite a bit more, but the results are quite a bit better.
For the absolute best results, consider purchasing SilverFast Scanner software, as well. If you already own a scanner, try using the software that came with it first. If you’re not satisfied with the results, you can check if your scanner is compatible with SilverFast here.
Avoid Image Capture
I strongly recommend that you do not use Apple’s Image Capture. The quality of its scans is vastly inferior to that of any software you can get with your scanner. To test this, take any photograph and scan it with the software that came with your scanner. Then, use Image Capture. Just use what you get, make no adjustments on each test, and compare. Look at the shadow and highlights. Image Capture simply doesn’t stand up.
Adjusting Photos and Scans
After each round of photographing and scanning, I made enhancements and adjustments to the images. As I worked, however, I encountered a few differences and stumbling blocks:
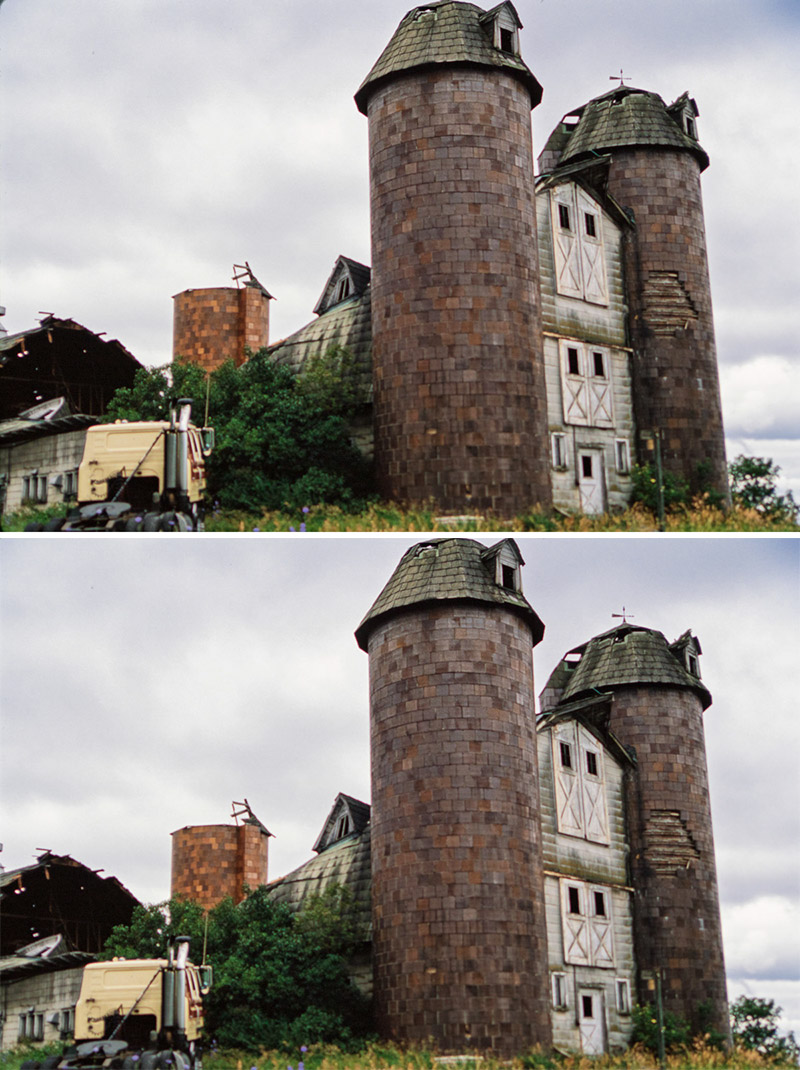
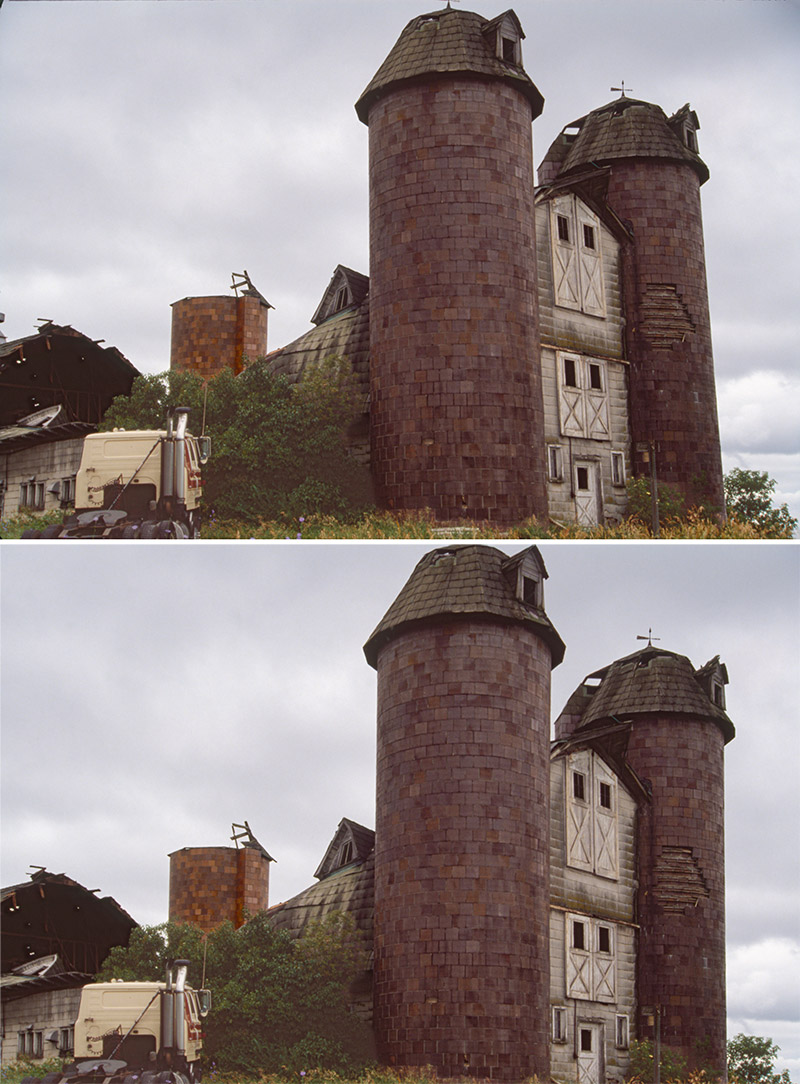
Transforming: The Transform function in Lightroom Classic produced almost no effect on photographed slides. The entire image would rotate clockwise about 3°, and that was it; there was no alignment with vertical or horizontal lines (Figure 5). When I scanned the same slide, Transform worked as expected (Figure 6).
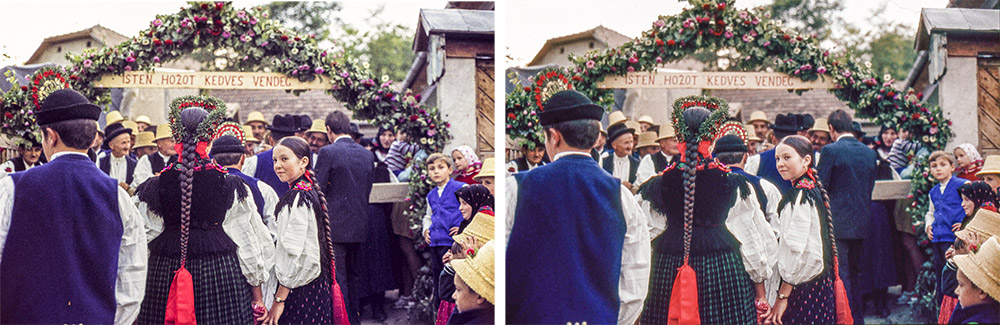
Color Calibration: Some colors were off (Figure 7), because the Calibrite Color Checker Passport for my camera adjusts for reflected light only. To verify colors, you would need a transparent, lightbox-specific Passport, which doesn’t exist.
Grain Reduction: Although the grain reduction feature built into my scanning software did a reasonable job (Figure 8), the same feature in Photoshop and Lightroom Classic did not. You could try Topaz software, which can do an excellent job on film grain sometimes.
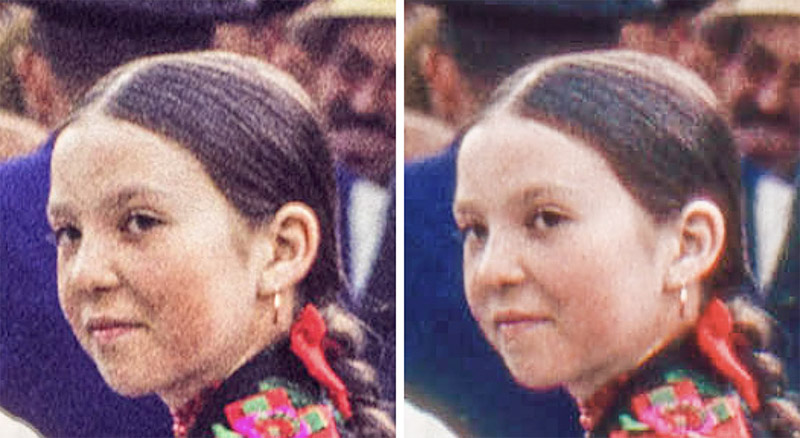
Don’t rely on post-production fixes
No matter what image-editing software you choose, don’t rely on it to fix everything for you. Relying on post-production software is not the way to develop as a photographer nor is it a good approach to scanning. If you do the bulk of that enhancement in the scanner before you get it to Photoshop or Lightroom, you’ll be way ahead of the game.
Don’t turn one problem into another
When you fix one problem in Photoshop, you may turn it into a completely different one. Suppose you try to use Levels to fix an image with a significantly low dynamic range. Figures 9–14 demonstrate the results of using the Levels panel, first in Photoshop and then in SilverFast. SilverFast performs well; Photoshop combs the histogram, meaning the full range of shades ends up as nothing more than a collection of lines.
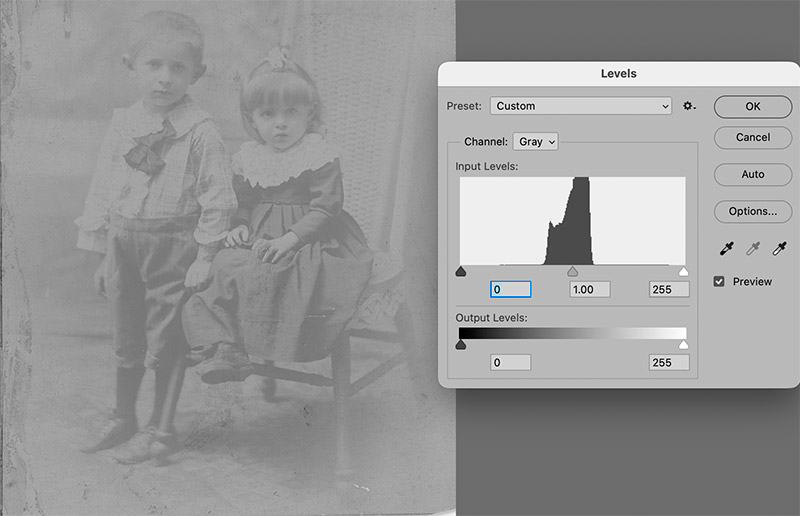
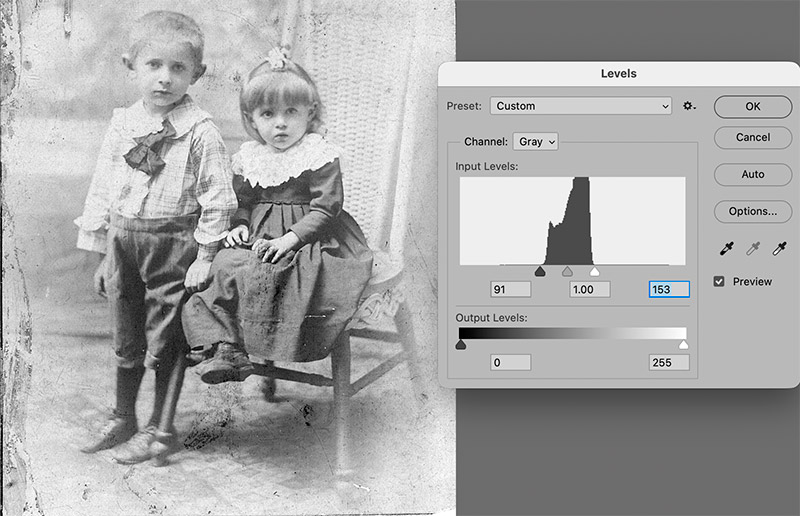
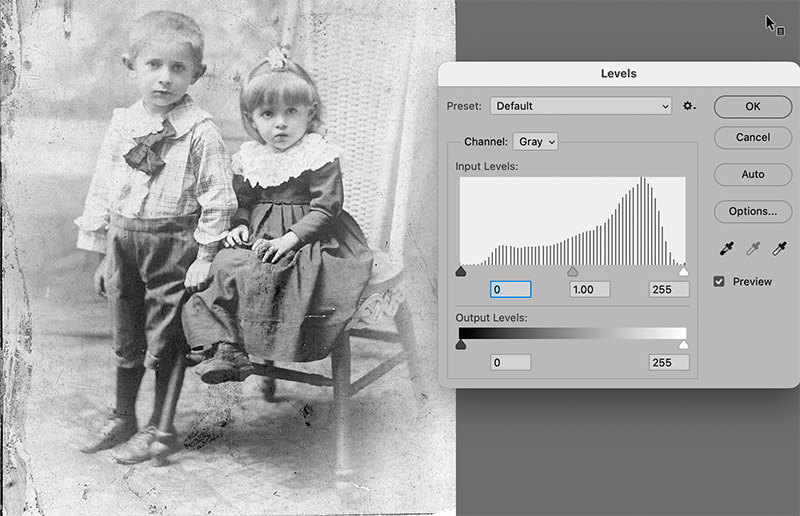
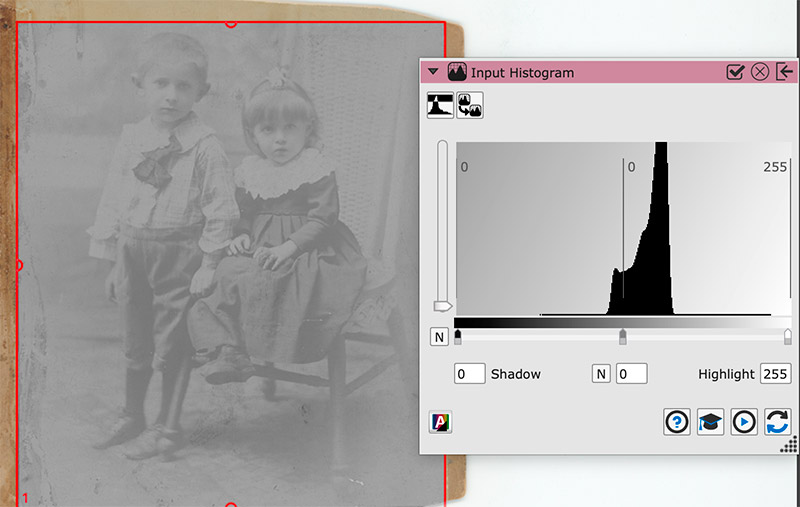
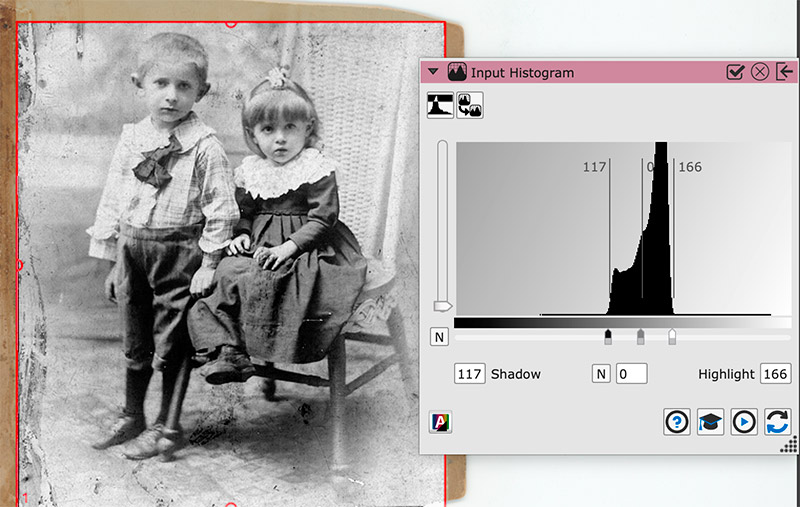
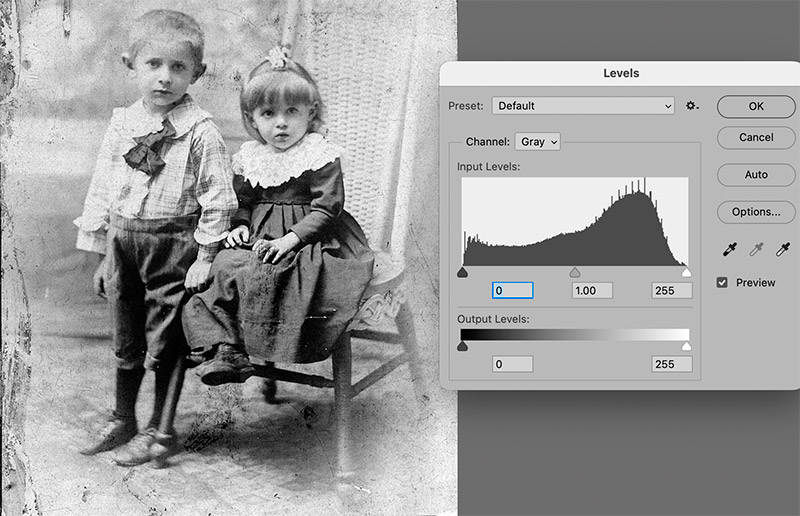
If I had photographed the original image, it would not have changed the result. If you’re is trying to increase the dynamic range by stretching the histogram beyond a reasonable range, it shifts the problem from low dynamic range to posterization. If you are using this technique for small adjustments or with 16-bit images, there will be no problem. The new problems come when you significantly stretch the histogram. If you could fix that dynamic range in the camera when taking the photograph, the result would be no different from what you get when you do it in the scanner. Because you cannot make this adjustment with a camera, you need a scanner to fix the issue before you take it into Photoshop.
Scanning Old Images: Color vs. Black and White
Old, printed images often fade to an amber color, even those originally printed in black and white. Whether you scan them as they were originally intended or in color is pretty much is up to you. Be aware, however, that a color scan creates a larger file. For example, Figures 11–14 are around 1.2 MB each, but would be three times larger (3.6 MB) if scanned in color. Black-and-white images have only one variable (shades of black), while color images have three variables (red, green, and blue). Thus, three times the data becomes three times the storage size.
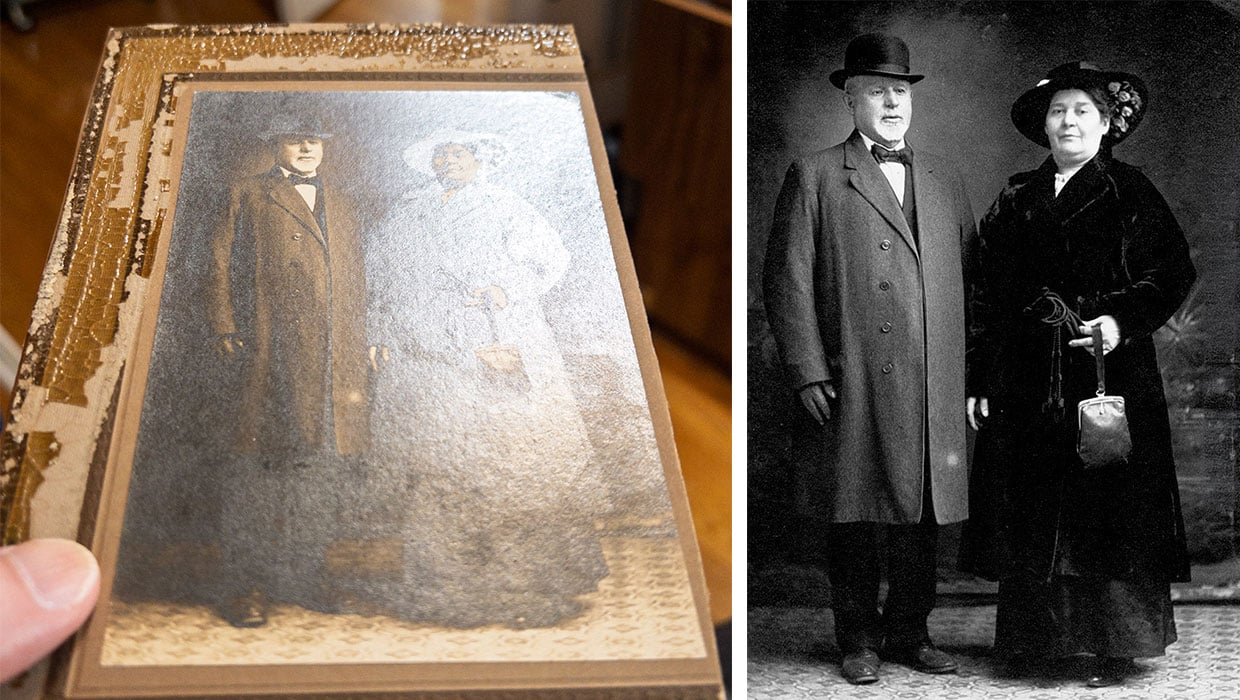
On the other hand, silver emulsion images should be scanned in color, especially if the silver in the print has started to reduce out, leaving a shiny appearance. Photographing these images may create issues due to inconsistent reflection across the image’s surface. Scanning can provide a uniform light environment across the entire surface and ensure that image recovery is fast and easy. To check an old print, hold the image at an angle and sight down the surface. if you see areas with light or white reflections (Figure 15), that’s probably reduced silver, indicating the image should be scanned in full color.
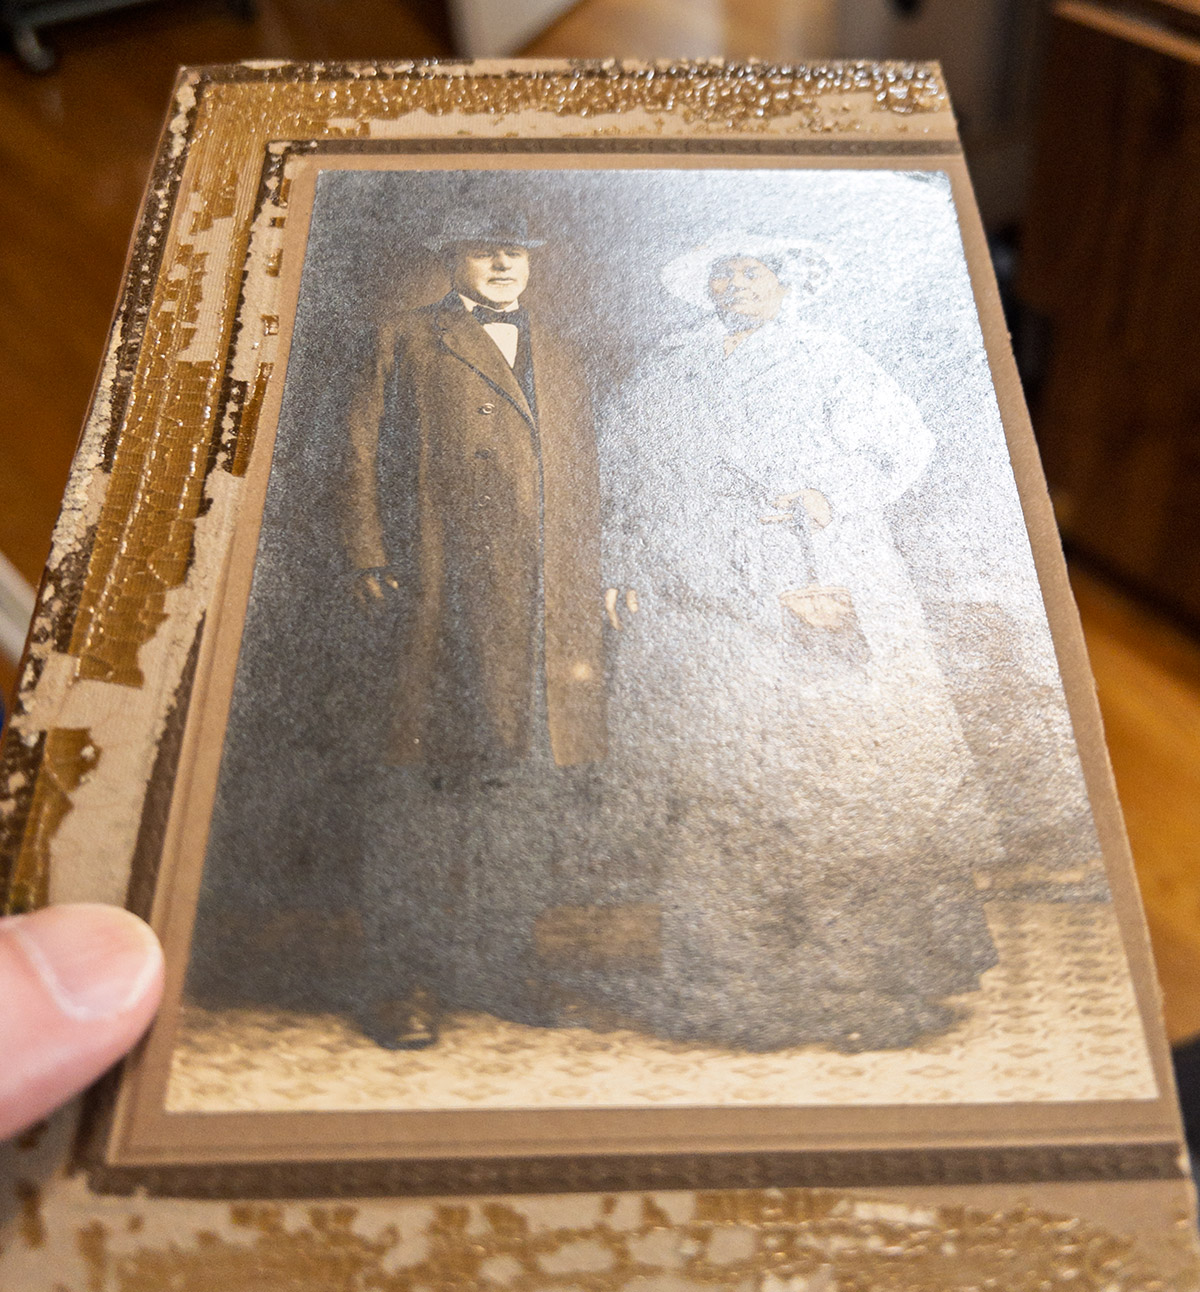
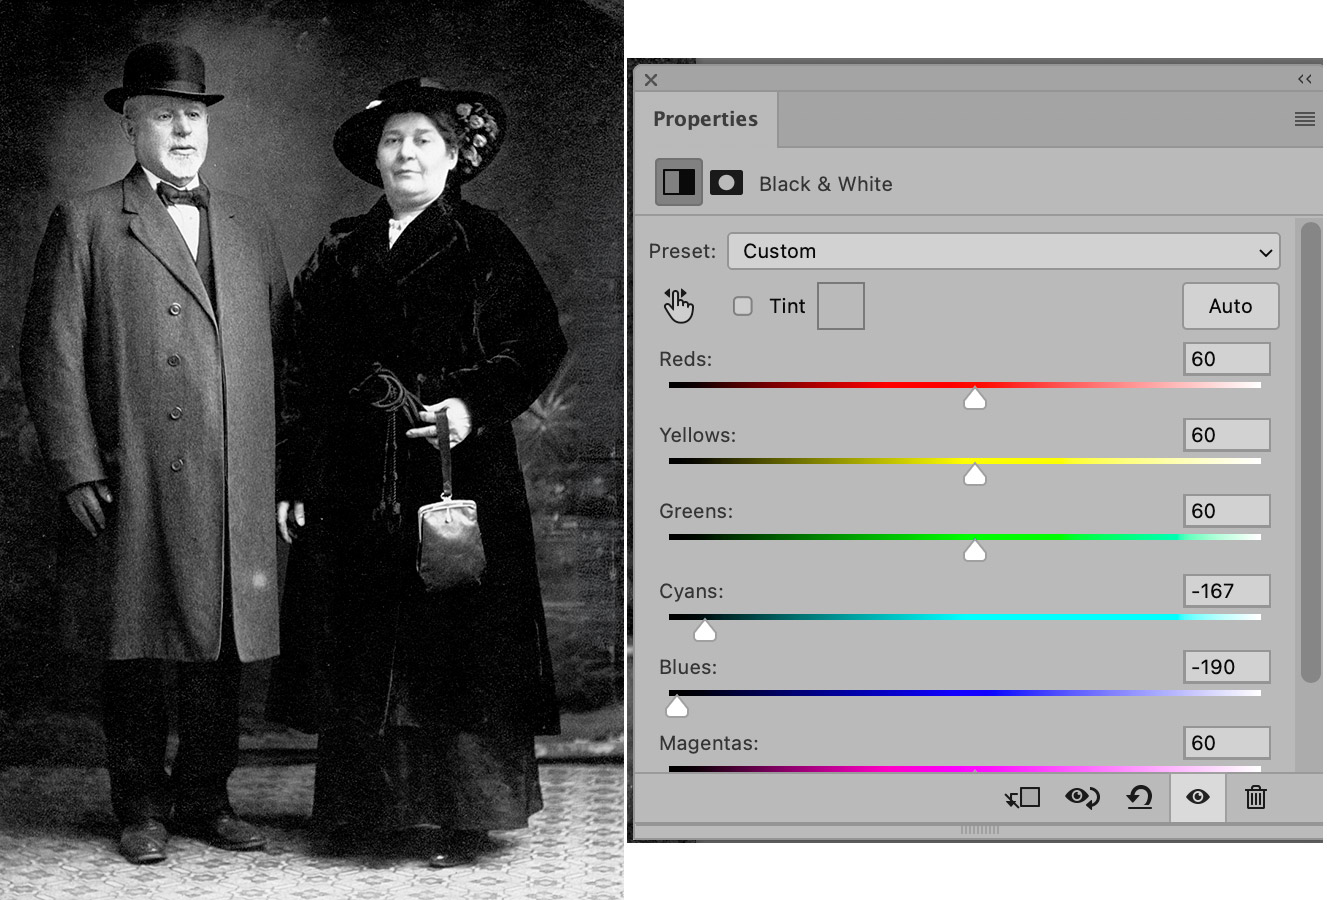
The light reflected off the reduced silver is mostly confined to the blue and cyan color range. If you reduce or limit that range of light, you remove the reflected light. Figure 16 was scanned in color, histogram slider adjustments were made in the scanning software, and then the image was saved.
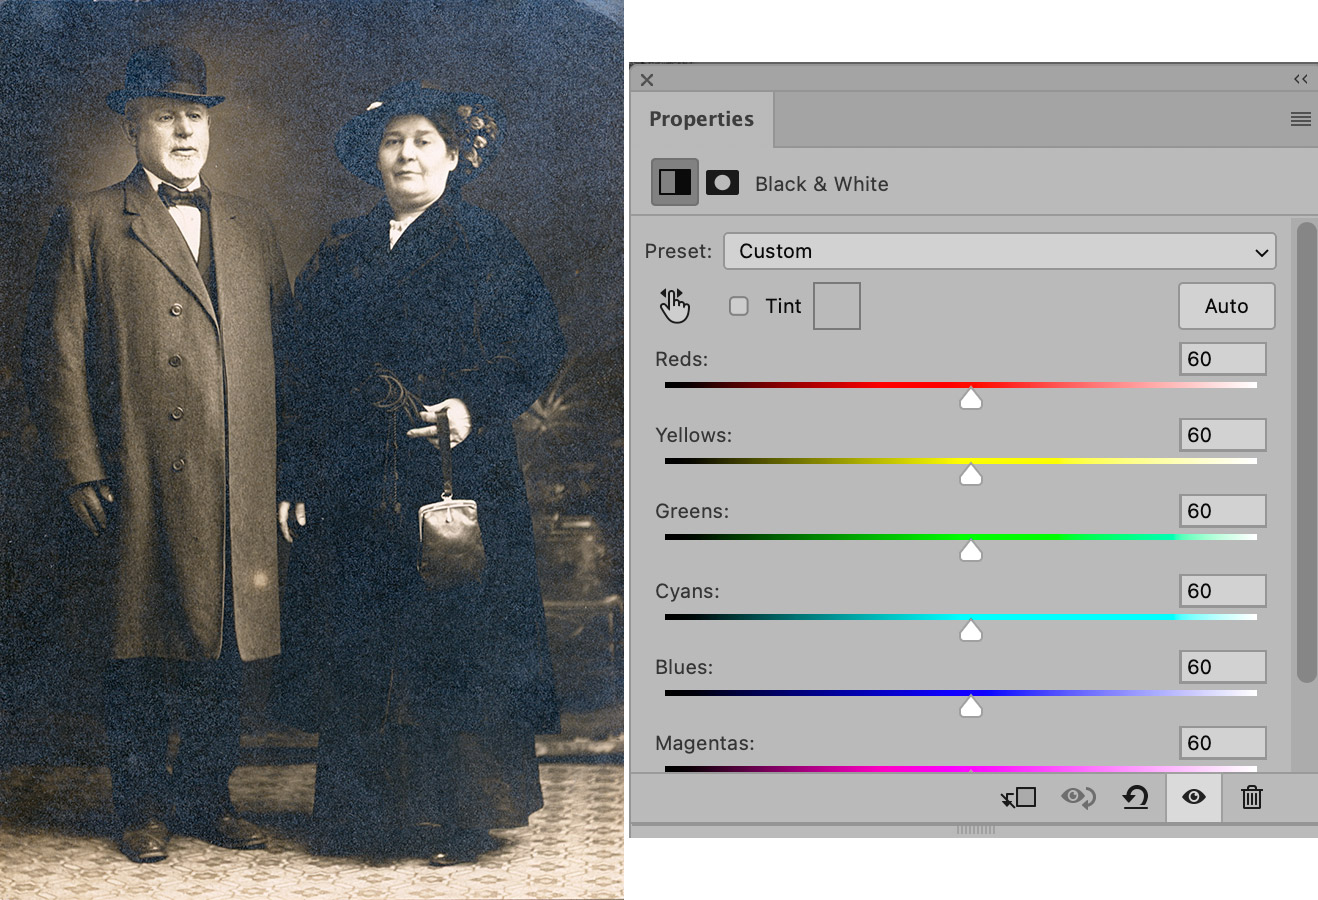
Consider a photo of my great-grandparents, Isaac and Ester. Ester’s dark coat has more silver pigment than other parts of the image, and this greater amount has gradually reduced over time, creating a reflective surface across the entire image, though it is more pronounced in very dark areas with a greater amount of pigment (Figure 16). The initial scan is barely acceptable, but using the Black & White Adjustment panel in Photoshop, I reduced the Cyan and Blue (Figure 17), and removed the reflection from the silver, leaving a clear image in the photograph.
Scanning the Film vs. the Print
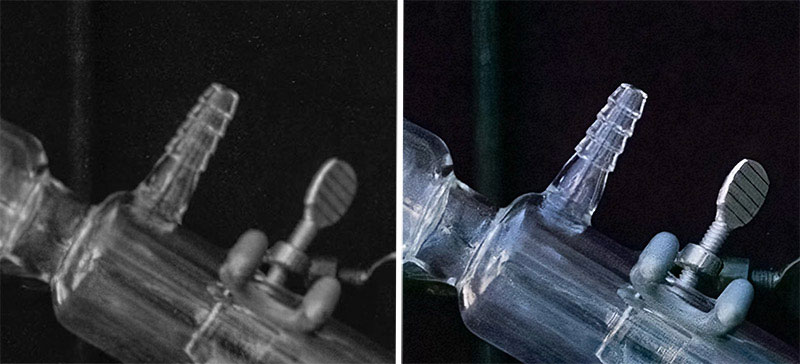
When you have the option to scan the original film, do so. The quality of a print can vary quite a degree depending on its original quality, its current condition, and the condition of the film it was printed from (Figure 18).
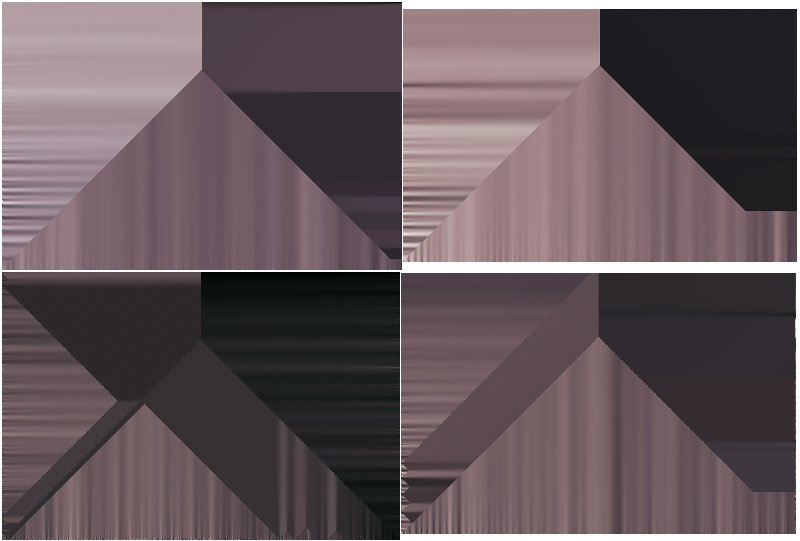
Do not, however, scan silver negatives. The light from within the scanner cannot pass through the pigment, and you will get some very interesting geometric designs. Like snowflakes, each one will be different (Figure 19).
To Scan, or Not to Scan?
Simply put, the need for scanners hasn’t disappeared just because a camera can capture images faster. Yes, speed is a fantastic benefit and should be taken advantage of. When an image requires some adjustments, however, Photoshop, Lightroom, or Adobe Camera Raw may cause stumbling blocks that we currently cannot surmount. Thus, scanners still maintain a significant role if you also want image quality.
This article was last modified on July 20, 2026
This article was first published on July 20, 2026
Commenting is easier and faster when you're logged in!

Recommended for you

Make a Time-Lapse Video from Multiple Photos in Photoshop
In this Three Minutes Max video, Colin Smith gives us a quick tip to create a ti...

Faster and Easier: How Face Recognition Tools Are Evolving
People masking in Camera Raw and Lightroom, improved portrait modes, and advance...

How to Use Lightroom Mobile for Temporary Travel
An attendee of one of my workshops wrote recently with a query. She was about to...