
Premiere: It’s Not Just For Video
Designers using InDesign and Photoshop can look at Premiere as a surprising resource for new effects and more creative options.
This article appears in Issue 56 of CreativePro Magazine.
You can use Premiere for more than video, motion graphics, and audio projects. You can easily add some fresh effects to still images and some efficiencies to your print design workflow.
Think about it. Video is a sequence of images and, while Premiere is a tool of choice for editing content in motion, you can also use it to quickly add effects or make creative use of transitions. You’ll export individual frames to place in your print or interactive layout.
In this article, I’ll show you how you can use Premiere to create:
- an image with light leak effects
- an image that includes a glitch effect
- a photo strip effect for a series of images
- a filmstrip effect for a series of images
- a series of still images you can then import into InDesign to create a flipbook
Tip: To see how to create a project in Premiere, watch Getting Started in Adobe Premiere, my exclusive video for CreativePro members.
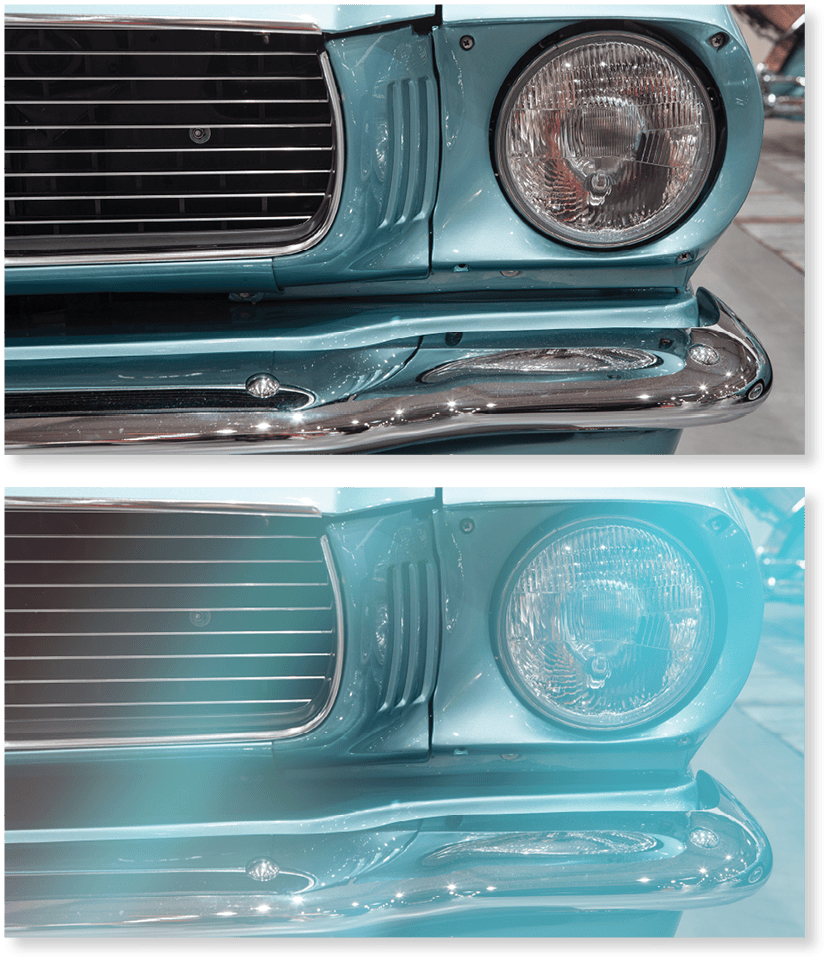
Design with Light Leak Effects
A light leak effect is good for evoking a warm, nostalgic feel. The effect simulates what would happen when a camera didn’t seal out all the light, partially exposing edges of the film.
You could simulate this effect in Photoshop in multiple steps, or you can use Premiere and do it in one step. Simply create a Premiere project with a still image, then drag Light Leaks from the Premiere Effects panel (Video Effects > Light & Glows > Light Leaks) (Figure 1).
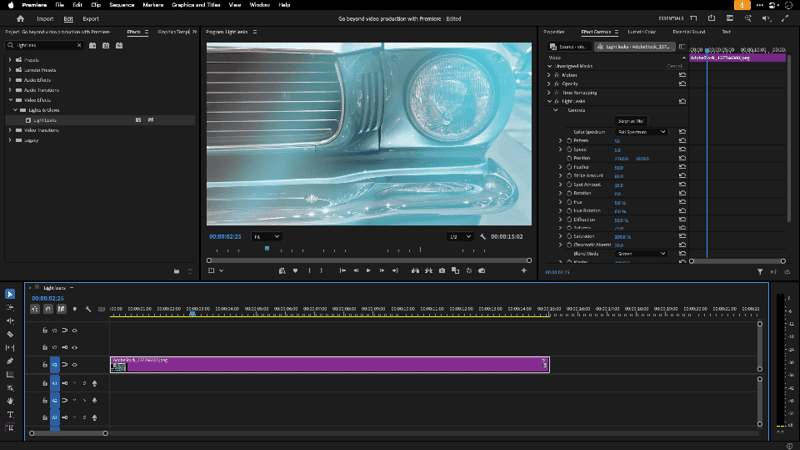
Once you apply the effect to the content, you can go to the Program Monitor and move the cursor along (scrub) the timeline to view the animated effect.
The default duration of a still image in Premiere is five seconds. Because the effect is animated, you get dozens of variations from which to choose. (How many depends on the frame rate of your project, or how many still images the viewer sees in one second. The frame rate is measured in frames per second, or FPS.)
You can use the timeline to view variations in a process that’s sort of like picking the best shot with Motion Photos on Android or Live Photos on iOS and macOS. If you want more variations, extend the duration of your clip, or modify the effect itself in the Effect Controls panel (Window > Effect Controls) (Figure 2).
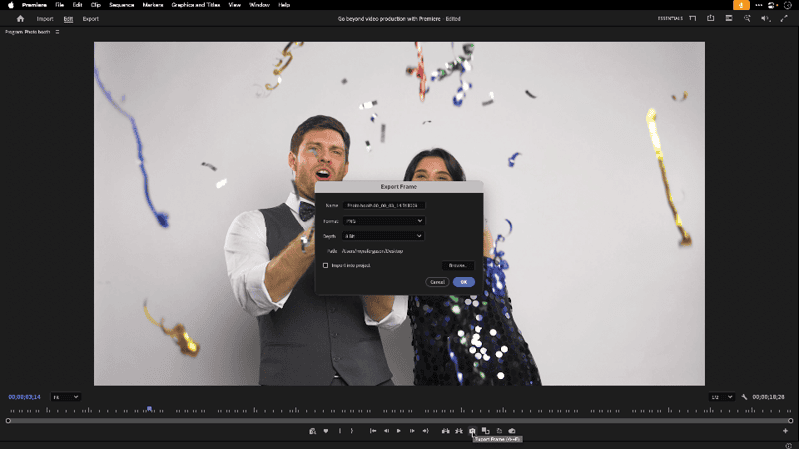
When you’ve settled on a frame with the look you want, export it by clicking Export Frame (the camera icon) in the Program Monitor.
Tip: For more information about how to export a still image from Premiere, see my video, Premiere: Easily Export a Still Image from a Video on the CreativePro YouTube channel.
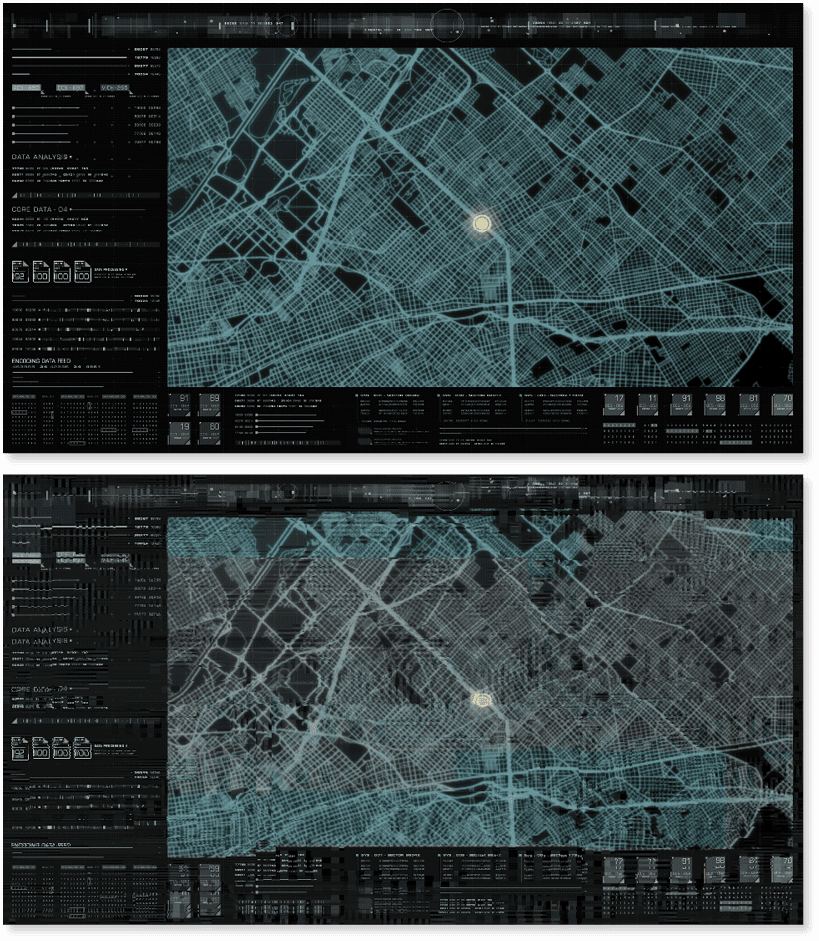
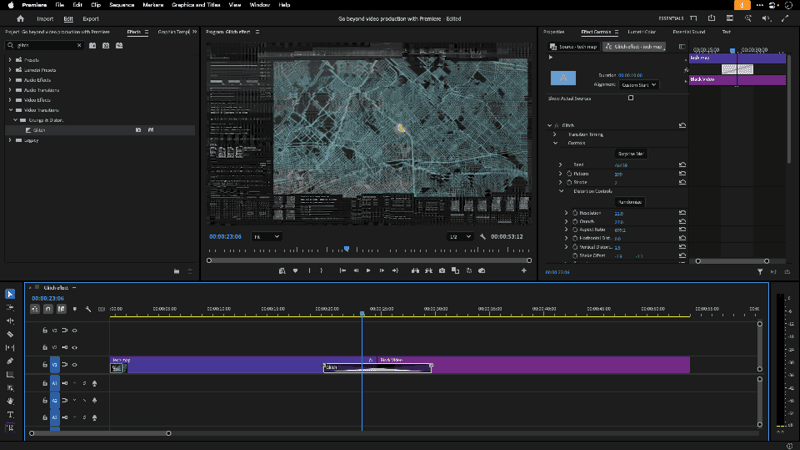
Creating a Glitch Effect Image
A glitch effect simulates the defects that used to appear on analog television, videocassette playback, and other retro technology. These defects appear as shifted, compressed, and distorted rows and blocks with chromatic aberration (red, green, or blue pixels creating a haze around objects) and can represent ideas of rebellion or digital disruption (Figure 3).
You could make a glitch effect from scratch in Photoshop using a complex sequence of steps, or you could make the effect in Premiere by simply dragging.
In Premiere, Glitch is a video transition (Window > Effects, then in the Effects panel, apply Video Transitions > Grunge & Distort > Glitch). You can add the transition to the beginning or the end of the clip without another clip if you want to transition to or from transparency—although it will appear black in the timeline. If you want to keep the black as part of the transition while exporting to the PNG format which supports transparency, you can add Black Video after the clip.
- Click the document icon at the bottom of the panel to the left of the trash can and select Black Video; a five-second clip, so titled, will appear in your project.
- Drag the Black Video to the timeline after your image.
- Drag the Glitch transition between the two clips.
You can increase the duration of the transition by dragging its left or right edge, double-clicking it, or selecting it and then changing the duration in the Effect Controls panel.
The longer its duration, the more variations you will have to choose from. You can also modify the parameters of the effect in the Effect Controls panel.
Once you find a frame with the effect you like, export it (Figure 4).
Assemble a Photo Strip Graphic
You can use Premiere to export specific frames to create a series of images in a classic photo booth style (Figure 5).

Scrub the timeline to select a frame, then export the image (Figure 6).
Repeat three more times (Figure 7) until you have four images.
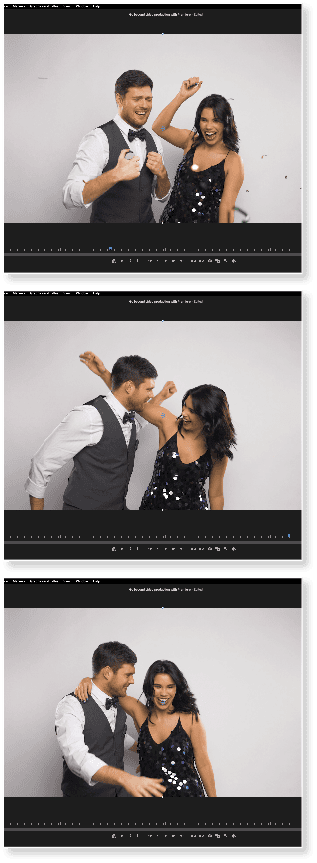
Select three more images from the video.
Then, in InDesign, place the images in four frames arranged vertically and evenly spaced over a rectangle. Apply a border to each frame (Figure 8).
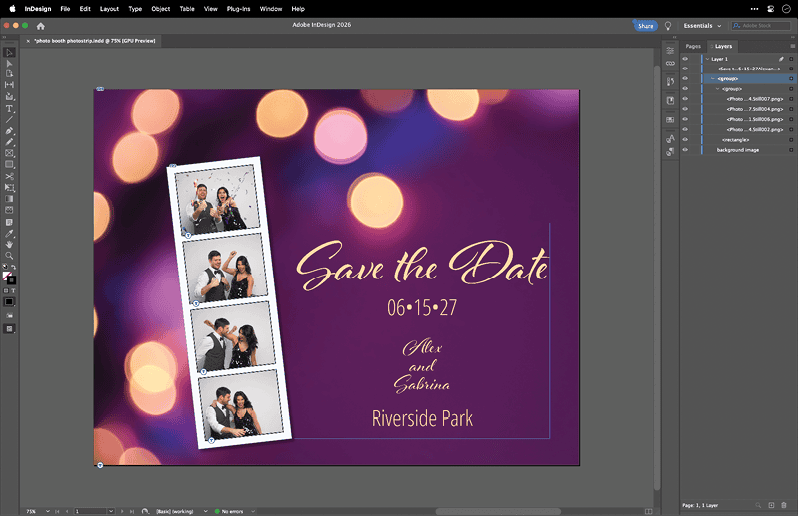
Tip: Alternatively, you can find free or affordable Photoshop templates that you can use to create your photo strip, from Adobe Stock or stock photo sites.
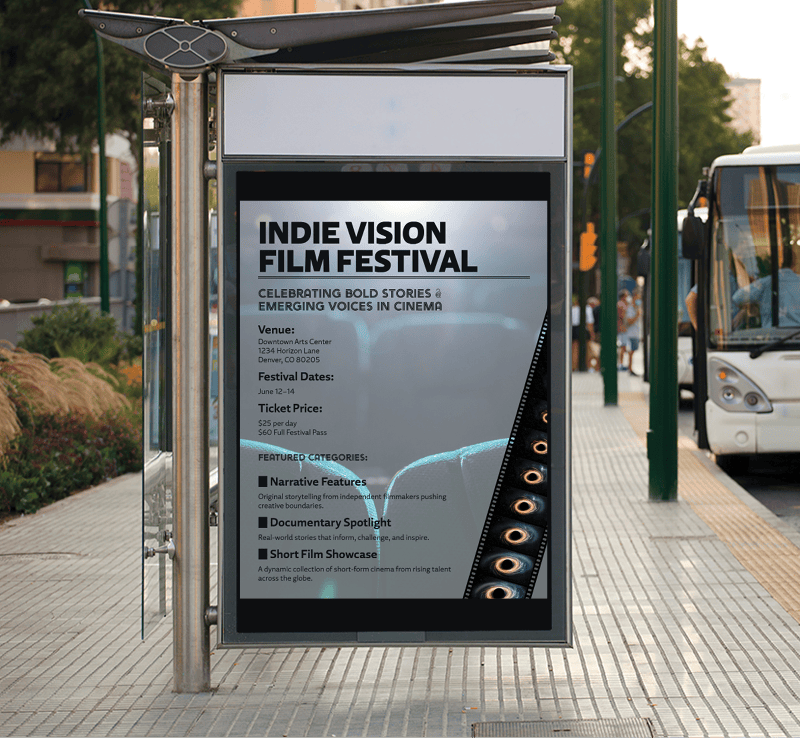
Make a Motion Picture Film Graphic
You can use Premiere to export frames and use them to create an effect that looks like frames of an analog motion picture film (Figure 9).
Instead of scrubbing the timeline to search for poses to export separately—as in the photo strip technique—this time, you’ll export a sequence of frames at a consistent interval.
Depending on the length or the content of the video clip, you may need to set in and out points to indicate where the exported frames should start and stop.
You can set those two extreme points with the Mark In and Mark Out tools, respectively, via the Source Monitor (Window > Source Monitor), which opens automatically when you double-click the clip from the Project panel or from the timeline.
You can also shorten a clip directly in the timeline by selecting it and dragging in either the left or right edges.
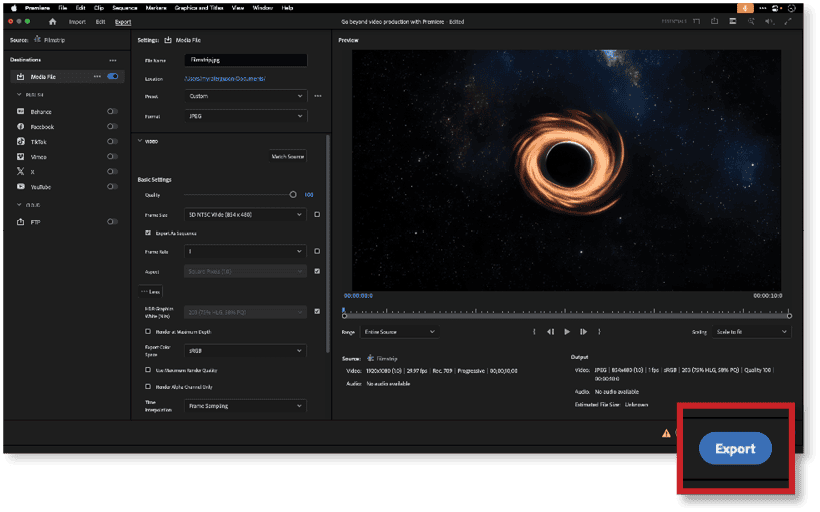
When the clip is ready to export, click Export at the top of the workspace window. In the Settings section, set the filename and intended location for the frames. Choose JPEG or PNG for your output file format.
In the Preset menu, you can select from presets of varying dimensions and compression quality, or you can adjust these settings individually. In the Video section, you can change the frame dimensions, if needed. First, deselect the checkbox. Then select from a list of standard video dimensions, or enter a custom size.
Make sure that the Export As Sequence option remains checked.
The Frame Rate determines how many images will be exported for your sequence. To show more change between frames over time, you’ll want to use a lower frame rate.
Divide the duration of your clip in seconds by the number of desired frames to determine what the FPS should be (Figure 10).
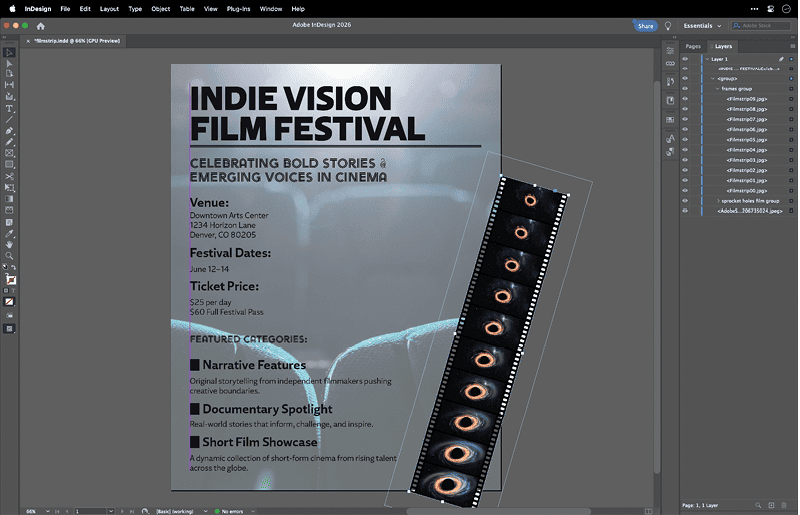
Open InDesign and place the images in frames arranged vertically and evenly distributed over a black rectangle with sprocket hole shapes on either side (Figure 11).
Tip: A plug-in, Filmstrip Effects for Adobe Photoshop ($16.50), is available on Adobe Exchange.
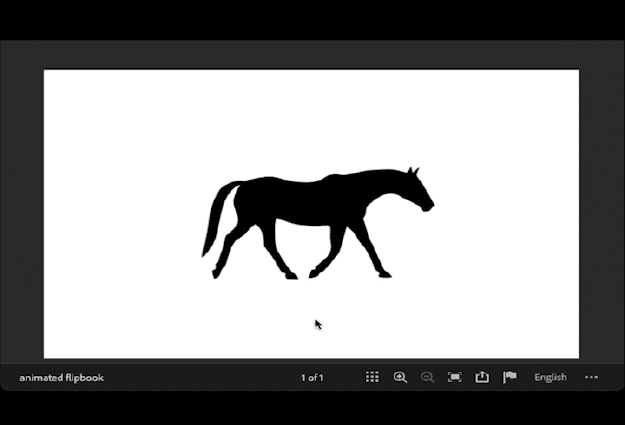
Produce a Flipbook
In animation, a flipbook is a sequence of similar images that slightly change to create the impression of movement (Figure 12).

You can make a flipbook by exporting frames from Premiere and then using them in InDesign as either a sequence of images that exists on a single page as an interactive element or as a single image in the same location over several pages that when printed can be flipped through manually.
Because video is comprised of a series of frames, you can export these frames from Premiere to create a JPEG or PNG sequence. Set the frame rate to export the desired number of frames.
Publish your flipbook online
To create a flipbook for Publish Online, create a document in InDesign. Place all the exported frames from the sequence, resize them (if needed), and align them precisely while making sure to keep their original order. (The exported frames include the number in your sequence as part of the image name.)
Select all the images, and in the Object States panel (Window > Interactive > Object States), click the + button at the bottom of the panel to convert the selection into a multi-state object (MSO).
Draw a rectangle with Fill and Stroke set to [None] to cover the MSO and, while it’s selected, open the Buttons And Forms panel (Window > Interactive > Buttons And Forms). Set its Type to Button, its Event to On Release or Tap, and, under Actions, click the + button to add a Go To Next State action.
Use Publish Online (File > Publish Online) to create a link with your flipbook. Each time a reader clicks the button, the animation will advance by one frame (Figure 13).
Print a flipbook with one frame on each page
Alternatively, you can print a piece with multiple pages. When all your frames are the same dimension and you put each on a page in the same location, the user will see the animation as they thumb quickly through the pages.
Consider building your document automatically with Data Merge. If you’re not familiar with the technique, watch David Blatner’s video How to Use Data Merge to Place Multiple Images.
More than Just for Video
If Premiere is not a part of your toolset, do consider giving it a try to accomplish some design tasks more efficiently, to explore new, creative approaches for static content, and to expand your offerings with interactive content.
You can also use Premiere to expand the scope of your stock art searches (now that you know how to make still images from video content). Eventually, you could use it to edit audio to make podcasts or perform voiceovers.
And, eventually, you can even make videos!
Commenting is easier and faster when you're logged in!

Recommended for you

InDesign Magazine Issue 74: Flipbooks
We’re happy to announce that InDesign Magazine Issue 74 (June, 2015) is now avai...
How to Fix Missing Content Problems in Premiere
Learn what the media warnings in Premiere mean and how to address them

InDesign Eye Candy, part 4: Pattern Swatches
Unlike Photoshop and Illustrator, InDesign doesn’t have pattern swatches t...