
Marginal Notes in InDesign
Learn two easy ways to convert footnotes and endnotes to marginal notes in InDesign.


This article appears in Issue 53 of CreativePro Magazine.
InDesign doesn’t provide functionality for marginal notes, but it’s simple enough to convert a document’s footnotes or endnotes. One method uses a script to convert notes to anchored text frames. The other flows an endnote story in marginal text frames and is a bit more involved. Which method best suits your text? Read on, and I’ll show you how each works and highlight the pros and cons of both approaches.
Notes as Anchored Frames
The first method, placing notes in anchored frames in the margins, relies on the sidenotes.jsx script. You can find the script and a detailed description of it on CreativePro’s website. Here, I’ll concentrate on the main points you need to know to compare it to the single-story method. The download also contains several scripts to manage the marginal notes after conversion, but the main script, the converter, may be the only one you need.
The script’s starting point is footnotes, so if your InDesign document uses endnotes, first choose Type > Convert Footnotes And Endnotes to convert them. Next, make sure that the notes use a dedicated paragraph style and that the note references are in a dedicated character style. You apply these styles in the Footnote Options dialog box (Type > Document Footnote Options).
Convert the footnotes
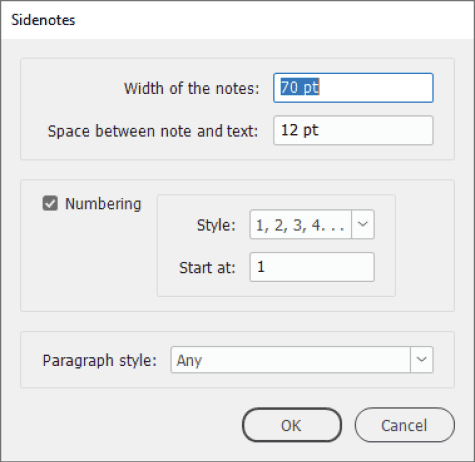
To convert the notes, run the sidenotes.jsx script. In the Sidenotes dialog box that opens, you can set the width of the frames, their distance from the text, and whether the notes should be numbered (Figure 1). You can also target notes in a specific paragraph style to selectively convert footnotes.
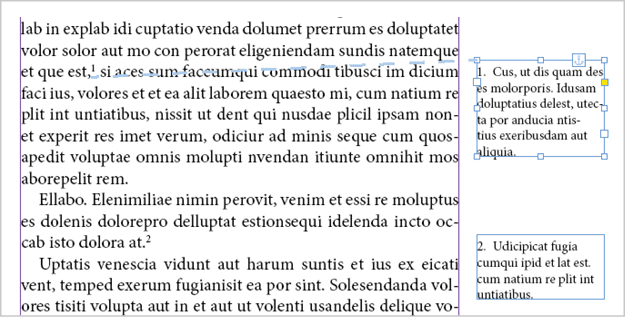
The script places each note as an anchored text frame, with its anchor at the note reference (Figure 2). Numbering is handled by InDesign’s paragraph numbering. The references are cross-references, so if you add or remove notes all numbers update automatically.
Script-applied styles
The script modifies the paragraph style used for the notes by setting their alignment to left and adding paragraph numbering. It also adds an object style for the anchored text frames and creates a cross-reference format for the note references. If you want to change any aspect of the appearance of the note frames, modify the sidenote object style. For more details on the styles, see the script’s web page.
Stack and add notes
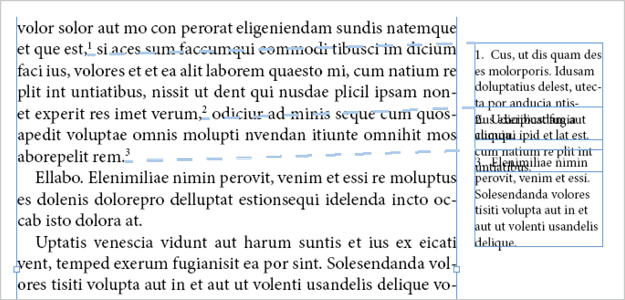
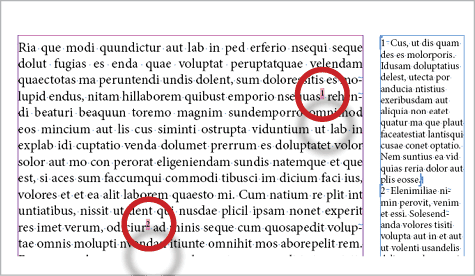
Notes are placed at their text anchors by default; that is, the top of the note’s frame aligns vertically with the line that contains the note reference. Placing notes at their references has one drawback: If there are two or more notes on a single line or in consecutive lines, those notes can overlap (Figure 3).
You could fix this by dragging one or more notes up or down, but it’s easier and looks better to stack the notes to form a single block on the page.
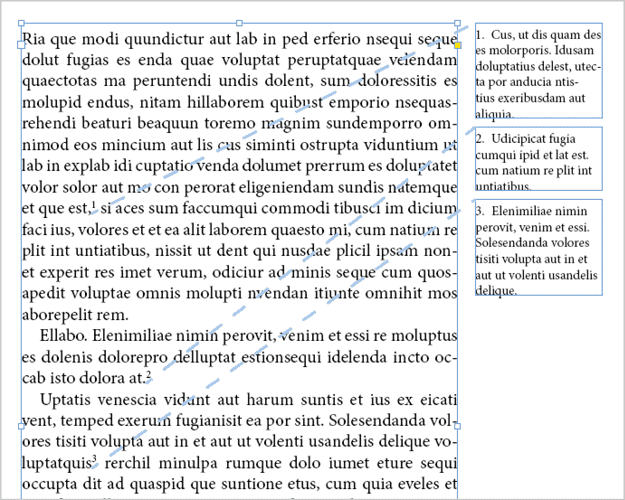
One of the download’s note-management scripts, sidenotes_stack.jsx, lets you easily stack notes at the top, center, or bottom of a page. You can target the active page or the whole document (Figure 4).
If you need to add more notes after the initial conversion or stacking, you can use another one of the companion scripts: sidenote_add.jsx. See the converter’s web page for details.
Pros and cons
The advantage of the anchored-frames method is that the marginal notes move with their references when the text reflows because they are anchored at their references. On the down side, however, when several notes are close together, the anchored frames can overlap. You can deal with this by stacking the notes, or you could try placing all the notes in a single story.
Notes as a Single Story
The alternative to placing each note in a separate text frame is to place all the notes as a single story in threaded text frames in the margins. The procedure isn’t very complicated but isn’t entirely self-evident either, so I’ll walk you through it step by step.
Prepare the document
Unlike the anchored-frames method, the single-story method needs endnotes to work. If your document uses footnotes, convert them to endnotes (Type > Convert Footnotes And Endnotes) to begin. You must also disable Smart Text Reflow or very strange things will happen. Choose Edit > Preferences > Type, then turn off the Smart Text Reflow option.
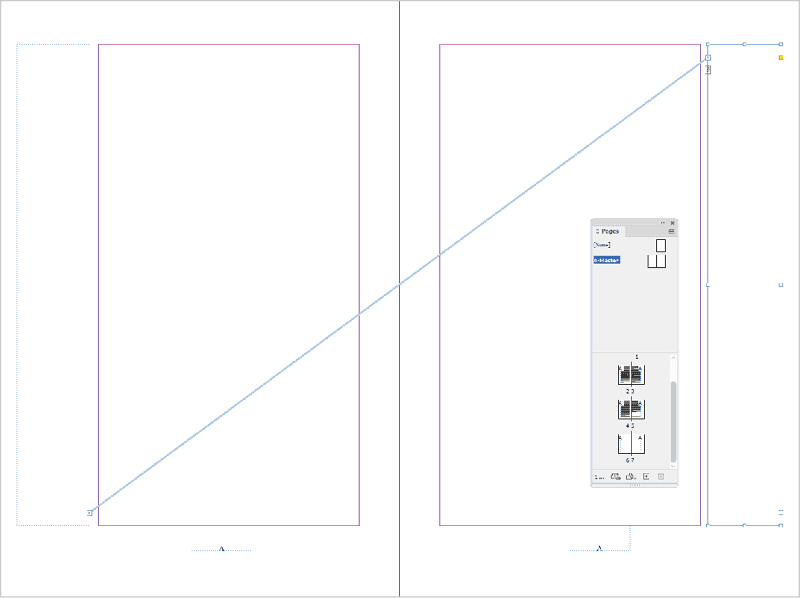
Place frames on the parent page
On the parent pages used for the main text, place text frames for the endnotes, one on each page. In a left-to-right oriented document with facing pages, thread the frame on the left parent to the one on the right. I recommend you set the screen mode to preview (View > Screen Mode > Preview) and show text threads (View > Extras > Show Text Threads) so that you can see the result (Figure 5).
Prepare the styles
Also unlike for the anchored-frames method, you must manually format your notes. First, set the paragraph style (I suggest left aligned) and the character style used for the references. You could do this later, but it’s better to do it before the notes are placed in the margins. If your note references don’t currently use a character style, create one (the formatting you use doesn’t matter).
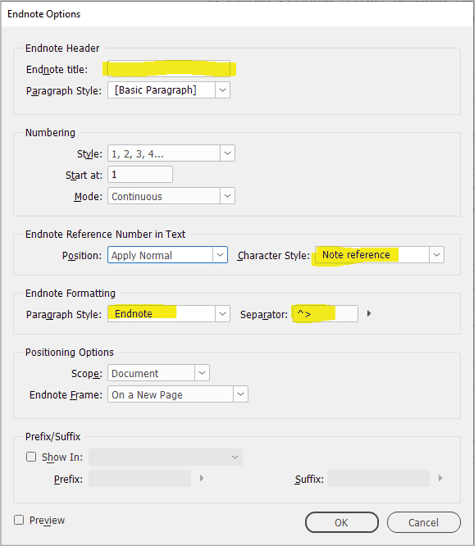
Next, go to the Document Endnote Options dialog box (Type > Document Endnote Options). Remove the endnote title (if the note had one), and apply your paragraph and character styles. The separator in the Endnote Formatting section defaults to a tab (^t); switch that to an en space (^>) or space. Figure 6 highlights the options that you should change.
Move the endnotes to the margins
You can place the margin notes in two ways: a brutal cut-and-paste or a more gentle reflow approach. The reflow method is marginally quicker and safer, so let’s use that:
Go to the last text frame of the endnote story, and click that frame’s outport (the small rectangle at the bottom right). The outport can have a red plus sign—it doesn’t matter, whatever its state, click the last frame’s outport. The pointer changes shape.
On the first page in the document, click the note frame. Although it’s still on the parent page, clicking the note frame overrides it. Why does it look as if nothing happened? Because the only thing you did was to thread the last endnote story frame to the frame on the first page.
Return to the endnote story, and delete all its text frames. If the story has a lot of frames, a script can speed up the process (see the sidebar, “A Script to Delete Text Frames”).
Back on the first page, you’ll see that the endnotes now start on that page as expected, but the story is overset.
Click the frame’s outport, go to the second page, and Shift-click the endnote frame on that page. InDesign now flows the complete endnote story.
As you can see, the endnotes remain InDesign endnotes, they’re just laid out in a different way (Figure 7). Therefore, you can add, remove, and edit notes the same as before.

(function () {
var frames = app.selection[0].parentStory.textContainers;
for (var i = frames.length-2; i >= 0; i–) {
frames[i].remove();
}
}());
Align notes with their references
The notes now sit in a single story in the margins, but the notes do not align with their references, which means occasionally a note may end up on a different page from its reference. Because quite a few scenarios are possible, a general script for alignment isn’t feasible and a custom script would depend on the document’s design. In other words, aligning notes with their references is a manual task, but in my experience that’s pretty simple to manage.
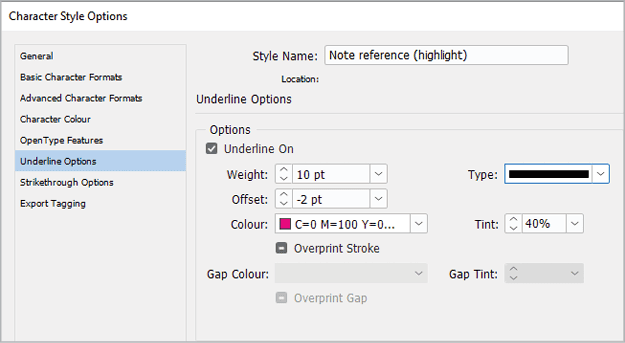
To make note references easier to find, highlight them: Create a new character style based on the character style used for the note references. Turn on underlining, then adjust its settings so the result will stand out in the text. I like a weight of 10 points, an offset of –2 points, a bright color, and a tint of 40% or 50% (Figure 8).
To toggle the highlight of the note references, apply the character style in the Document Footnote Options dialog box (Figure 9).
When moving a note down a page or to the next one to align with a newly highlighted reference, resist the urge to simply press the Enter or Return key. All those empty paragraphs will sooner or later make a mess of the marginal note story. Instead, to move a note down, increase the space before it in the Paragraph panel. You could also use these simple paragraph spacing scripts.
To move a note to the next page, in the Keep Options panel (Type > Paragraph), set the note to start in the next column (or frame—it doesn’t matter). If the next page doesn’t contain any notes, collapse the note’s frame on that page to 6 points to skip that page. Don’t delete the frame because you may need it in future.
Which Approach Is the Best for You?
The two approaches to marginal notes are very different. Which you choose mainly depends on the density of the notes and their length. If you don’t have many notes overall and few on any single page, then anchored notes are easier to deal with. If your document contains many notes, especially long ones, then the single-story approach would be better. If alignment is vital, I recommend the anchored-frame method. To sum up:
Anchored-frames method
Advantages: Notes align with their references. Notes always stay on the same page as their reference.
Disadvantages: When notes cluster in a single line or paragraph, the frames may overlap. Unraveling the frames is a hassle, but it can be handled by stacking the notes.
Single-story method
Advantages: Notes never overlap. Notes don’t have to be on the same page as their references.
Disadvantages: Aligning notes with their references on a page (if required) is a manual job, as is moving a note that is on a different page than its reference. Notes do not change position when their references do. Alignment must be rechecked after changes in the text.
So, look over your notes, think about your priorities, then choose your method.
Commenting is easier and faster when you're logged in!

Recommended for you

InDesign Magazine Issue 105: Designing Books
We’re happy to announce that InDesign Magazine Issue 105 (January 2018) is...

Endnote and Footnote Improvements in InDesign CC 2019
InDesign CC 2018 introduced a new endnotes feature to go along with its long-sta...

Book Panel Extras
InDesign’s Book panel lacks various useful features. The script described...