
10 Terrific Time Savers for InDesign
Life is busy. Work is hard. Use these tips to get more done faster.

This article appears in Issue 51 of CreativePro Magazine.
The big, flashy techniques attract more attention, but major time savings usually comes from the cumulative effect of small tip efficiencies. Here are 10 of my favorite tips that have literally saved me weeks of work throughout my decades working in InDesign.
Automate Text Formatting with Auto Style and Style Packs
InDesign’s AI-driven Auto Style feature, introduced in 2023, offers a significant shortcut for styling large blocks of text. Auto Style uses AI to analyze your text and automatically apply a series of paragraph styles for such elements as headings, subheadings, body copy, and lists. Simply select your text (at least 1,000 characters), and pick a ready-made style pack from the Style Packs panel by choosing Window > Styles > Style Packs (Figure 1). InDesign then processes the text in the cloud and applies the matching styles.
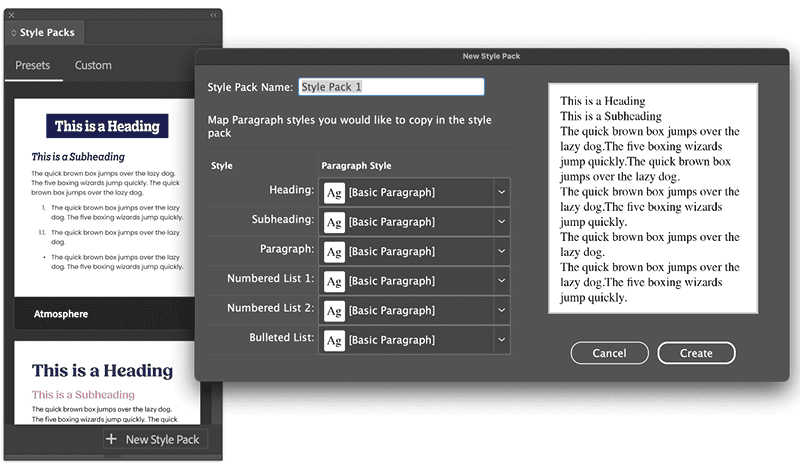
Even better, you can create your own custom style packs by defining how specific paragraph styles should be applied to different types of text. This allows you to tailor the automation to your specific project’s style guide.
For example, you can define a style pack that recognizes certain text patterns as headings and applies your designated heading style. This drastically reduces the manual effort of identifying and styling various text elements, especially when dealing with unformatted text from external sources.
Adobe suggests this as a replacement for pasting formatted text, but the ability to automate styling based on predefined packs also can be a considerable time-saver for initial formatting or when applying a consistent look to large amounts of text quickly.
Color-Code Pages
No matter the size of the thumbnails on your Pages panel, it still takes a moment to look at the content and figure out what’s happening on each page. Is the page finished or still under construction? Does it have final copy or placeholder text? If it’s an ad, has the advertiser sent the final ad creative, or is it still the low-res or previous month’s version as a placeholder? Has the rest of your team finished designing their sections of the publication?
All of these questions (and more) can be answered by employing a color-coding system on your page thumbnails.
InDesign enables you to add color bars under each thumbnail so you can tell the status of every page instantly. Right-click any thumbnail in the Pages panel, choose Page Attributes > Color Label, then pick a color (Figure 2). Pages can even inherit a color from their parent page!
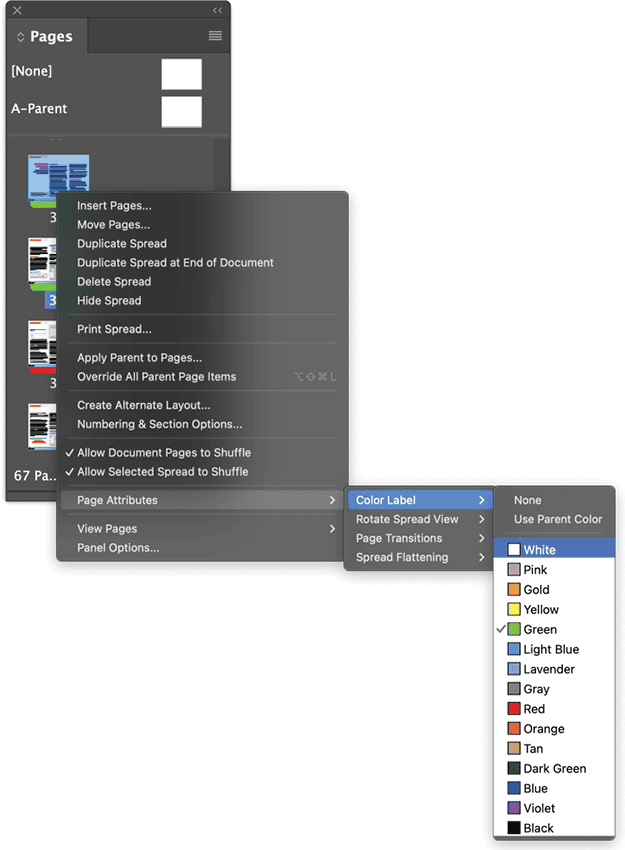
Which of the 15 colors your workflow needs and what each color means are up to you. Maybe you want green to represent finished pages, red for those under construction, and yellow for those waiting on ad creative. Or maybe you color-code pages to indicate which member of your team is working on which page. A glance at your Pages panel will now tell you who is working on what, and you can label finished pages as Gray or White.
Apply Anything from a Single Keyboard Shortcut
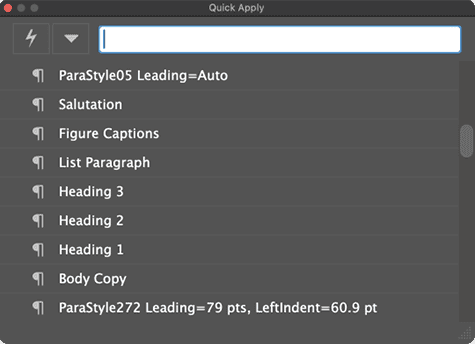
Quick Apply is an efficient way to access and apply various InDesign functions without navigating through menus and panels. Press Command+Return (macOS) or Ctrl+Enter (Windows) to open the Quick Apply dialog box, then start typing the name of a paragraph, character, table, or object style, a menu command, a script, text variables, or even a condition. Quick Apply will filter the results as you type. When you see the desired item, select it and press Return/Enter to apply it.
Because your hands are already on the keyboard, Quick Apply can be significantly faster than manually searching for styles in the Paragraph Styles or Character Styles panels or visiting the menu bar. For instance, if you need to apply a Body Text paragraph style, you can open Quick Apply and type Body, and the style will likely appear at the top of the list, ready to be applied with a single keystroke (Figure 3).
Quick Apply is a versatile tool for not just applying styles but also for quickly executing commands or accessing frequently needed panels without interrupting your text flow or digging through submenus—potentially speeding up your workflow considerably.
Streamline Word Document Imports with Presets
Word content sometimes needs to be modified upon import into InDesign, and you probably already know the drill: Choose File > Place, find the DOCX file, turn on Show Import Options, and then set all the options to control how the text and formatting are imported and the style mapping that turns Word style x into InDesign style y. If you change these settings often, however, you can save yourself some time by creating Word import presets.
To do so, use File > Place to import a document, and select Show Import Options as you select your file. When the Microsoft Word Import Options dialog box appears, set the various options, then click Save Preset. Give your new preset a name and click OK (Figure 4).
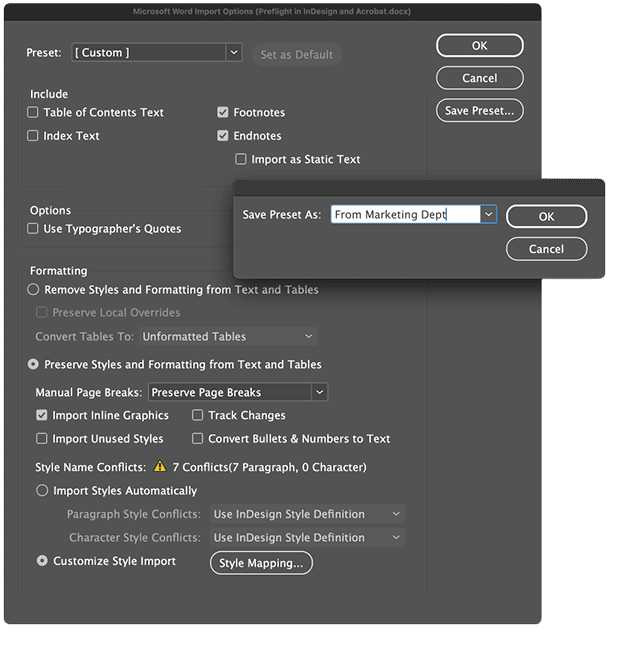
Now all the changes you just made to the import options will be saved for easy, two-click recall. The next time you place a Word document that needs the same settings, simply choose your preset.
You can even make multiple presets to account for different types of content, eliminating the repetitive and error-prone task of manually setting the import options.
Automate Sequential Paragraph Formatting with Next Style
Most text-heavy InDesign documents have a pattern of styles that repeat in sequence throughout the pages; perhaps a Heading 2 subhead is always followed by a Body Copy paragraph. Continually navigating to the Paragraph Styles panel and selecting the style you need (or even using Quick Apply) not only gets tedious but can also break your concentration or creative flow.
Don’t do that! Instead, edit your paragraph styles to use the Next Style option to automatically apply a paragraph style to the following paragraph. Here’s how:
- Define all the paragraph styles you need.
- Find the start of a sequence of repeating styles (such as Heading 2), and open the Paragraph Style Options dialog box for that style (Figure 5).
- On the General tab, set the Next Style field to the next paragraph style you need (Body Copy, in the example).
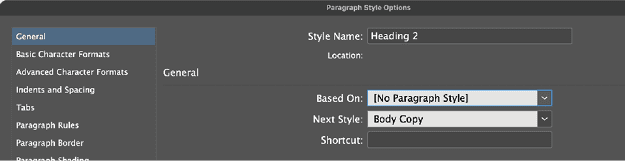
Now, when you finish typing Heading 2 text and press Return/Enter, InDesign will automatically style the text you type next as Body Copy.
What if you’re formatting text and not typing it? Object styles can set off a cascade of paragraph styles starting with the first. Select the Paragraph Style section of the New Object Style dialog box, specify the first paragraph style in the sequence, and turn on Apply Next Style. A script, InDesign Quick Apply With Next Style (ID-Extras, free; registration required), will do the same.
When you chain more than just two paragraph styles via Next Style, you can really ramp up the efficiency. For example, in a directory listing, you might have a Name paragraph style followed by an Address style, then a Phone Number style, and finally loop back to the Name style for the next listing. By setting Next Style for each of these, you can format an entire list of unformatted entries simply by applying the first style to the first name.
I’ve been doing this so long, I honestly can’t imagine ever formatting lists, directories, catalogs, and other structured documents without a chain of Next Style attributes.
Make Spelling and Hyphenation Exceptions Travel with Documents
When you add words and hyphenation exceptions to InDesign via Check Spelling or Edit > Spelling > User Dictionary, InDesign saves them to its User Dictionary, which lives exclusively on your computer. Send that same InDesign document to someone else, and none of those exceptions will apply. Check Spelling will flag your carefully added words as wrong for your collaborators, but—significantly worse—your hyphenation exceptions will be lost. That can cause the text to reflow on someone else’s copy of InDesign, perhaps dramatically altering the layout.
If you choose the document name from the Target field in the User Dictionary dialog box (instead of the default of User Dictionary), you can send all the exceptions that you then add as part of the document, making them apply for anyone who edits the document.
Alas, seldom do designers remember to change the exceptions target before they make their first exception. That’s where the really useful time-saver tip comes in.
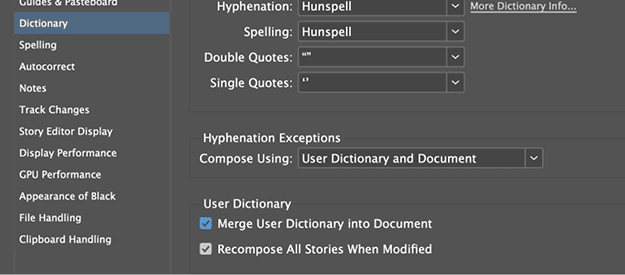
Turn on the Merge User Dictionary Into Document option in the Dictionary preferences tab (accessible via InDesign/Edit > Preferences > Dictionary), and InDesign will make your User Dictionary part of the active document (Figure 6), even if in the User Dictionary dialog box (Edit > Spelling > User Dictionary) you did as you should and left Target set to User Dictionary.
This means that anyone opening the document on a different computer will have access to the same custom spellings and hyphenation exceptions, preventing spell check errors for project-specific terms and ensuring consistent hyphenation.
Merging your dictionary eliminates the need for collaborators to manually add the same terms to their local dictionaries or for you to export and share user dictionaries separately. It lets you streamline collaboration and ensure consistency across working environments.
Reuse Keyboard Shortcuts
Custom keyboard shortcuts in InDesign are great time-savers and quick to create:
- Choose Edit > Keyboard Shortcuts.
- In the Keyboard Shortcuts dialog box, choose a menu or area from the Product Area menu. The Commands list will then show relevant commands for that part of InDesign to which you can assign keyboard shortcuts.
- Select the command you want in the list.
- Go to the New Shortcut field and press the shortcut you want to assign to the command.
- Click Assign followed by OK.
Congratulations! You’ve added your keyboard shortcut to your preferences. (To save it, relaunch InDesign. If you crash before doing so, you’ll find this work has vanished when the program restarts.)
You can rapidly reach a point where new, unique key combinations require Olympic-level finger gymnastics. Instead of spraining a muscle, reach for the Context menu, which enables you to reuse a shortcut to do several different things (Figure 7).
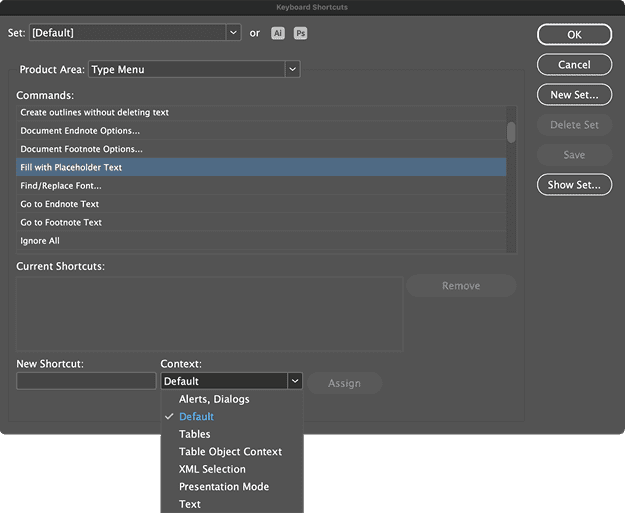
In that menu, you can specify the context in which the shortcut applies: Default (everywhere, basically); only in dialog boxes and alert popups; only when working with tables, table objects, text, and XML; or even only when InDesign is in Presentation mode.
For example, Command+T/Ctrl+T opens the Character panel in the Default context, but you can assign the same shortcut to Fill With Placeholder Text by choosing Text in the Context menu. Now, if you press Command+T/Ctrl+T while in a text frame with the Type tool selected, InDesign will fill the frame with placeholder text. And if you want, you could also make Command+T/Ctrl+T open the Tables panel while working within a table.
Easily Share Swatches Across All Creative Cloud Applications
I’ll be honest: This tip is largely negated by Creative Cloud Libraries. However, not everyone can use the cloud-based features of Creative Cloud; many of my students are in government agencies, financial services companies, or other entities whose security needs prevent the use of cloud-based tools. If that’s you, you might find this tip useful if you jump between various Adobe applications.
Suppose you defined your client’s signature colors while designing a logo in Illustrator, but now you need those same colors for marketing layouts in InDesign and web ads in Photoshop. The brute-force approach would be to double-click each signature color swatch in Illustrator, writing down the RGB, CMYK, or HSB values each time, then manually recreating the swatches one by one in InDesign and Photoshop. What a fun way to eat up your lunch hour!
Or you could take the easy route, which creates an Adobe Swatch Exchange (ASE) file:
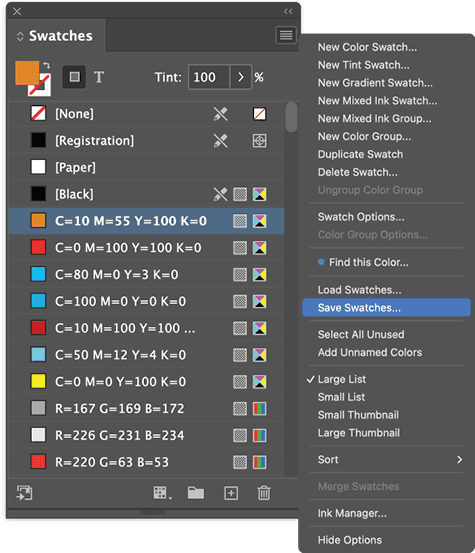
- After creating your brand color swatches in one of these applications, go to its Swatches panel.
- From the panel menu, choose the relevant command: Save Swatches (InDesign, Figure 8), Export Swatches For Exchange (Photoshop), or Save Swatch Library As ASE (Illustrator).
- When the Save dialog box appears, save the swatches as an ASE file. I usually save mine in the same folder as my other brand assets for the client or project.
- Now, open the other applications. From each application’s Swatches panel menu, choose the command to load the ASE: Load Swatches (InDesign), Import Swatches (Photoshop), or Open Swatch Library > Other Library (Illustrator).
Done! Your colors are shared across the three applications—now off you go to lunch.
Sort Tables and Lists
You can reorder InDesign table rows by dragging them, and you can do the same with non-table lists, if you enable Drag And Drop Text Editing in Layout view in the Preferences. Even with that option, if your list or table is more than a few rows deep, you probably don’t want to manually reorder. Fortunately, there are better ways to sort lists and table rows. For example, Adobe provides a built-in (but well-hidden) way to sort your paragraphs. Here’s how to find and use it:
- Choose Window > Utilities > Scripts to open the Scripts panel.
- Drill down through the Scripts panel folders to Application > Samples > JavaScript, where you will find SortParagraphs.jsx.
- Highlight the paragraphs you want sorted alphabetically in ascending (A–Z, 0–9) order.
- Double-click the script in the Scripts panel. A little dialog box will provide a couple of simple options. Click OK, and InDesign will instantly reorder your paragraphs.
“But—but, Pariah,” you say. “The SortParagraphs script doesn’t work on tables!” You’re right. This method does, however:
- Select your entire table with the Type tool.
- Copy the table with Command+C/Ctrl+C.
- Open Word, and start a new, blank document.
- Paste with Command+V/Ctrl+V.
- With the table selected in Word, go to the Table Layout tab on the ribbon.
- Choose the Sort button, set the options for one-, two-, or three-column sorting in the dialog box, and click OK. Word will sort the table rows (Figure 9).
- Now reverse the sequence: Copy the table in Word.
- Paste it into InDesign, replacing your existing rows. Try a regular paste, but if you don’t like the results, use Edit > Paste Without Formatting.
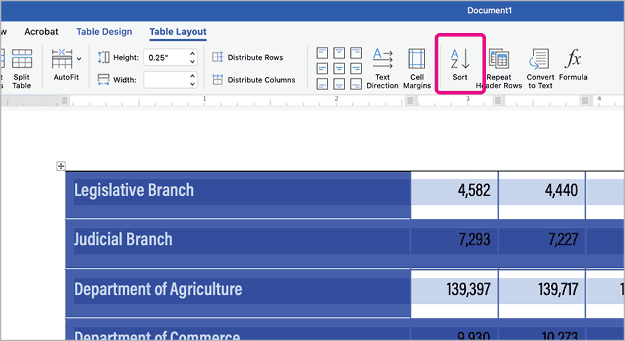
Excel has the same sort function as Word but without limiting you to three columns.
A bigger benefit to using Excel to sort data copied or imported from InDesign is the ability to not only sort but also filter data. Want to create subset lists from the whole data set? No problem! Make a filter, and Excel will build you a separate, sortable list of the matching data.
Break the Habit of Breaking Words
Sometimes, even though you enable hyphenation for a story, you don’t want a particular word to hyphenate. Other times, you don’t want a phrase to wrap across multiple lines.
The method I use to deal with these and similar unwanted wrap or break situations is easier, much faster, and infinitely more flexible than hyphenation exceptions for rare instances or manually inserting non-breaking spaces.
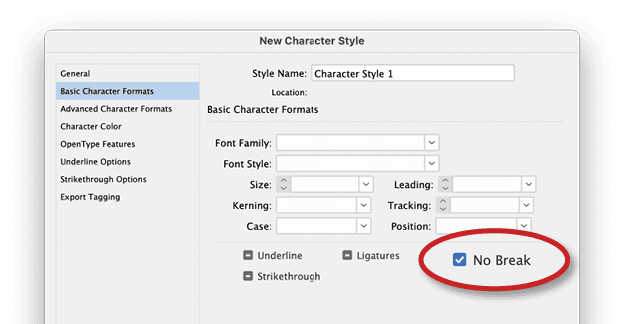
Just create a new character style named No Break. Clear all of the style’s options, and then enable the No Break option in the Basic Character Formats section of the New Character Style dialog box (Figure 10).
Save the style, and apply it to any word you don’t want to hyphenate or phrase you don’t want broken across multiple lines.
Beat the Clock
Small changes can add up to big improvements in your workflow. Try these 10 terrific time-savers and see if they save you as much time working in InDesign as they save me.
Commenting is easier and faster when you're logged in!

Recommended for you

Navigate Panels from the Keyboard
You don't need a mouse to navigate through many of your InDesign panels. You jus...
How to Style Text with AI for Use in InDesign
Have ChatGPT handle your Word document text formatting so you can focus on desig...
How to Apply Styles Quickly to Formatted Text in InDesign
Learn how to take InDesign text that has formatting already applied and assign s...